-
- Abundante
- Adquirentes de pagos
- Ajustes
- Analítica
- Citas en línea
- Comercio Electrónico del Sitio Web de Odoo
- Configuración el Sitio Web de Comercio Electónnico
- Diseñe la Página de Su Sitio Web
- Gestión de Productos
- Gestión de Varios Idiomas
- Grupos
- Herramientas de fragmento
- Lista de precios
- Listado de productos
- Métodos de envío
- Múltiples compañías
- Múltiples sitios web
- Operaciones de blog en backd
- Pedido
- Personalización de la Página del Catálogo de productos
- Personalización del catálogo de productos
- Personalizar el menú y las apariencias
- Porcos
- Programas de cupón y promoción
- Publicar contenido específico para el sitio web
- RedirracionAmiento
- Salas de chat
- Sesión de Productos en la PESTAÑA CONFIGURACIÓN
- Sitio Web
- Tablero de Comercio Electrónico
- Tarjeta de Regalo
- Twitter Wall
- Visitantes
- Vistas de la Página
-
- Activo
- Adquirentes de pagos
- Biblioteca de contabilidad
- Catálogo de cuentas
- Conabilidad miscelána
- Configuración de Datos Bancario
- Contabilidad
- Contábilidad analíta
- Diario
- Estados de Cuenta Bancario
- Factura de Clientes al Pago
- Fechas de Bloqueo
- Fiscales de posiciones
- Gastos de Empleados
- Informa de de Socios
- Informa de seguimiento
- Informa en contabilidad
- Ingresos y Gastos Diferidos
- Mandatos de débito directo
- Notas de Crédito
- Pagos
- Pagos por lotes
- Presupuesto
- Reconciliatura
- Redondeo en efectivo
- Tablero de contabilidad
- Tipos de contabilidad
- Transferencias automáticas
- Términos de Pago
-
- Abundante
- Adquisico de Plomo
- CREACIÓN DE COTIZACIONES DE VENTAS
- CRM
- Caracteríssticas de Odoo 15 CRM
- Convertir LOS Cables en Oportunidades
- Cómo Odoo CRM Gestiona Las Oportunidades Perdidas
- FluJo de trabajo general de Odoo CRM
- Formulario de generación de plomo múltiples fuentes
- Funcionando -Con Clientes Potenciales
- Manejo de Liderazgo
- Nuevas Opciones en la ventana de configuración de Odoo 15
-
- Análisis de producción
- CREANDO CENTROS DE TRABAJO
- Fabricación
- Facturas de materiales
- Gestión de Chatarra
- Gestión de Mantenimiento
- Gestión de órdenes para no consultor
- Informe General de Efectividad del Equipo
- Pedidos de Fabricación
- Planificación de Pedidos Laborales por producción
- Planificación de órdenes de Trabajo por WorkCenter
- Programa de producció Maestra
- Órdenes de Trabajo
-
- Abundante
- Ajustes de Inventario
- Anuncios
- CARACTERÍSTICAS DEL MÓDULO DE INVENTARIO DE ODOO
- Categorizacia de productos
- Categorías de Almacenamiento
- Configuración del producto
- Confirmación de SMS en la Entrega
- Confirmación por Correo Electrónico en la Entrega
- Costos de Aterrizaje
- Empaquetado del producto
- Entrega
- Entregar Paquetes
- Estategias de Eliminación
- Gestión de Almacenes
- Gestión de Chatarra
- Integrando el Remitente de Terceros en Odoo
- Inventario
- Operaciones de inventario
- Planificadores
- Reglas de Caída
- Reglas y rutas
- Tiempos de Programació
- Trazabilidad del Producto
- Ubicacia
- Unidad de Medida
- Variantes de productos
-
- APEGO Salarial
- Abundante
- Configuración
- Contratos
- Entradas de Trabajo
- Estructuras salariales
- Información personal
- Nómina de Odoo
- OTROS TIPOS DE ENTRADA
- Parámetros de la regla salarial
- Reanudar
- Salarios de reglas
- Salpicaduras
- Tablero
- Tiempos de Trabajo
- Tipo de estructura salarial
- Tipos de Entrada de Trabajo
- Ventajas
Purchase - Odoo 15 Enterprise Book
Vendor Management
Crear y mantener una relación sólida con los proveedores es un aspecto fundamental en la gestión de la compra.Un buen sistema de gestión de proveedores lo ayuda a facilitar el acceso rápido y la conveniencia para sus proveedores.Para que pueda mantener una buena relación entre sus proveedores y su organización.Al administrar eficientemente a sus proveedores, puede realizar fácilmente la negociación de contratos y podría crear y apoyar los estándares para sus proveedores, ¿cuál es más?Puede identificar fácilmente a los mejores proveedores útiles.Odoo ERP hace que sea fácil mantener a sus proveedores de una manera simple.Cada operación y procesos con respecto a sus proveedores o proveedores se puede automatizar con la herramienta de gestión de compras de Odoo.También puede definir múltiples proveedores para un producto o servicio en la plataforma Odoo.
Los proveedores en el sistema Odoo se enumerarán y organizarán en el menú de proveedores disponible en la pestaña Pedidos del módulo de compra de Odoo.Para que podamos dar los pasosOdoo -> Purchase -> Orders -> Vendors to view the window. The image of the window is depicted below.
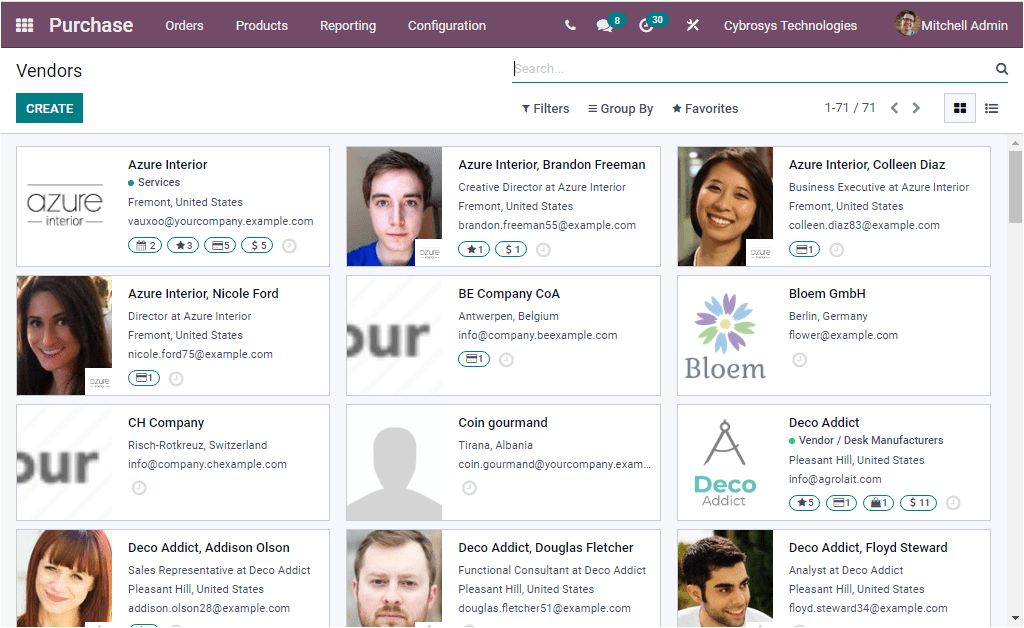
En la ventana de los proveedores, Odoo representará a todos los proveedores definidos en el sistema Odoo de una manera bellamente arreglada.Odoo le permite ver el registro en dos vistas, como Kanban View y List View.La imagen de arriba representa la vista Kanban de la ventana del vendedor.En la vista de Kanban, puede ver los detalles de cada proveedor en tarjetas separadas.Que incluirán los detalles importantes, como el nombre del proveedor, el tipo de proveedor, la dirección de contacto, los detalles de la actividad programada, las compras, junto con el emblema o la fotografía de ese proveedor en particular.Si necesita ver los contactos y la información del proveedor en detalle, puede hacer clic en el proveedor respectivo para representar la ventana del proveedor.Por ejemplo, si necesita ver los detalles del interior de Azure o desea editar los detalles de ellos, puede hacer clic en el interior de Azure.Ahora la ventana se abrirá frente a usted como se muestra en la imagen a continuación.
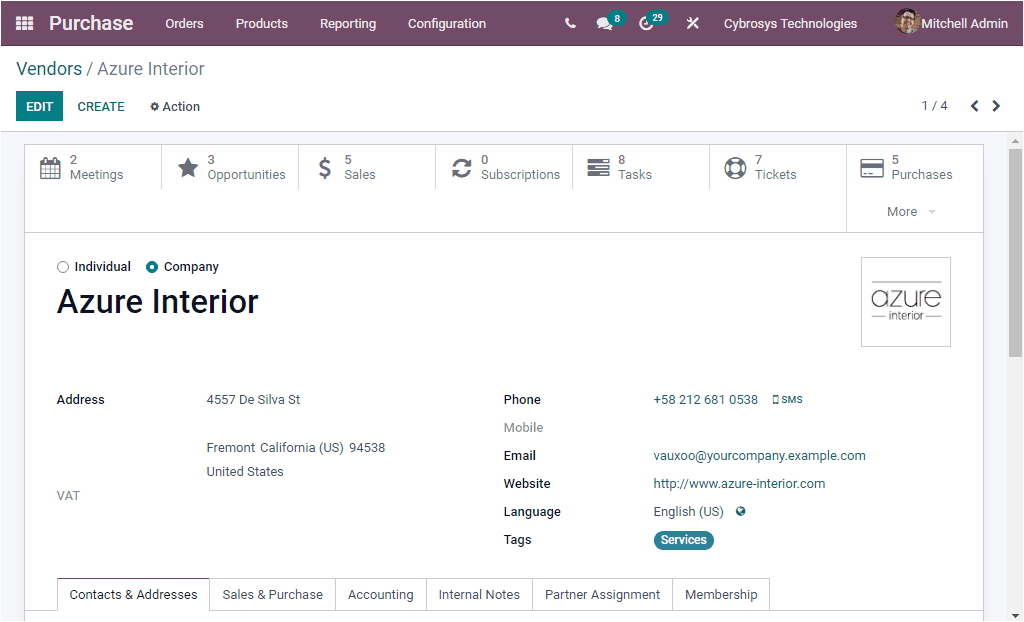
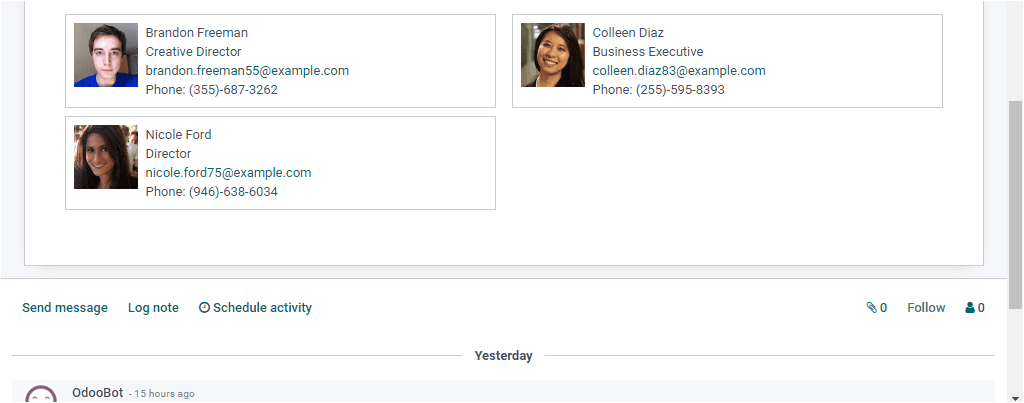
Aquí puede ver toda la información sobre este proveedor en particular y puede editar los detalles si desea realizar cambios usando el botón Editar disponible. Vuelva a la ventana de los proveedores, cuando desee ver la ventana de los proveedores en la vista de lista, puede hacer clic en el icono de vista de lista disponible en la esquina superior derecha de la ventana.Ahora se lo representará con una ventana como se muestra en la imagen a continuación.
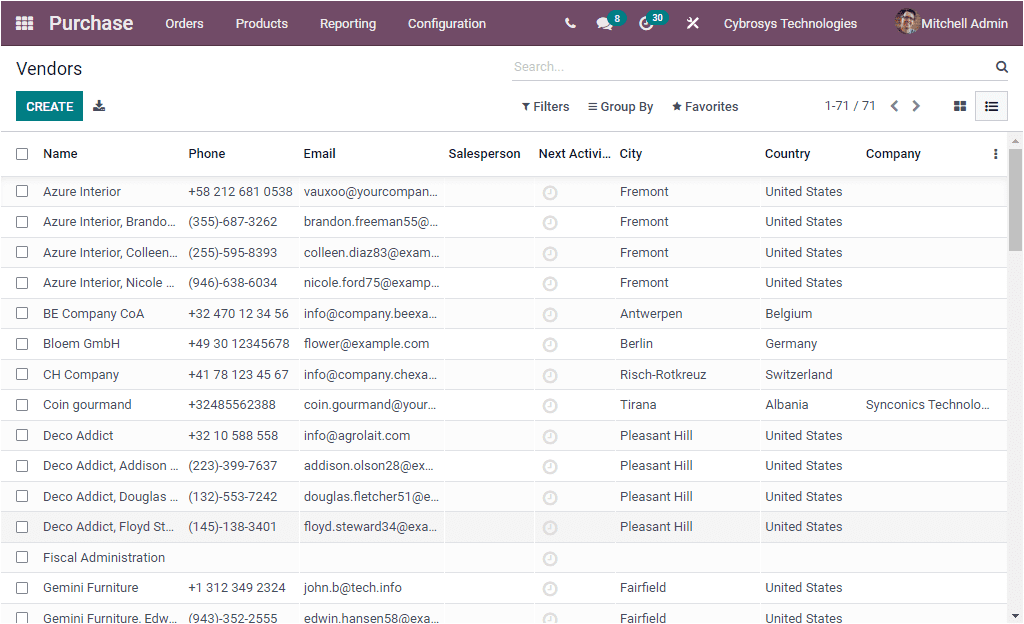
En la vista de la lista, puede ver los detalles como el nombre del proveedor, el número de teléfono, la dirección de correo electrónico, el vendedor, la próxima actividad, la ciudad, el país y la empresa.Puede incluir más campos en función de sus preferencias haciendo clic en los tres puntos disponibles en la esquina izquierda.
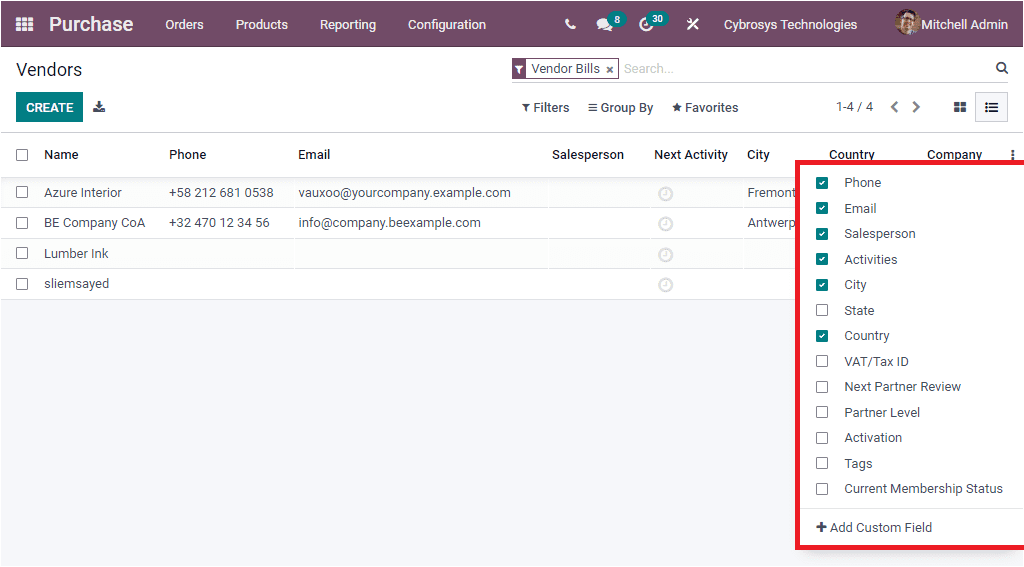
Además, Odoo le permite resolver fácilmente a sus proveedores en función de varios aspectos.Por defecto, Odoo ofrece algunas opciones de filtrado.Por lo tanto, puede filtrar a sus proveedores en función de individuos, empresas, facturas de clientes, facturas de proveedores, subcontratistas.Los proveedores archivados se pueden enumerar seleccionando el menú archivado.Además, puede agregar más filtros personalizados haciendo clic en la opción Agregar filtro personalizado disponible.
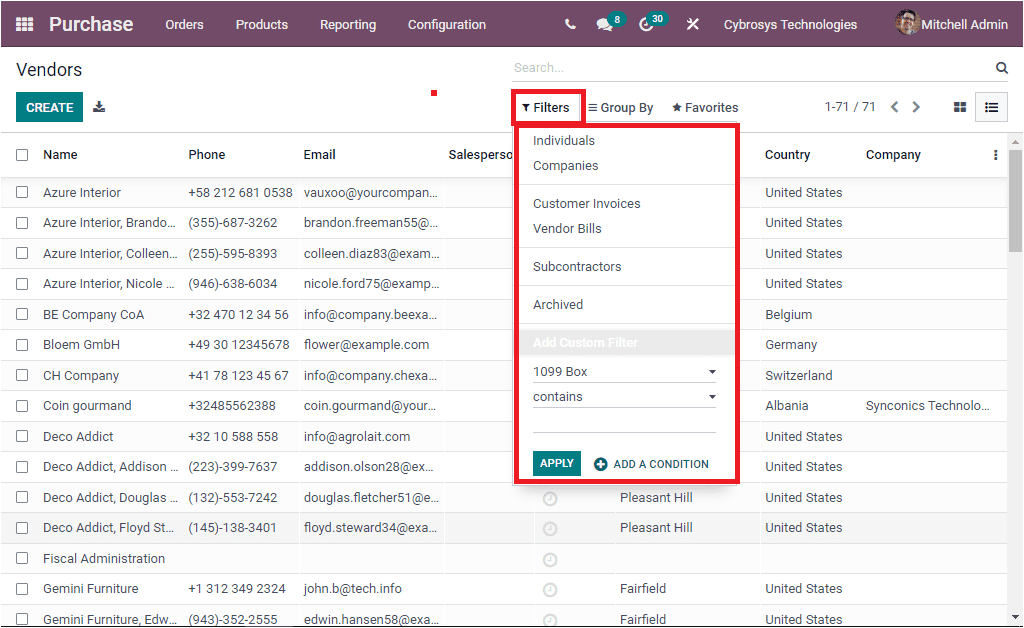
El grupo por menú disponible en la ventana de los proveedores se puede utilizar para agrupar a sus proveedores en varias categorías.Aquí también tiene un grupo predeterminado por funcionalidades como vendedor, compañía, país.También puede definir más grupos personalizados en función de los requisitos de su empresa.Esto se puede realizar haciendo clic en el botón Agregar grupo personalizado disponible.
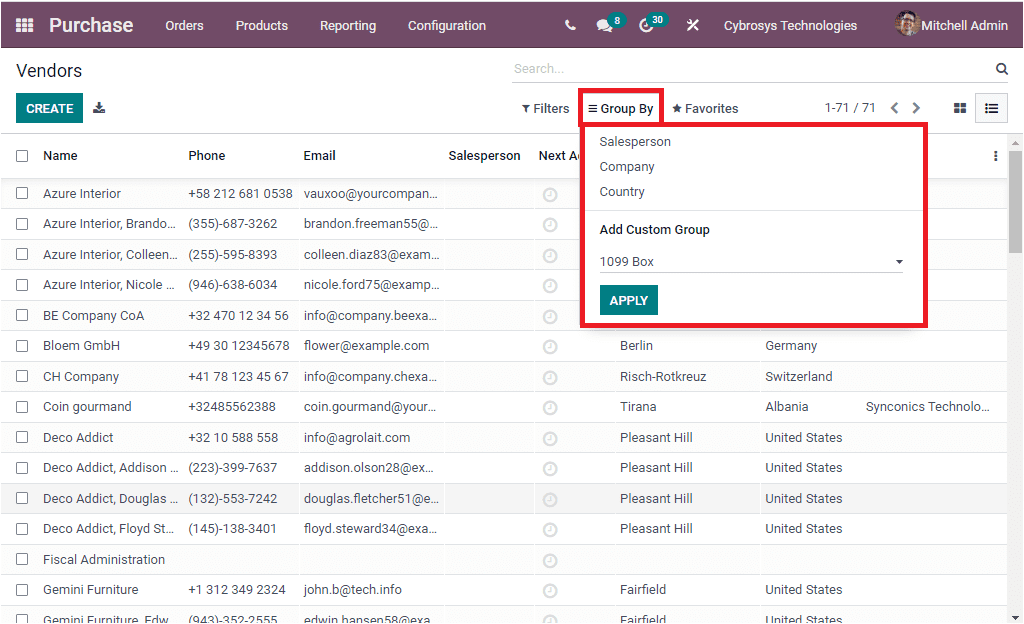
The Favorites tab in the window also consists of so many options in its dropdown menu.
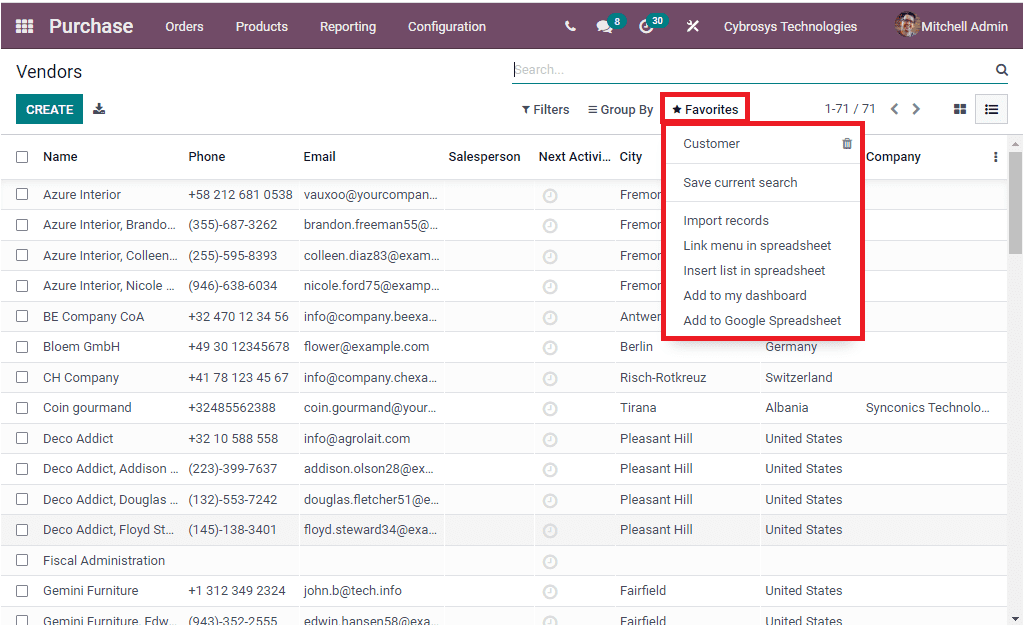
The Import Records option helps you to import all the records in the window to an XLSX file. Also you have the Link menu in spreadsheet option for inserting your pivot. Moreover the options such as Insert list in spreadsheet, Add to my dashboard, Add to google spreadsheet makes the platform more user friendly. The list of options are not completed yet- you have the advanced options to export all records into an excel file by clicking on the Export All button which you can access near the CREATE icon. If you are aiming to create new Vendors, you can access the CREATE button available on the top left corner of the Vendors window. A single click on this button takes you to the Vendor creation form. The image of the Vendor creation form is depicted below.
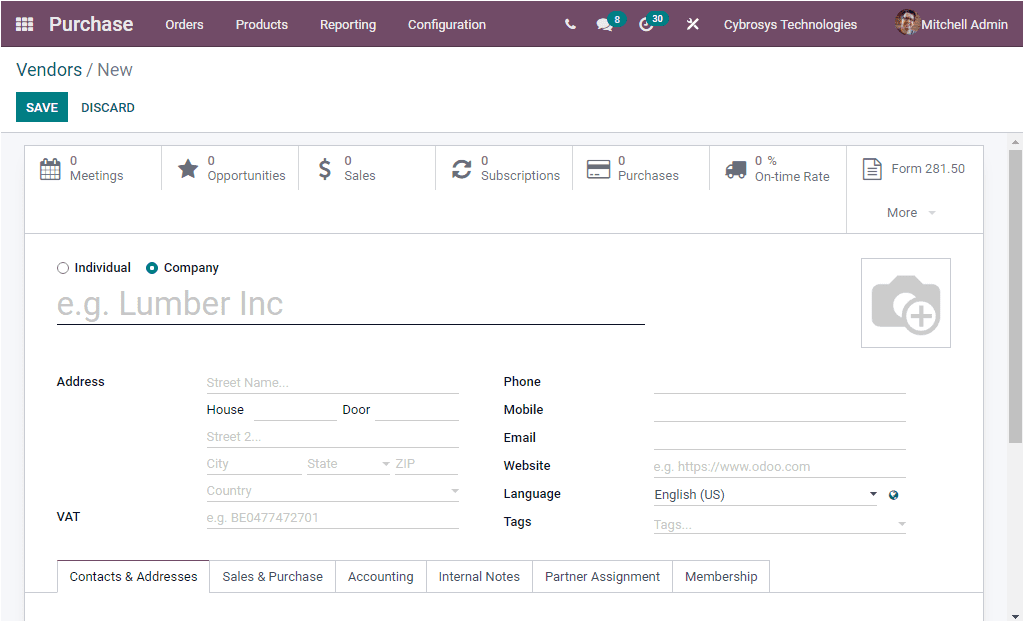

In the Vendor creation form, you can describe the Name of the Vendor and you can mention whether it is an Individual or Company. Then you can provide the detailed Address of your vendor along with the Phone number, Mobile number, Email Address. The Value Added Tax ( VAT ) can be given in the provided space. The tax identification number must be given if the contact is subjected to the government taxes. The Website link can be provided in the space given. Then you can have a Language option. All the emails and documents sent to this contact will be translated into the selected language. In addition, the Tags can be allocated to easily recognize your Vendor. In addition, the photograph related to this vendor can be given in the provided space. If the vendor is a company, you can give the companyâs logo or if it is an individual, you can give the Photograph of the vendor. Now you have so many tabs to give details. Under the Contacts & Addresses tab, you can create contacts by clicking on the ADD menu available. When you click on the ADD button, a pop up menu will appear as depicted below. Where you can create a record.
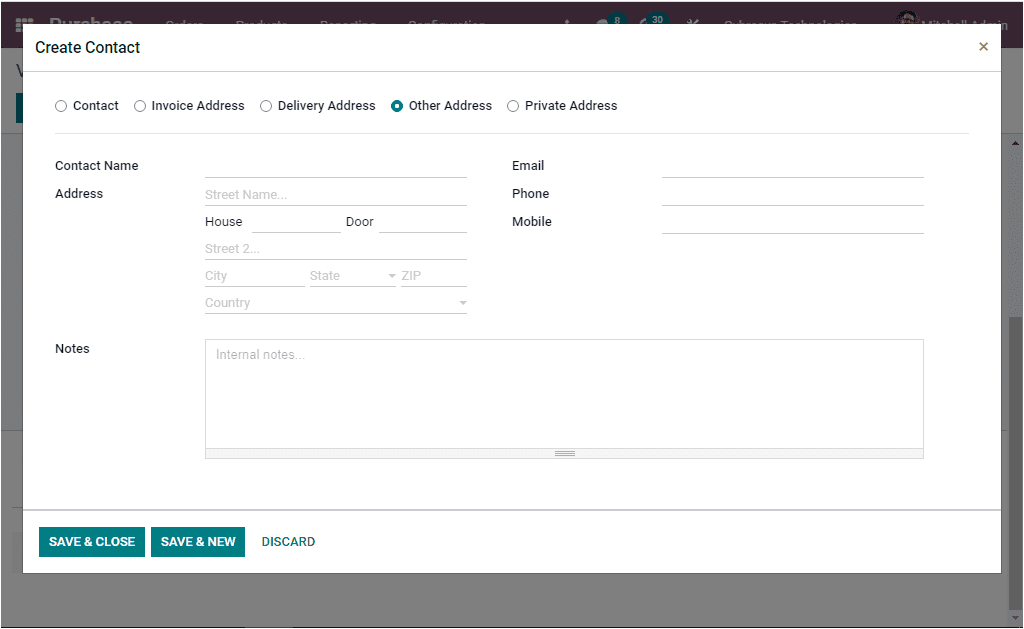
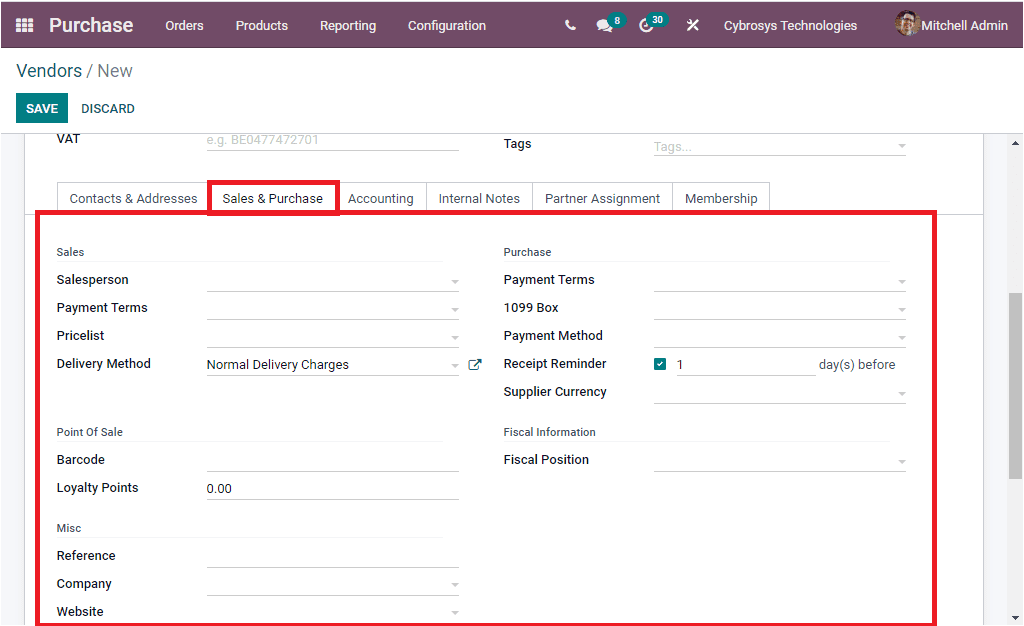
In the pop up menu you can view various addresses. Now let us move on to the Sales & Purchase tab available under the Vendors creation window. Under this tab, you can provide various details. The Sales information such as the Salesperson- internal user incharge of this vendor contact, Payment Terms so that these payment terms can be used instead of the default one for the sale orders and customer invoices. Here you can set company specific values. Then you can give the Pricelist. This pricelist will also be used instead of the default one for creating sales to this particular vendor. Finally the Delivery Method can be selected from the dropdown menu. Additionally, the Point of Sale details such as Barcode(this barcode is used for identifying the vendor contact) and Loyalty Points in the given space. Furthermore, the Miscellaneous details such as Reference, Company, Website, Website Tags, Industry, SLA Policies can be given in this field. Similarly, the Purchase information such as Payment terms( these payment terms are used instead of the default one for purchase orders and vendor bills). Then you have to fill the field 1099 Box using the dropdown menu available. Journal items of this vendor will be summed in the selected box of the 1099 report. Then the Payment Method can be selected from the dropdown menu available. Then you have the provision for activating the Receipt Reminder option. So that it will automatically send a confirmation email to the vendor. You can specify the number of days for sending a reminder email before the promised receipt date. This option was very helpful for confirming the exact date. Then the Supplier Currency can be allocated along with the Fiscal Position.
Here in Odoo Vendor and Customer records are treated as contacts that are the same master. So if you are creating a vendor it is not required to provide the Sales related fields.
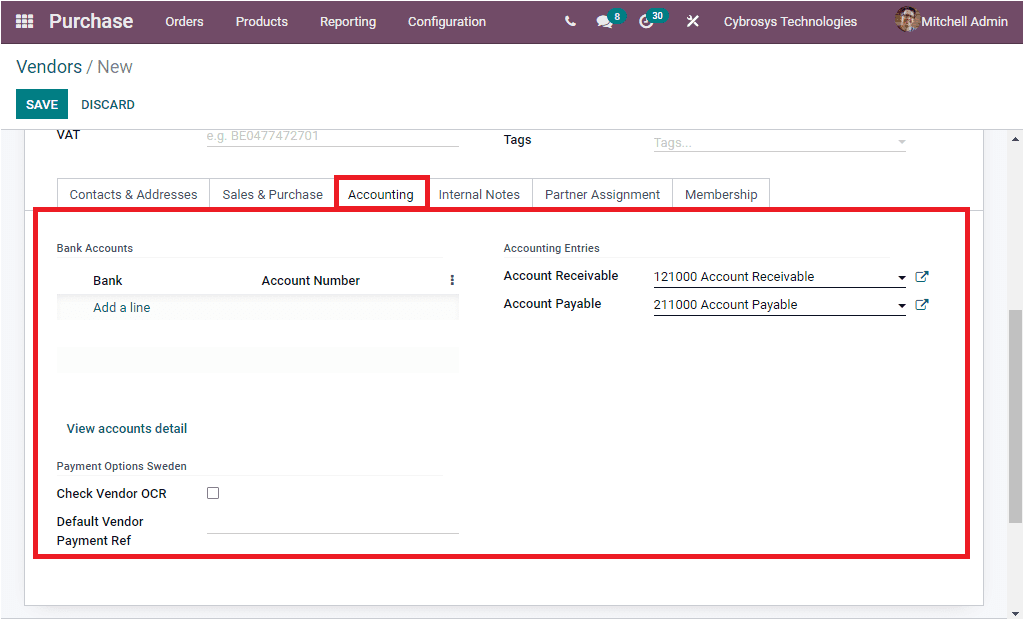
Now let us move on to the Accounting tab available under the Vendors creation form. Under this tab, you will have to provide Bank Accounts details. You can mention the Bank and Account number by selecting the Add a line option available. The Accounting Entries details can be given along with the other details. The Account receivable field is used while making a customer invoice and Account payable field is used at the time of creating a vendor bill.
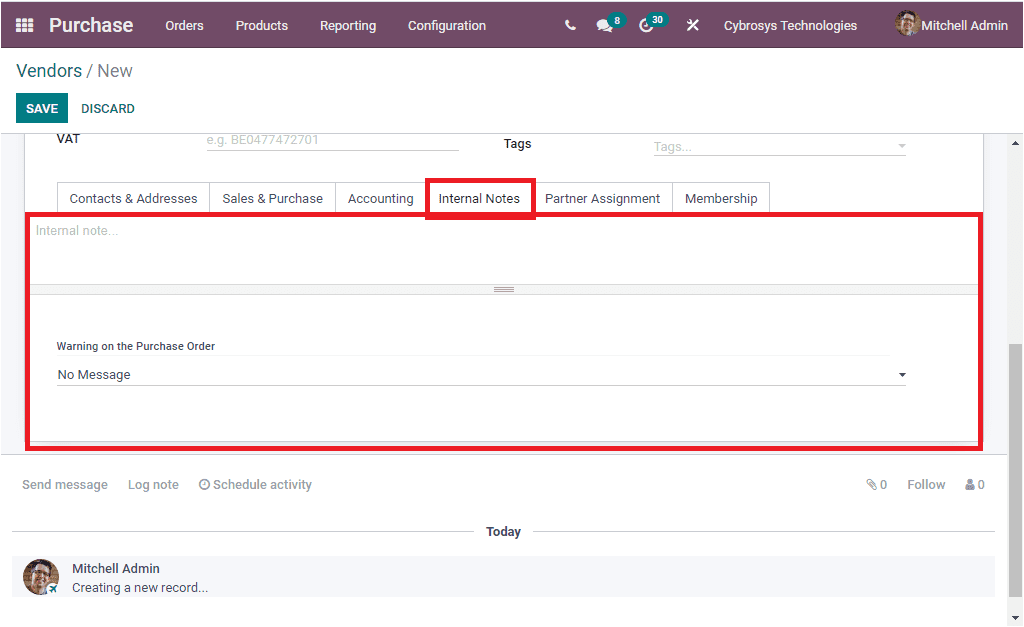
Under the Internal Notes tab, you can include internal notes if any and the Warning on the Purchase Order.
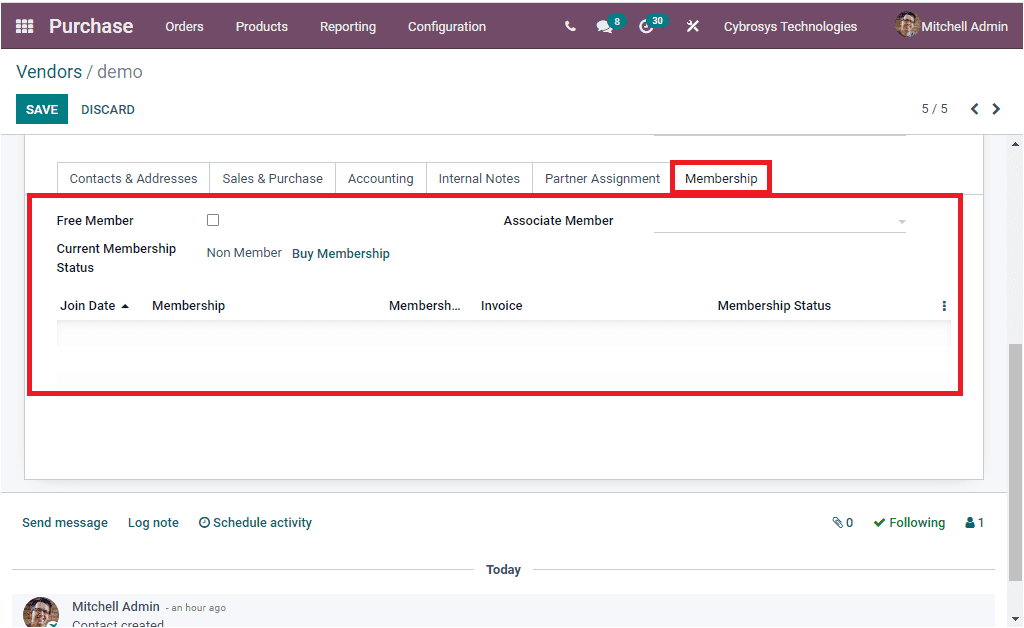
Under the Partner Assignment tab, you can include the Geo Location. The Partner Activation data such as Partner Level, Commission Plan, Activation, and Level weight. Then in the Partner Review, you can add the Latest Partner Review, Next Partner Review, and the Partnership Date. The Last tab available in the Vendor creation form is Membership tab which will allow you to add membership details. Here you have the option Free Member. You can activate this option if you want to give free membership for this vendor. The current membership status could be seen. Non Member defines a partner who is not applied for any membership.
Cancelled Member: A member who has cancelled his membership
Old Member: a member with membership date has expired
Waiting Member: A member who has applied for the membership and whose invoice is going to be created.
Invoiced Member: A member whose invoice has been created
Paying Member: a member who has paid the membership fee.
In addition the Associate Member also can be allocated
When you complete all these steps, you can save the details of the new vendor by clicking on the SAVE button available. Now you are able to view the created vendor in the Vendors window.
Apart from these options, the Vendorâs window will depict some smart button which will provide you an insight into the various operations with this particular vendor and give you direct access to these windows just by clicking on them. Let us have a glance at these smart tabs.
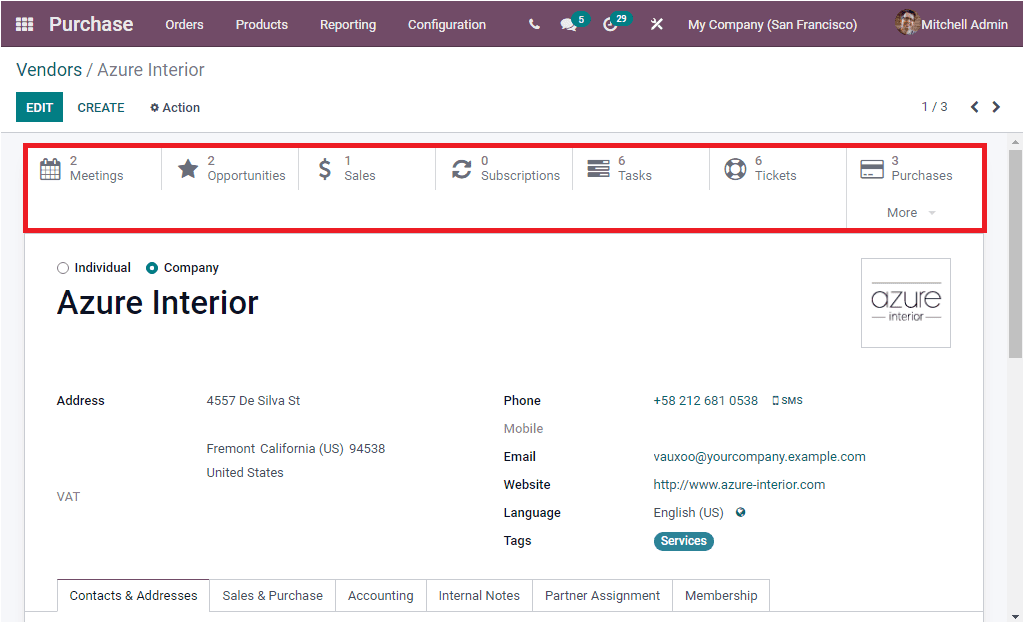
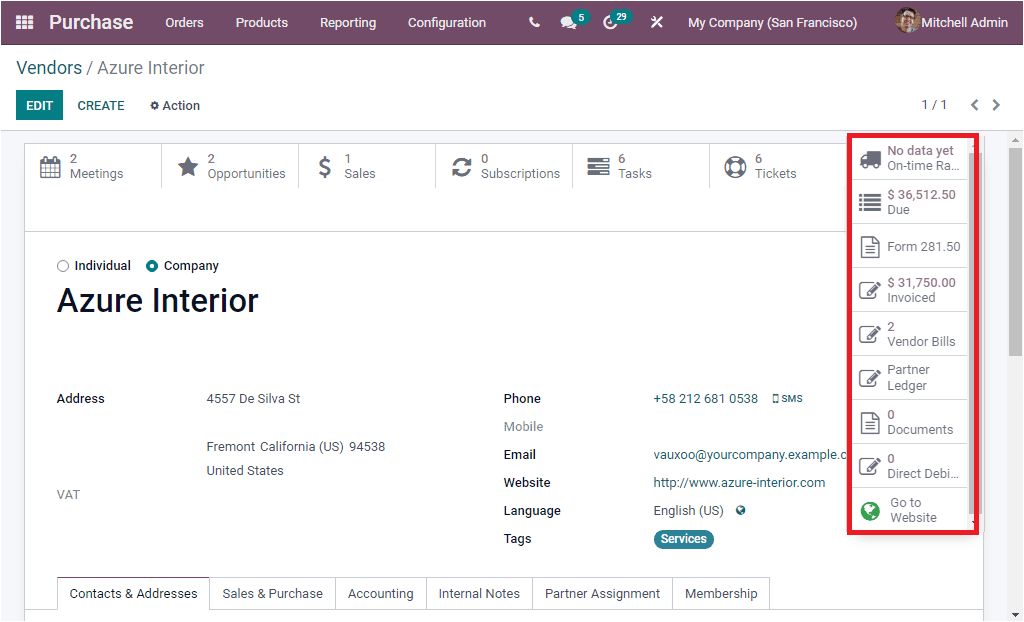
In the above screenshot of the Vendors window, you can view the highlighted options. These highlighted options are the smart tabs that will help you to navigate to the respective windows. This option includes Meetings, Opportunities, Sales, Subscriptions, Tasks, Tickets, Purchases and the list of smart tabs continues. You can view additional tabs such as On-time Delivery, Due, Invoiced, Vendor Bills, Partner Ledger, Documents, Direct Debit Mandates, and Go to Website by clicking on the More menu available just below the smart Purchases tab. The image of these additional tabs are highlighted in the below screenshot.
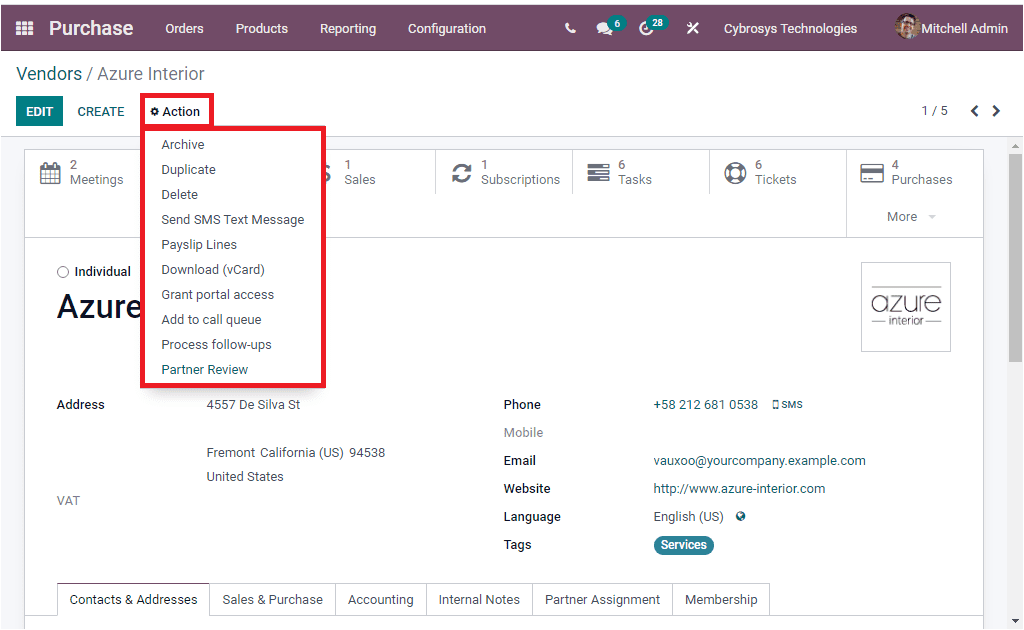
Additionally, the Action button available on the left top corner of the window will allow you to define additional actions. When you click on this button, you will be depicted with a dropdown menu where you can access a list of advanced features such as Archive, Duplicate, Delete, Send SMS Text Message, Payslip Lines, Download (vCard), Grand portal access, Add to call queue, Process Follow-ups, Partner Review.
So far we were discussing how Odoo helps you to manage your Vendors and we have a detailed analysis on the Vendor creation form. Now let us have a look into the Vendor Pricelists.