-
- Abundante
- Adquirentes de pagos
- Ajustes
- Analítica
- Citas en línea
- Comercio Electrónico del Sitio Web de Odoo
- Configuración el Sitio Web de Comercio Electónnico
- Diseñe la Página de Su Sitio Web
- Gestión de Productos
- Gestión de Varios Idiomas
- Grupos
- Herramientas de fragmento
- Lista de precios
- Listado de productos
- Métodos de envío
- Múltiples compañías
- Múltiples sitios web
- Operaciones de blog en backd
- Pedido
- Personalización de la Página del Catálogo de productos
- Personalización del catálogo de productos
- Personalizar el menú y las apariencias
- Porcos
- Programas de cupón y promoción
- Publicar contenido específico para el sitio web
- RedirracionAmiento
- Salas de chat
- Sesión de Productos en la PESTAÑA CONFIGURACIÓN
- Sitio Web
- Tablero de Comercio Electrónico
- Tarjeta de Regalo
- Twitter Wall
- Visitantes
- Vistas de la Página
-
- Activo
- Adquirentes de pagos
- Biblioteca de contabilidad
- Catálogo de cuentas
- Conabilidad miscelána
- Configuración de Datos Bancario
- Contabilidad
- Contábilidad analíta
- Diario
- Estados de Cuenta Bancario
- Factura de Clientes al Pago
- Fechas de Bloqueo
- Fiscales de posiciones
- Gastos de Empleados
- Informa de de Socios
- Informa de seguimiento
- Informa en contabilidad
- Ingresos y Gastos Diferidos
- Mandatos de débito directo
- Notas de Crédito
- Pagos
- Pagos por lotes
- Presupuesto
- Reconciliatura
- Redondeo en efectivo
- Tablero de contabilidad
- Tipos de contabilidad
- Transferencias automáticas
- Términos de Pago
-
- Abundante
- Adquisico de Plomo
- CREACIÓN DE COTIZACIONES DE VENTAS
- CRM
- Caracteríssticas de Odoo 15 CRM
- Convertir LOS Cables en Oportunidades
- Cómo Odoo CRM Gestiona Las Oportunidades Perdidas
- FluJo de trabajo general de Odoo CRM
- Formulario de generación de plomo múltiples fuentes
- Funcionando -Con Clientes Potenciales
- Manejo de Liderazgo
- Nuevas Opciones en la ventana de configuración de Odoo 15
-
- Análisis de producción
- CREANDO CENTROS DE TRABAJO
- Fabricación
- Facturas de materiales
- Gestión de Chatarra
- Gestión de Mantenimiento
- Gestión de órdenes para no consultor
- Informe General de Efectividad del Equipo
- Pedidos de Fabricación
- Planificación de Pedidos Laborales por producción
- Planificación de órdenes de Trabajo por WorkCenter
- Programa de producció Maestra
- Órdenes de Trabajo
-
- Abundante
- Ajustes de Inventario
- Anuncios
- CARACTERÍSTICAS DEL MÓDULO DE INVENTARIO DE ODOO
- Categorizacia de productos
- Categorías de Almacenamiento
- Configuración del producto
- Confirmación de SMS en la Entrega
- Confirmación por Correo Electrónico en la Entrega
- Costos de Aterrizaje
- Empaquetado del producto
- Entrega
- Entregar Paquetes
- Estategias de Eliminación
- Gestión de Almacenes
- Gestión de Chatarra
- Integrando el Remitente de Terceros en Odoo
- Inventario
- Operaciones de inventario
- Planificadores
- Reglas de Caída
- Reglas y rutas
- Tiempos de Programació
- Trazabilidad del Producto
- Ubicacia
- Unidad de Medida
- Variantes de productos
-
- APEGO Salarial
- Abundante
- Configuración
- Contratos
- Entradas de Trabajo
- Estructuras salariales
- Información personal
- Nómina de Odoo
- OTROS TIPOS DE ENTRADA
- Parámetros de la regla salarial
- Reanudar
- Salarios de reglas
- Salpicaduras
- Tablero
- Tiempos de Trabajo
- Tipo de estructura salarial
- Tipos de Entrada de Trabajo
- Ventajas
Website & eCommerce- Odoo 15 Enterprise Book
Forum
Discutimos cómo publicar un foro en el frente, y ahora podemos discutir la operación de back -end.Un foro en el sitio web brinda la oportunidad a sus visitantes de comunicarse entre sí en forma de mensajes publicados.También se puede considerar como una excelente herramienta para aumentar el tráfico del sitio web.Esta característica avanzada será beneficiosa para usted para familiarizar su negocio con nuevos clientes.
El módulo del sitio web de Odoo le ofrece la oportunidad de construir una plataforma única para la publicación de foro.La plataforma lo ayudará a crear publicaciones de foro y foro de manera factible.Se puede considerar como un banco de discusión para que los clientes o visitantes respondan a sus dudas y consultas.Cuando mira la barra de menú principal del módulo del sitio web, puede encontrar la pestaña del foro.Para administrar foros, puede hacer clic en el menú Publicar disponible en la pestaña Foro.
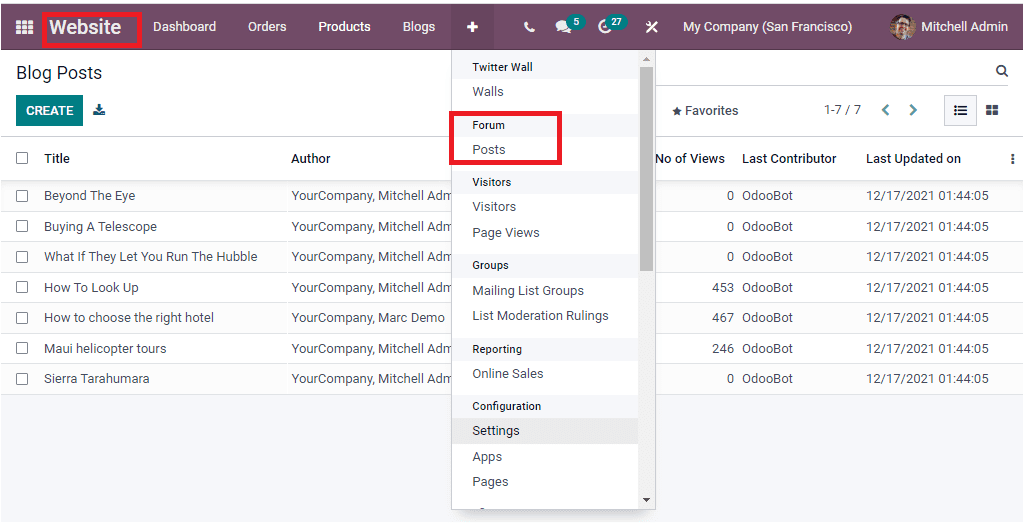
Once you click on the Posts menu, you will be redirected to the Forum Posts window, as shown below.
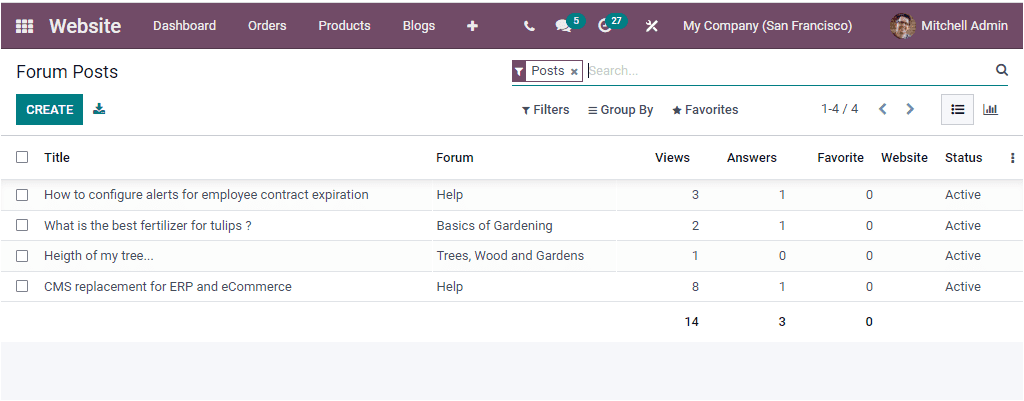
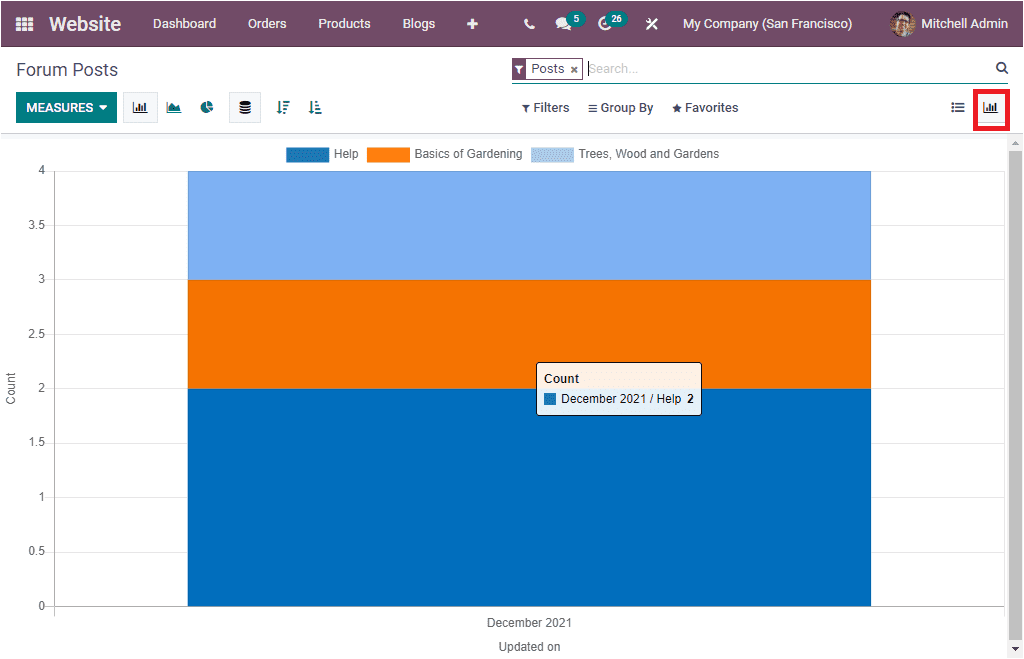
All the Forum posts created in the platform will be saved in the system and displayed in the window. As you see in the image, the window will depict the Title, Forum, Number of views, Number of answers, Number of Favourite, Website, and Status. The window provides you with many default and customizable Filters, Group By, Favourite, and Search options that will be very handy for easily finding out and categorizing your details. The default Filters available in the window are Posts, Answers, Accepted Answers, Answered Posts, Asked on, Updated On ( month-wise, quarter-wise, and year-wise), and Archived. Similarly, the default Group By options available is Forum, Author, and Post. The above-depicted image is in the list view, and you can also view the details in the window in a graph view. You can click on the Graph view icon to get the Graphical representation.
In the List view, you can see the CREATE button on the top left corner which will help you to access the creation window. Using this creation window you can create new forum posts. The screenshot of the creation window is depicted below.
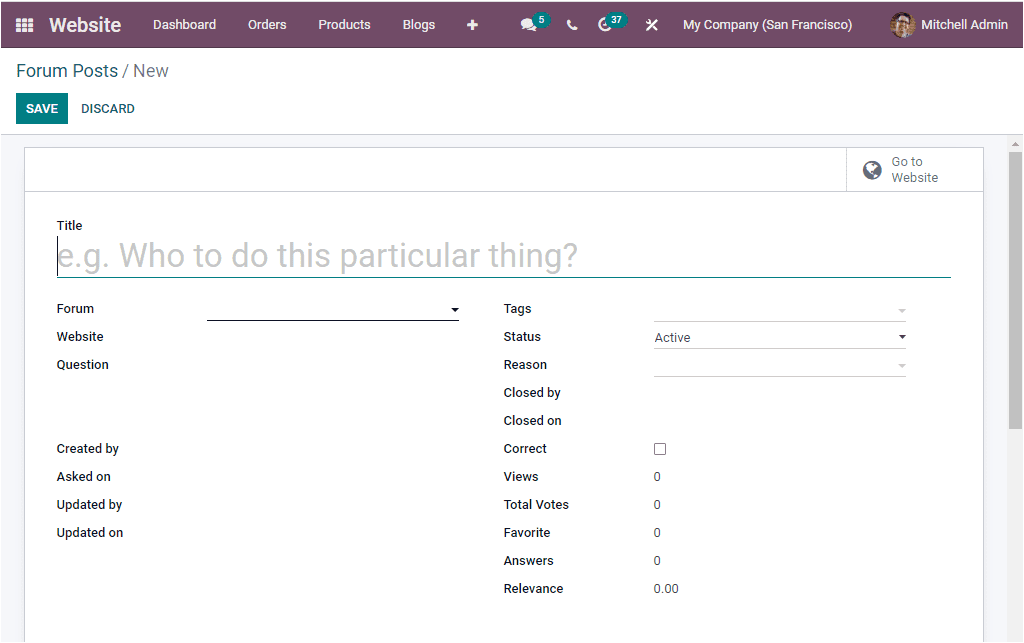
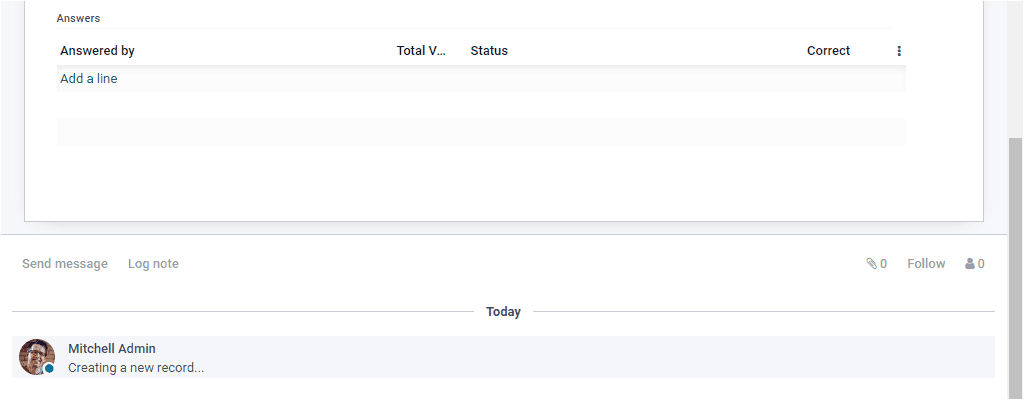
For creating new Forum Posts, you should specify the title of the forum post in the Title field. Then you can mention the Forum using the dropdown menu. This dropdown menu will list out all the preconfigured forums. In addition, you can allocate the Website, Question, Created by, Asked on, Updated by, Updated on, Tags, Status, Reason, Closed By, Closed on, Correct, Views, Total Votes, Favourite, Answers, and Relevance. When you scroll down the window, you can view some more fields. Under the Answers tab, you can describe the post answers. You can click on the Add a line option available to do this. Apart from all these options, the window also gives you a direct link to the Website, and this can be done by clicking on the smart button Go to Websitethat should be available on the top right corner. Once you give all the details, you can save the new forum posts by clicking on the SAVE button.
When you look at the Configuration tab of the Odoo Website module, you can view a separate Forum section which includes various menus such as Ranks, Forums, Tags, Badges, and Close Reasons.
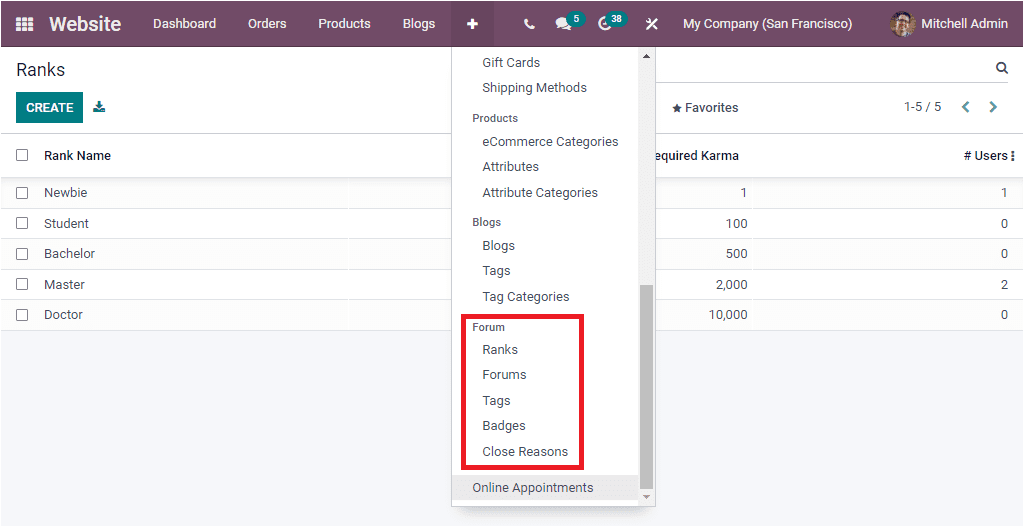
Let us have a look at each of these menus. First of all, we can click on the Forum menu.
Forum
The Forum menu available under the Configuration tab of the Odoo Website module allows you to configure Forums based on our business requirements. Upon selecting the menu, you will be directed to the Forum window as shown below.

As you can see, the window will list out all the Forums configured in the platform together with the details such as Forum Name, Website, Number of Posts, Number of Views, Number of Answers, and Number of Favourites. To create a new forum, you can click on the CREATE button.
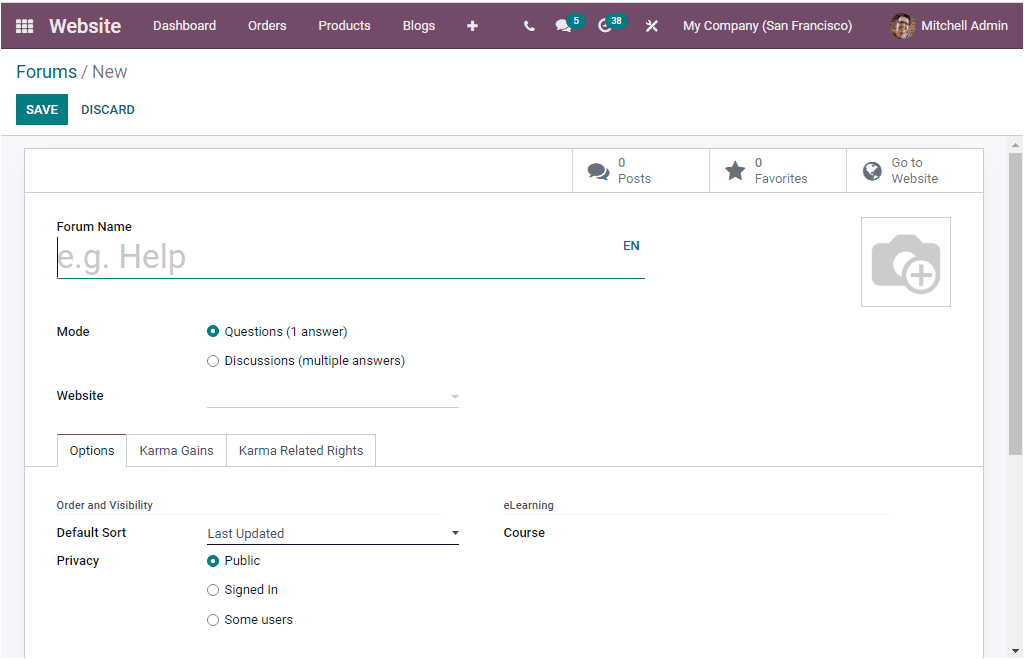
Using this creation form, you can configure new forums effortlessly. First, you should provide the Forum Name and select the Mode. It can be either Question mode (only one answer allowed) or Discussions mode( multiple answers are allowed). After that, you can specify the Website when you need to publish this forum. Moreover, you can include the Photograph related to the forum in the given space.
Under the Optionstab, you can set up the order and visibility of the forum. The Default Sort field allows you to select a default sorting method. The default sorting methods given in this field are Newest, Last Updated, Most Voted, Relevance, and Answered. The Privacy policy can be defined as Public, Signed In, or Some Users. If you select public, the forum will be public, and it will be visible to everyone. In the case of Signed In, the form will be visible for the signed-in users. Finally, in Some users' cases, the forum and their content are hidden for non-members of the selected group. Furthermore, you can also provide a description of the forum, which will be visible on the website.
Under the Karma Gains tab, you can define the various karma points to the participants for their multiple activities.
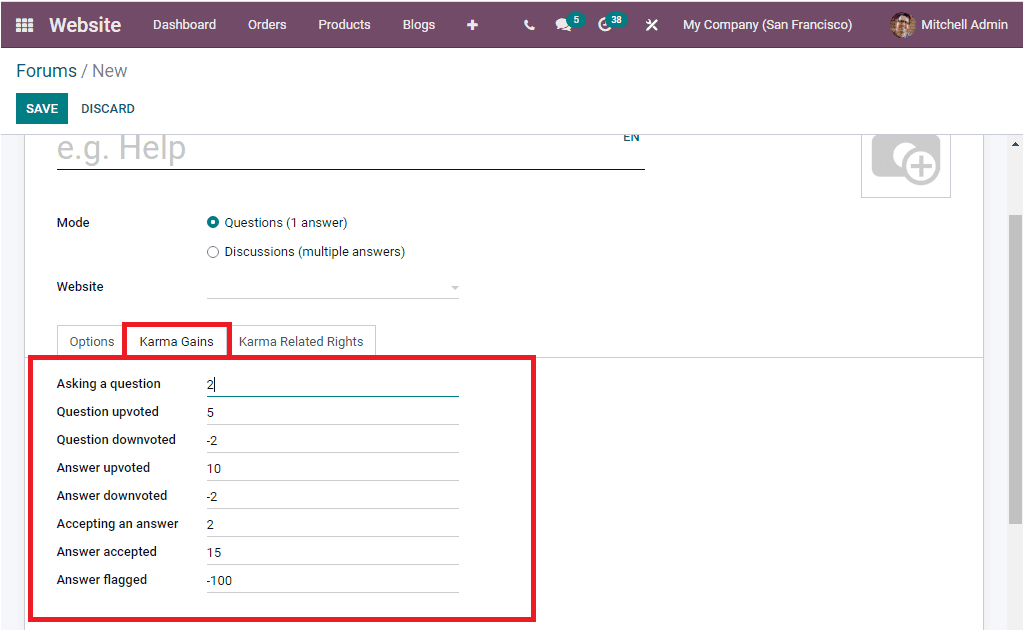
If the participant earns the karma points, it will make them able to gain certain rights. Odoo allows you to describe the right under the Karma Related Rights tab.
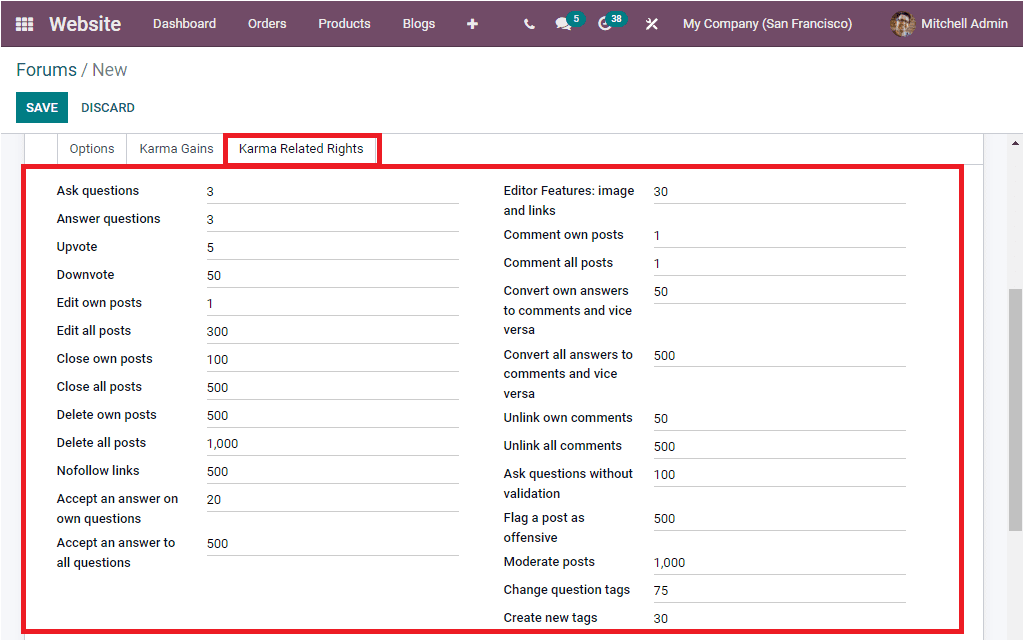
In this Karma Related Rights tab, you can view a list of rights. If the participants earn the mentioned karma points can only gain the rights.
After completing all these steps, you can save the details by clicking the SAVE button.
Let us discuss the Ranks menu.
Ranks
The Ranks menu available under the Configuration tab of the Odoo Website module will help you configure different ranks for the forum participants. The screenshot of the Ranks menu is shown below
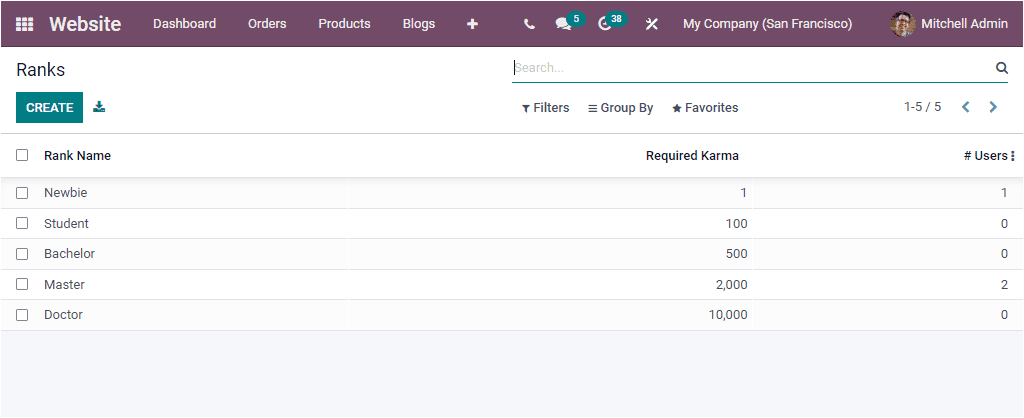
Odoo always helps you to keep the details of all the configured Ranks in the platform. You will get all these details in the above window. The window will give you the details of each Rank Name, the Required Karma, and the number of users. The various ranks can also be achieved based on the Karma points gained. To configure a new Rank, you can click on the create button.
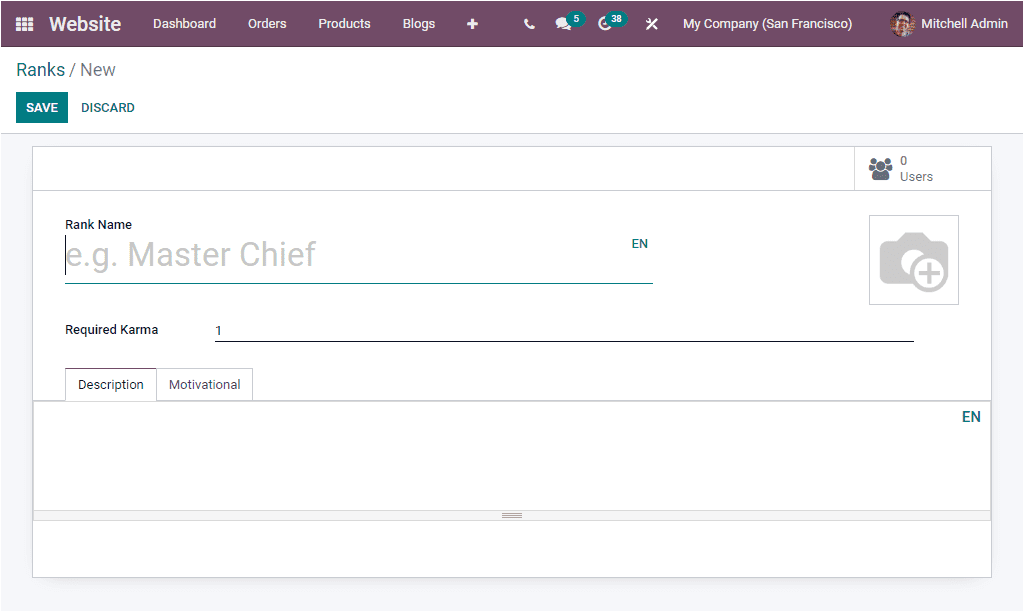
In the Rank configuration form, you can provide the Rank Name and mention the Required Karma to achieve the rank. Under the Description tab, you can describe the defined Rank. A motivational phrase to reach this particular rank can be given under the Motivational tab.
Tags
The Odoo Website module also allows you to configure various tags for the forum posts. These tags will be beneficial for categorizing and quickly recognizing forum posts based on the requirements. The tags menu can be accessed from the Forum section available under the Configuration tab of the module.
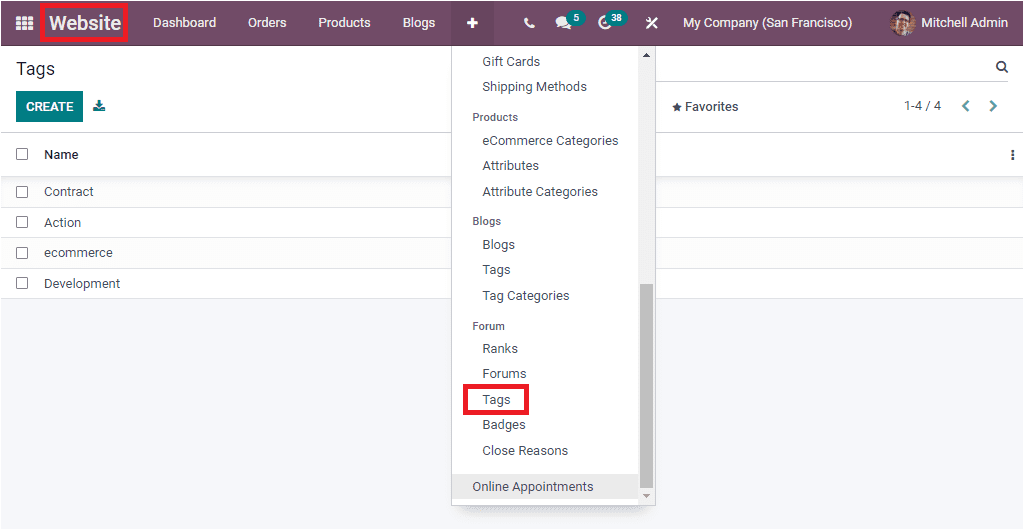
When you click on the Tags menu, you will be directly entered into the Tags window as shown in the image below.

Here you can view all the predefined Tags along with the Name and associated Forum name. Click on the CREATE button to create new Tags. Then a new row will be displayed in the same window where you can give the details.
Badges
Odoo offers you a distinct feature for creating and managing badges, especially for the visitors of your forum posts on your website. This feature provides you insight into defining certain criteria to allow the visitors to win the badges by making them perform various activities described on your forum. These specified badges can be awarded as rewards for the challenges placed on your website.
The Badges menu can be accessed from the Configuration tab of the Odoo Website module. Let us have a look into the Badges window.
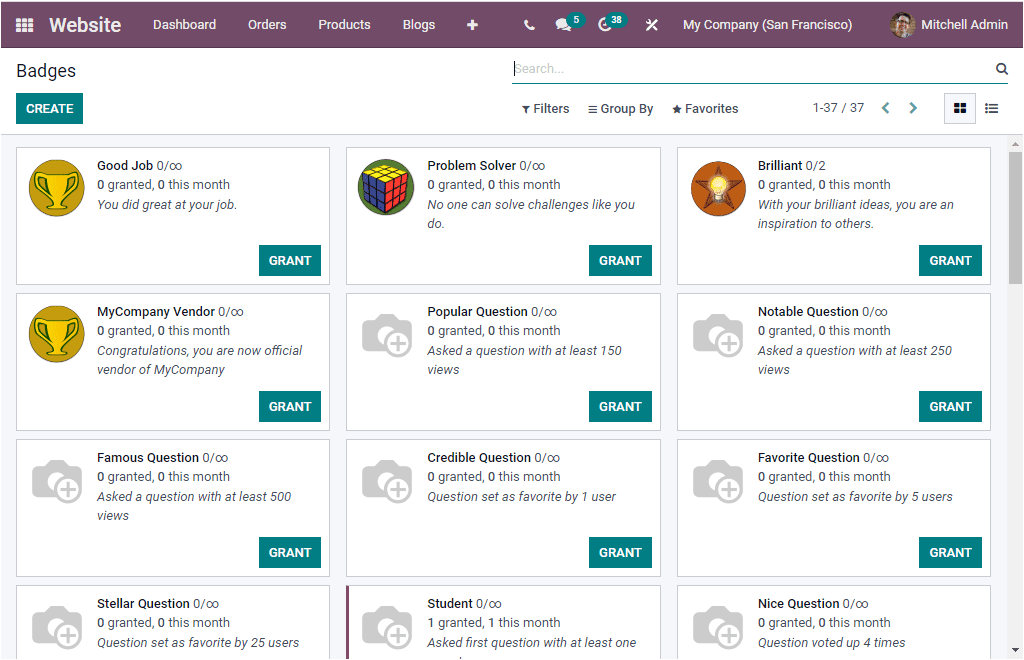
The Badges window will display all the Badges defined in the platform. The above image depicts the Badges window in Kanban view. In the kanban view, you can view the GRAND button on the bottom side of each badge. You can click on the button to grant this badge to your participant. When you click on this button, you will depict a pop-up window as shown in the image below.
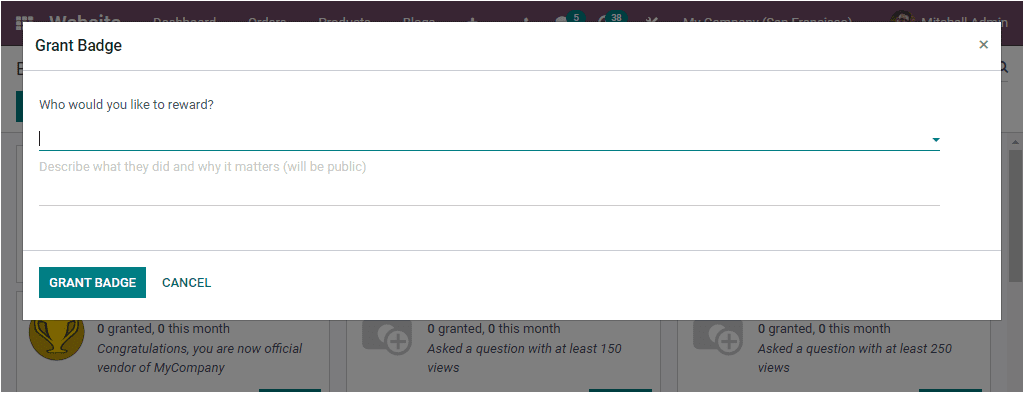
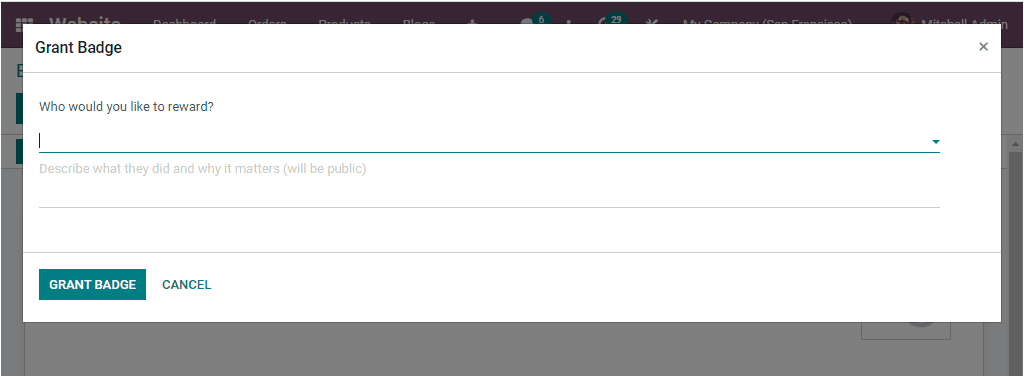
Here you can mention the person who you would like to reward. Also, you can describe what they did and why it matters. The description you gave will be public. Then you can click on the GRANT BADGE button.
You can also access the Badges window in List view. For creating new Badges, you can click on the CREATE button. The screenshot of the creation form is given below.
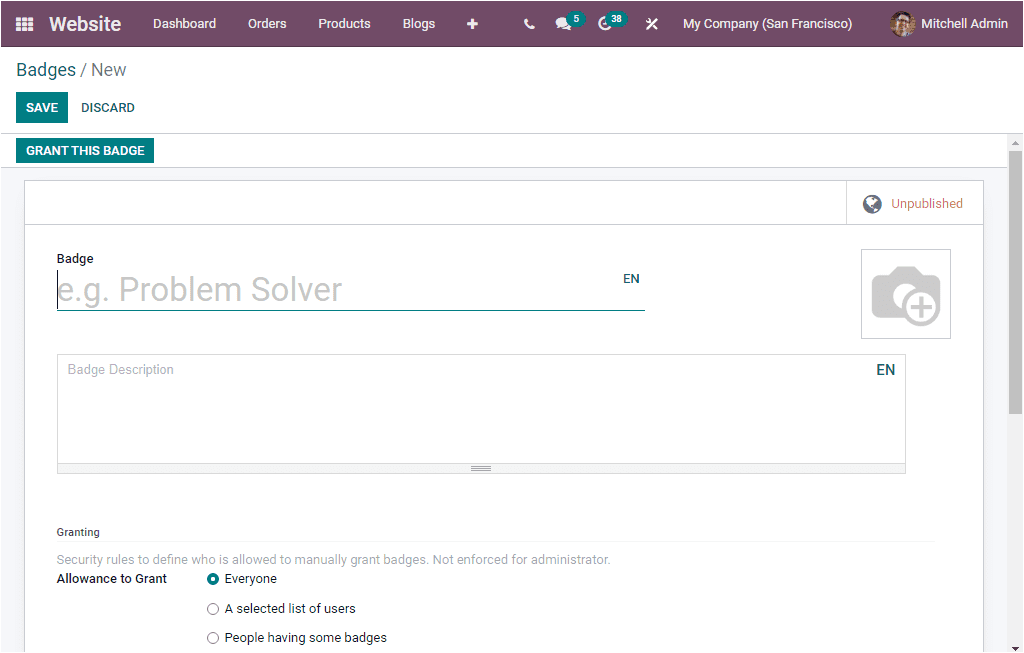
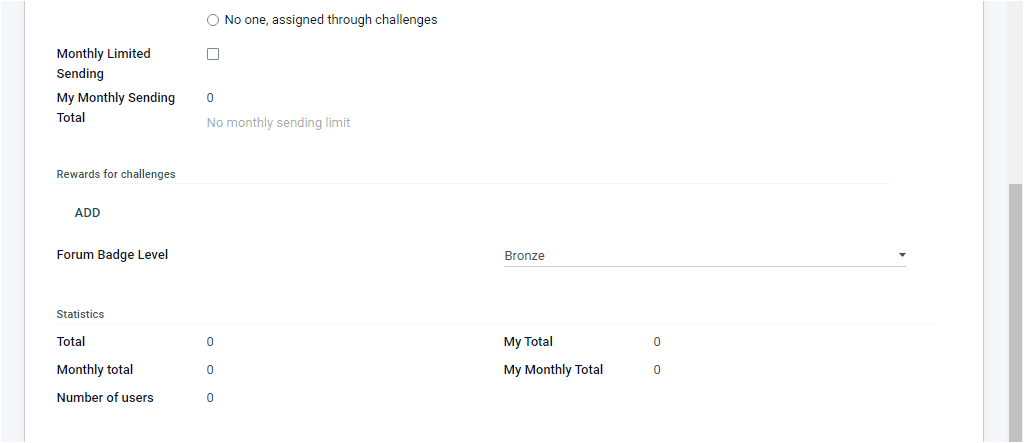
In this Badge creation form, you can allocate the Badge Name along with the Badge description. The granting section gives the security rules to define who can manually grant badgesânot enforced for administrators. In the Allowance to Grant field, you can mention who can grant this badge. This can be selected from the given options.
- Everyone
- A selected list of users
- People having some badges
- No one, assigned through challenges.
You can activate the option Monthly Limited Sending to set a monthly limit per person for sending this badge. My Monthly Sending Total can also be defined. That means it is the number of times the current user has sent this badge to this month. Moreover, you are able to add rewards for challenges. To do this, you can click on the ADD button available under the Rewards for Challenges field. When you click on the ADD button, a pop-up window will be displayed with all the predefined reward of challenge records.
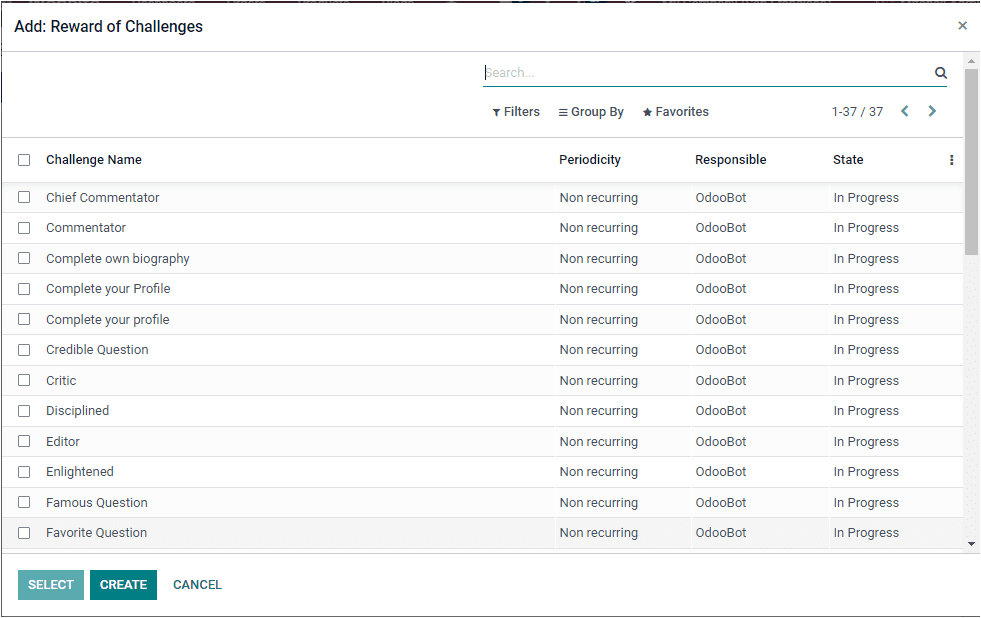
You can add a suitable record to this field.
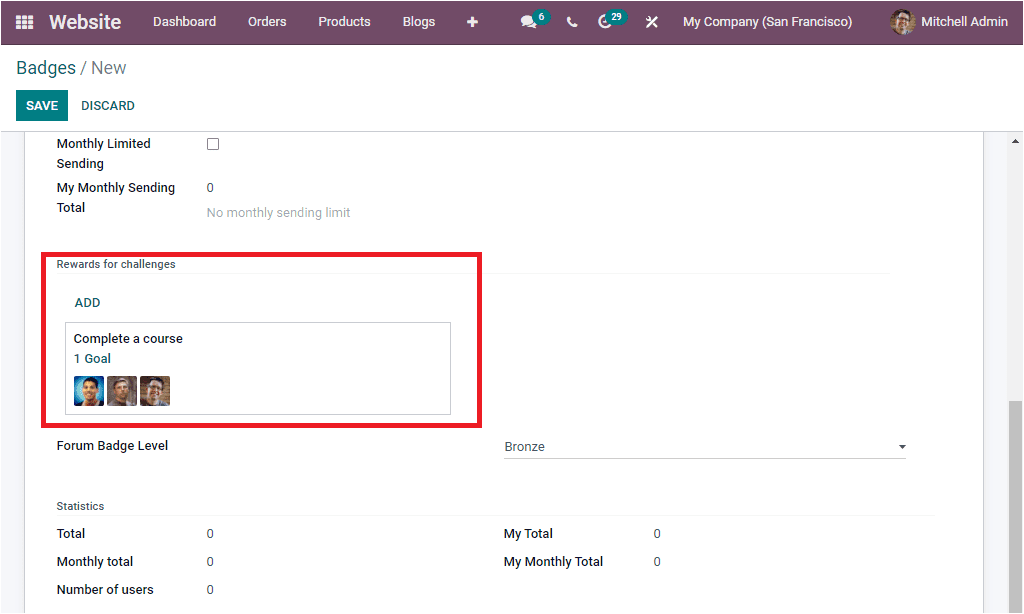
The Forum Badge Level can be defined from the list given. The list includes the options such as Bronze, Silver, and Gold. The Statistics section in the Badges creation window will allow you to define the following details.
- Total: The number of the total this badge has been received
- Monthly Total: The number of times this badge has been received this month.
- Number of users: The number of times this badge has been received by unique users.
- My Total: The number of times the current user has received this badge.
- My Monthly Total: The number of times the current user has received this badge this month.
Once you fill in all these fields, you can click on the SAVE button to save the details. After saving it, you can click on the GRANT THIS BADGE option to reward this badge to your participants
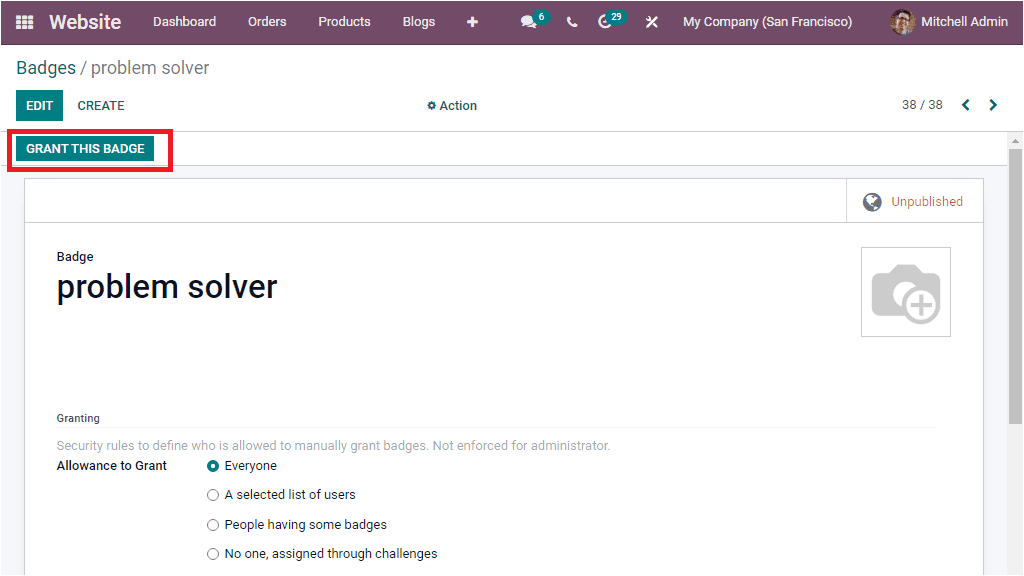
When you click on the GRANT THIS BADGE button, you will depict a pop-up as shown below, where you can mention the participant and the real explanation for the reward. After that, click on the GRANT BADGE button.
Now we can discuss the Close Reasons menu.
Close Reasons
The Close Reasons menu available under the Configuration tab of the Odoo Website module is placed to describe the reasons for closing particular forum posts from your website. It will be a straightforward but useful feature that will help you to increase credibility. You can access the Close Reasons menu in the Forum section of the Configuration tab. To access you can go to Website -> Configuration-> Forum -> Close Reasons. When you click on this menu, you will be directed to the Post Close Reasons window as shown in the image below.
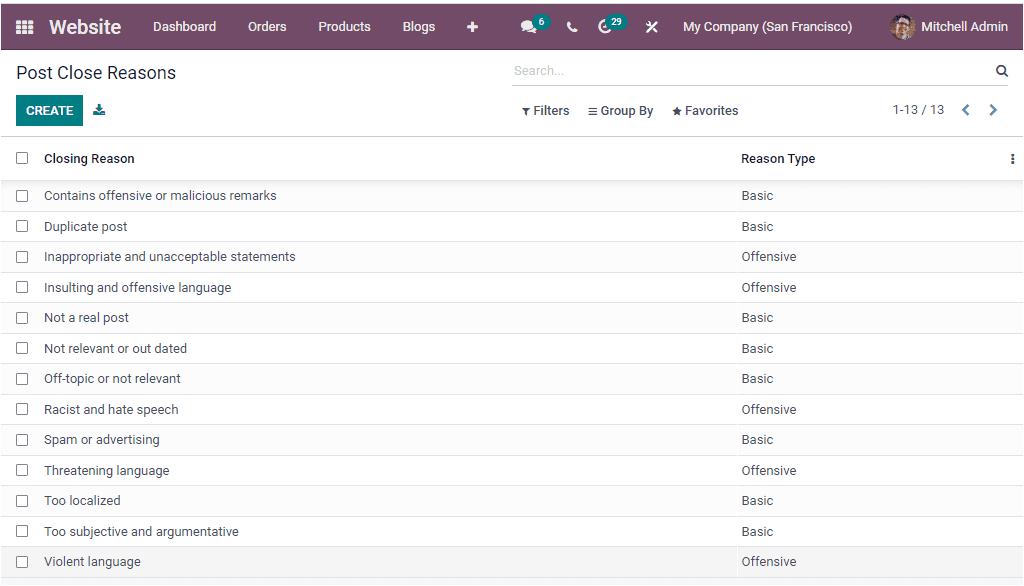
You can find all the already described Close reasons in the window along with its reason types. For creating new close reasons, you can click on the CREATE button. Now you will find a new row where you can give the closing reason and can mention the Reason Type.
So far, we have been discussing the various features in the Forum section available under the Configuration tab of the Website module. We can now discuss how to customize your product catalog page.