-
- Abundante
- Adquirentes de pagos
- Ajustes
- Analítica
- Citas en línea
- Comercio Electrónico del Sitio Web de Odoo
- Configuración el Sitio Web de Comercio Electónnico
- Diseñe la Página de Su Sitio Web
- Gestión de Productos
- Gestión de Varios Idiomas
- Grupos
- Herramientas de fragmento
- Lista de precios
- Listado de productos
- Métodos de envío
- Múltiples compañías
- Múltiples sitios web
- Operaciones de blog en backd
- Pedido
- Personalización de la Página del Catálogo de productos
- Personalización del catálogo de productos
- Personalizar el menú y las apariencias
- Porcos
- Programas de cupón y promoción
- Publicar contenido específico para el sitio web
- RedirracionAmiento
- Salas de chat
- Sesión de Productos en la PESTAÑA CONFIGURACIÓN
- Sitio Web
- Tablero de Comercio Electrónico
- Tarjeta de Regalo
- Twitter Wall
- Visitantes
- Vistas de la Página
-
- Activo
- Adquirentes de pagos
- Biblioteca de contabilidad
- Catálogo de cuentas
- Conabilidad miscelána
- Configuración de Datos Bancario
- Contabilidad
- Contábilidad analíta
- Diario
- Estados de Cuenta Bancario
- Factura de Clientes al Pago
- Fechas de Bloqueo
- Fiscales de posiciones
- Gastos de Empleados
- Informa de de Socios
- Informa de seguimiento
- Informa en contabilidad
- Ingresos y Gastos Diferidos
- Mandatos de débito directo
- Notas de Crédito
- Pagos
- Pagos por lotes
- Presupuesto
- Reconciliatura
- Redondeo en efectivo
- Tablero de contabilidad
- Tipos de contabilidad
- Transferencias automáticas
- Términos de Pago
-
- Abundante
- Adquisico de Plomo
- CREACIÓN DE COTIZACIONES DE VENTAS
- CRM
- Caracteríssticas de Odoo 15 CRM
- Convertir LOS Cables en Oportunidades
- Cómo Odoo CRM Gestiona Las Oportunidades Perdidas
- FluJo de trabajo general de Odoo CRM
- Formulario de generación de plomo múltiples fuentes
- Funcionando -Con Clientes Potenciales
- Manejo de Liderazgo
- Nuevas Opciones en la ventana de configuración de Odoo 15
-
- Análisis de producción
- CREANDO CENTROS DE TRABAJO
- Fabricación
- Facturas de materiales
- Gestión de Chatarra
- Gestión de Mantenimiento
- Gestión de órdenes para no consultor
- Informe General de Efectividad del Equipo
- Pedidos de Fabricación
- Planificación de Pedidos Laborales por producción
- Planificación de órdenes de Trabajo por WorkCenter
- Programa de producció Maestra
- Órdenes de Trabajo
-
- Abundante
- Ajustes de Inventario
- Anuncios
- CARACTERÍSTICAS DEL MÓDULO DE INVENTARIO DE ODOO
- Categorizacia de productos
- Categorías de Almacenamiento
- Configuración del producto
- Confirmación de SMS en la Entrega
- Confirmación por Correo Electrónico en la Entrega
- Costos de Aterrizaje
- Empaquetado del producto
- Entrega
- Entregar Paquetes
- Estategias de Eliminación
- Gestión de Almacenes
- Gestión de Chatarra
- Integrando el Remitente de Terceros en Odoo
- Inventario
- Operaciones de inventario
- Planificadores
- Reglas de Caída
- Reglas y rutas
- Tiempos de Programació
- Trazabilidad del Producto
- Ubicacia
- Unidad de Medida
- Variantes de productos
-
- APEGO Salarial
- Abundante
- Configuración
- Contratos
- Entradas de Trabajo
- Estructuras salariales
- Información personal
- Nómina de Odoo
- OTROS TIPOS DE ENTRADA
- Parámetros de la regla salarial
- Reanudar
- Salarios de reglas
- Salpicaduras
- Tablero
- Tiempos de Trabajo
- Tipo de estructura salarial
- Tipos de Entrada de Trabajo
- Ventajas
Employee - Odoo 15 Enterprise Book
All Contracts
Puede acceder al menú de todos los contratos en la pestaña Empleados del módulo de empleados de Odoo.La imagen de la ventana Todos los contratos se muestra a continuación.También puede ver el menú todos los contratos, como se destaca en la captura de pantalla a continuación.
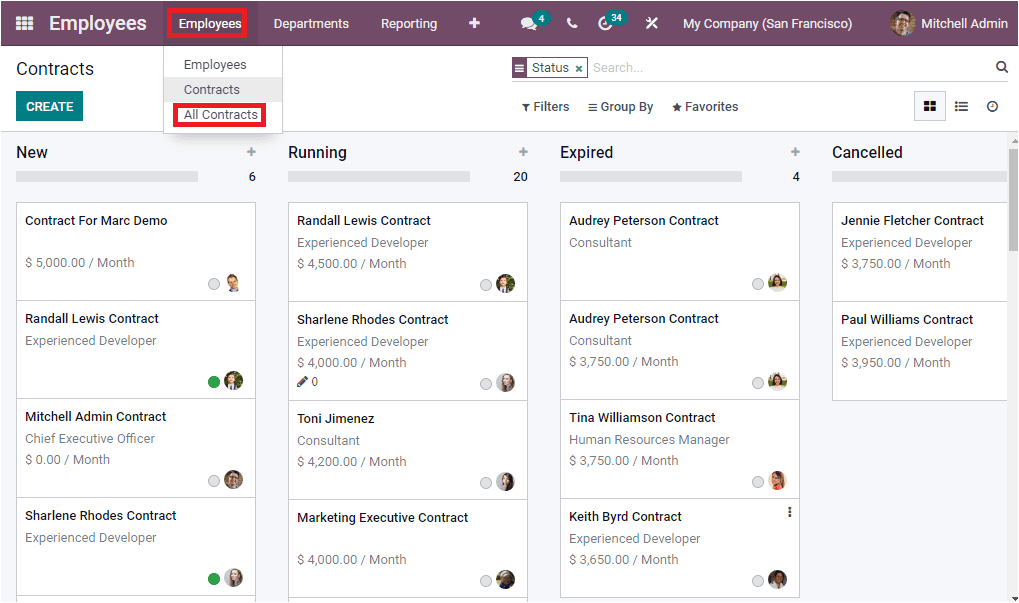
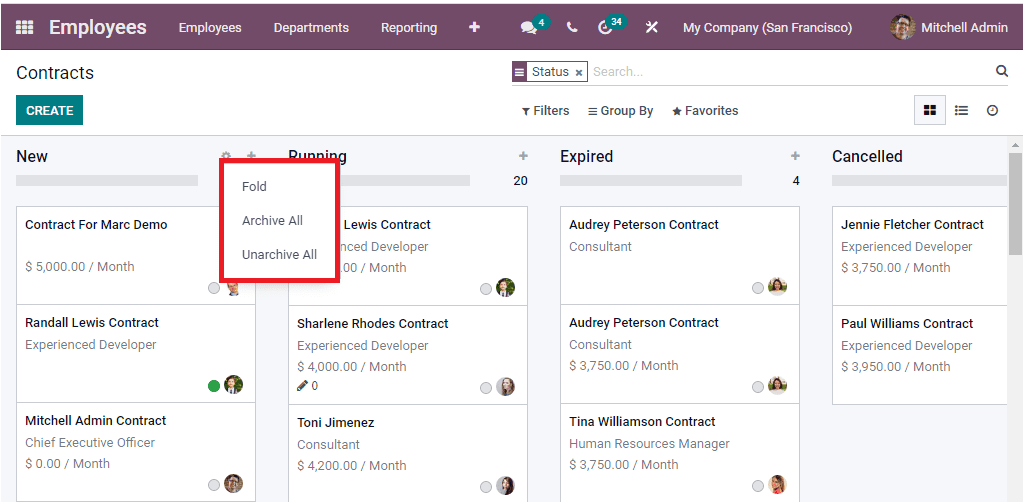
El historial de todos los contratos de los empleados se puede ver aquí en esta ventana.Puede ver los detalles tanto en formato Kanban como en formato de lista.La captura de pantalla anterior muestra la vista Kanban, y en esta ventana, los contratos se clasifican en varias etapas de operaciones.También puede tener la disposición de crear y personalizar múltiples etapas de contrato.En cada etapa, puede acceder a los iconos del menú comoSetting and Quick add options. The Settings button includes Fold, Archive All, and Unarchive All menus
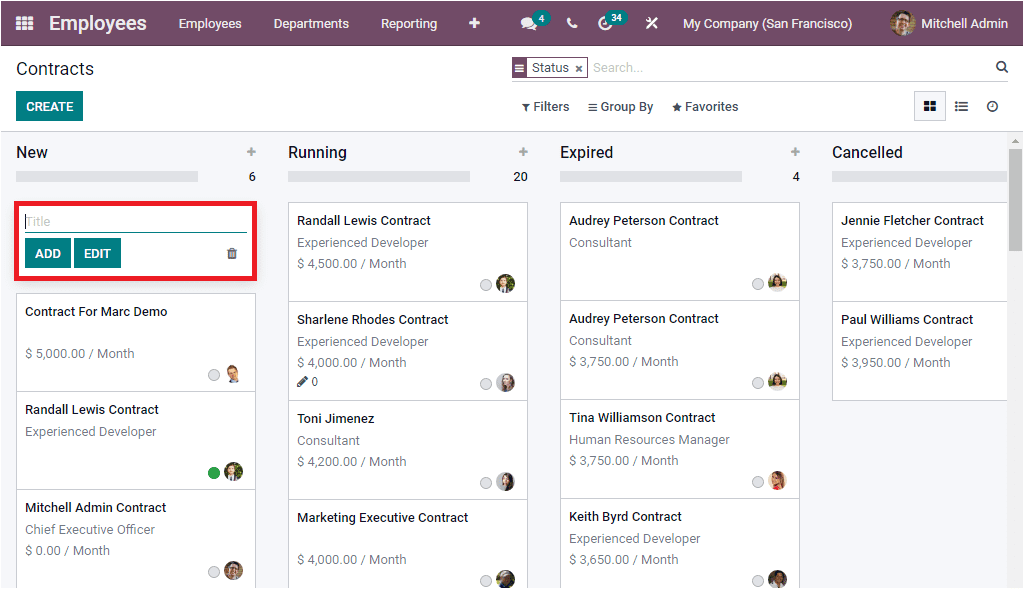
La opción Agregar rápido le permite agregar registros.Al seleccionar este icono, representará un menú emergente como se muestra en la imagen a continuación.
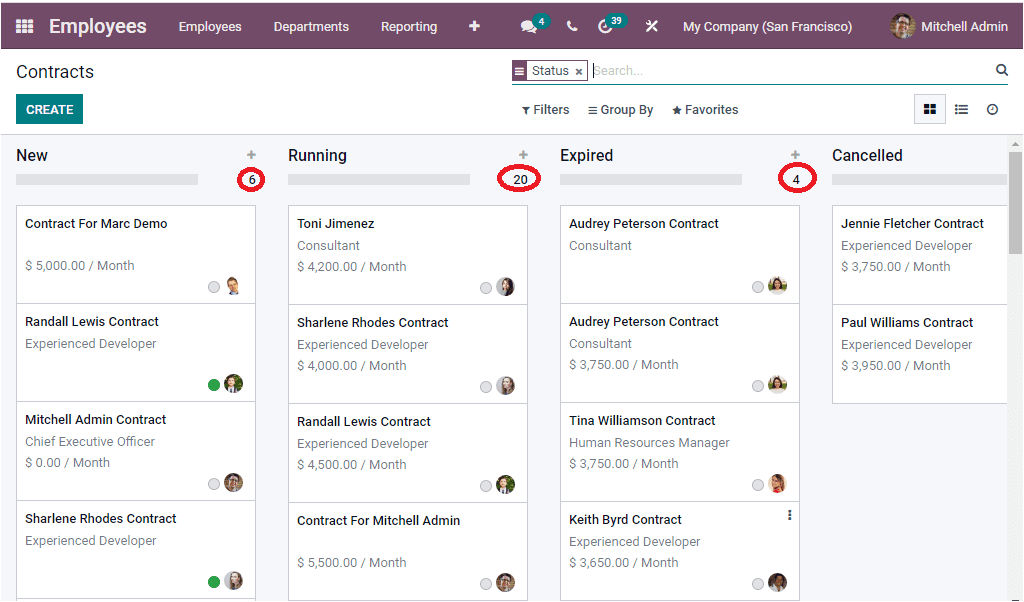
Justo debajo del botón Agregar rápido, puede ver el número total de contratos en cada etapa como se destaca en la imagen a continuación.
También puede aplicar filtros predeterminados como ejecutar, no ejecutar, cambiar de ocupación, empleado, archivado, actividades tardías, actividades hoy y actividades futuras.Además, la opción Agregar filtro personalizado también es ventajosa para personalizar sus propios filtros.Del mismo modo, puede usar el grupo por opciones para reagrupar sus datos en función de criterios específicos.El grupo predeterminado por opciones disponibles en la ventana es el estado, el empleado, la fecha de inicio, el puesto de trabajo, el horario de trabajo y el tipo de estructura salarial.Y también, puede configurar más grupos personalizados utilizando el botón Agregar grupo personalizado disponible.El menú favorito incluye las opciones como guardar la búsqueda actual, importar registros, menú de enlace en la hoja de cálculo, agregar a mi tablero y agregar a la hoja de cálculo de Google.
Ahora echemos un vistazo a la vista de la lista de la ventana Todos los contratos.La imagen se muestra a continuación
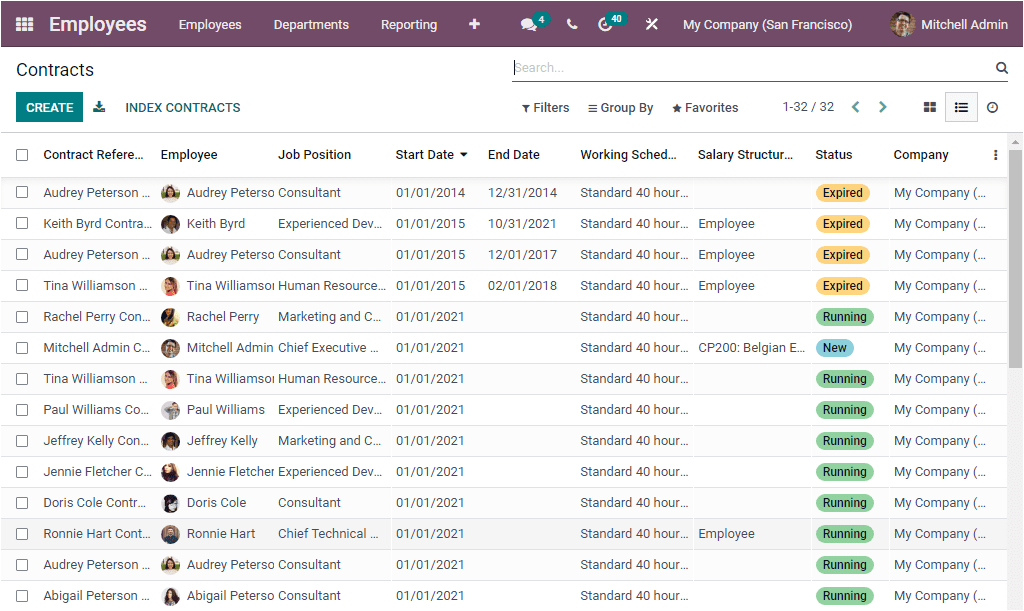
La vista de la lista también enumera todos los contratos definidos en la plataforma junto con los detalles como referencia de contrato, empleado, puesto de trabajo, fecha de inicio, fecha de finalización, horario de trabajo, estructura salarial, estado y empresa.Puede hacer clic en el botón Crear para crear un nuevo contrato.La imagen del formulario de creación del contrato se muestra a continuación.
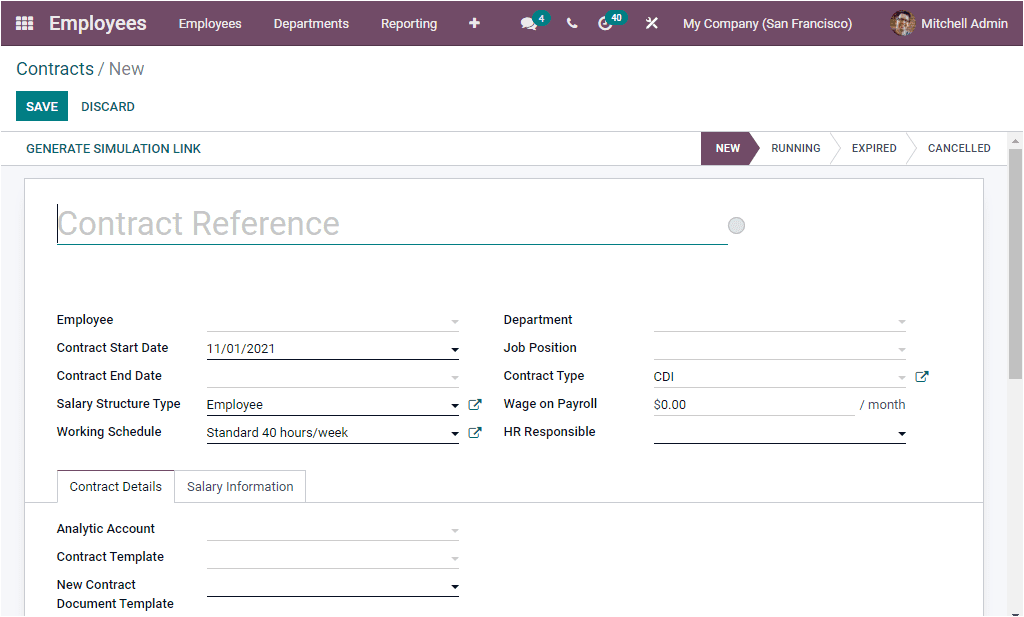

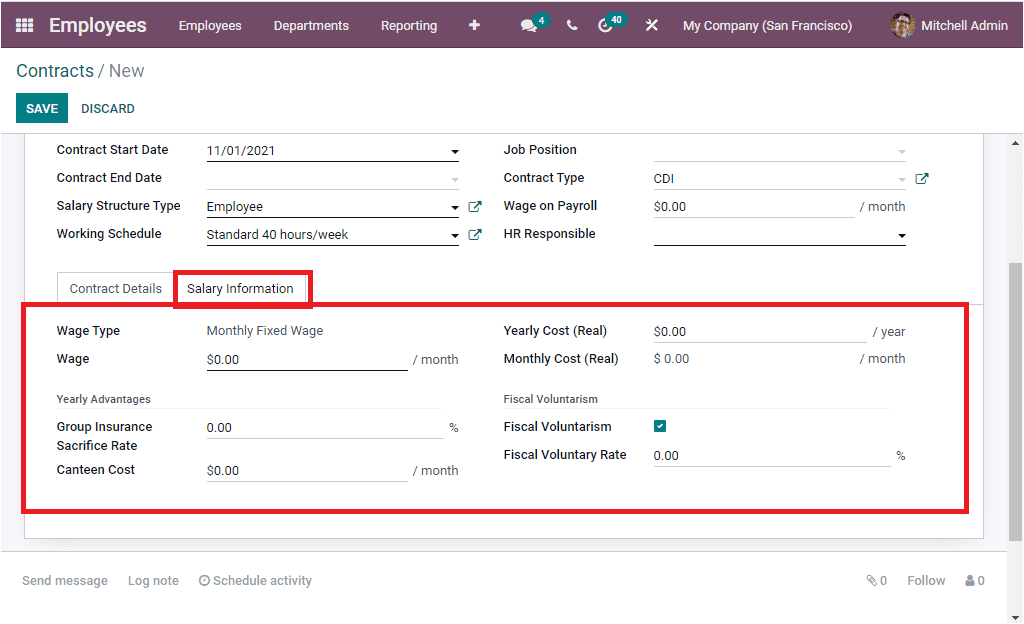
En esta ventana de contratos, puede proporcionar la referencia del contrato y el nombre del empleado.La fecha de inicio del contrato de campo se asignará automáticamente, y también puede describir la fecha de finalización del contrato y el tipo de estructura salarial.El tipo de estructura salarial considerará cómo se paga a un empleado con la organización o empresa.Al igual que si él/ella es un empleado pagado en función de algunos contratos como el salario diario o en función de las horas de trabajo, o un empleado pagado mensualmente.Después de asignar la estructura salarial, puede mencionar el horario de trabajo, el departamento, el puesto de trabajo, el tipo de contrato, el salario en la nómina, el salario de la firma del contrato y los recursos humanos responsables.Este responsable de recursos humanos es la persona responsable por validar el contrato de los empleados.Bajo laContract Details tab, you have to fill in the Analytic Account, Contract Template, New Contract Document Template, Contract Update Document Template. The Contract Template is the default contract used when making an offer to an applicant. The New Contract Document Template is also the default document that the applicant must sign to accept a contract offer. And the Contract Update Document Template is the default document that the Employee will have to sign to update his contract. After providing all these details, you can also offer Notes, if any. When we come to the Salary Informationtab, it will help us to fill up the salary details such as Wage Type, Wage per month, and the Yearly Advantages like Group Insurance Sacrifice Rate, Canteen Cost, and Monthly Cost. Moreover, you also have a Fiscal Voluntarism field that can be enabled or disabled. If you activate this option, you also have to fill Fiscal Voluntary Rate. After providing all these details, you can save it by clicking on the SAVE button available.
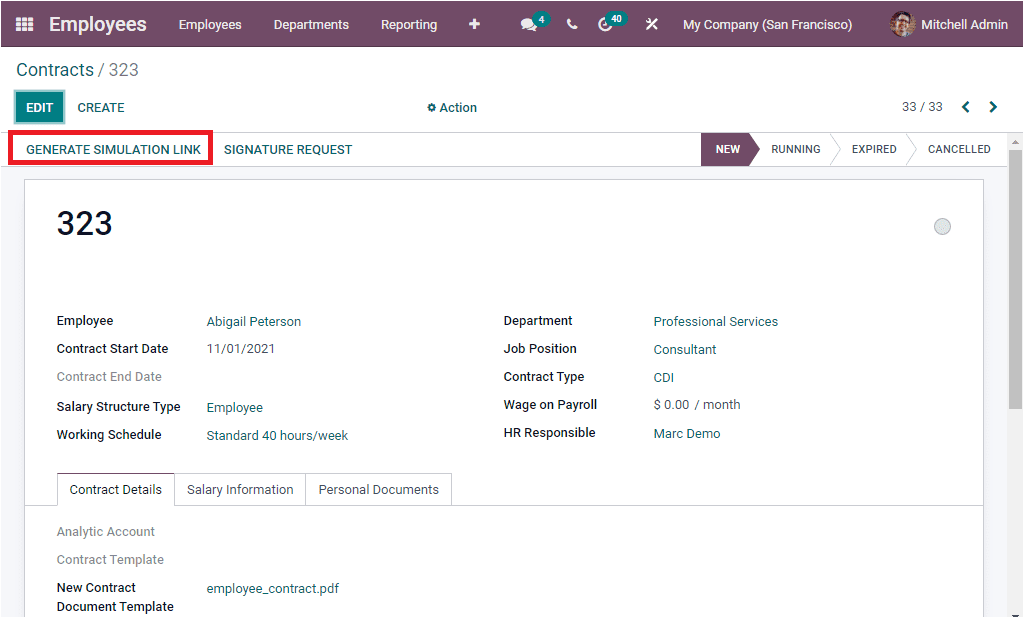
The GENERATE SIMULATION LINK icon available on the top left just under the Create icon allows you to generate a simulation link that can be used to send an updated offer to the employees.
When you click on the GENERATE SIMULATION LINK icon, you will depict a pop-up as shown in the image below.
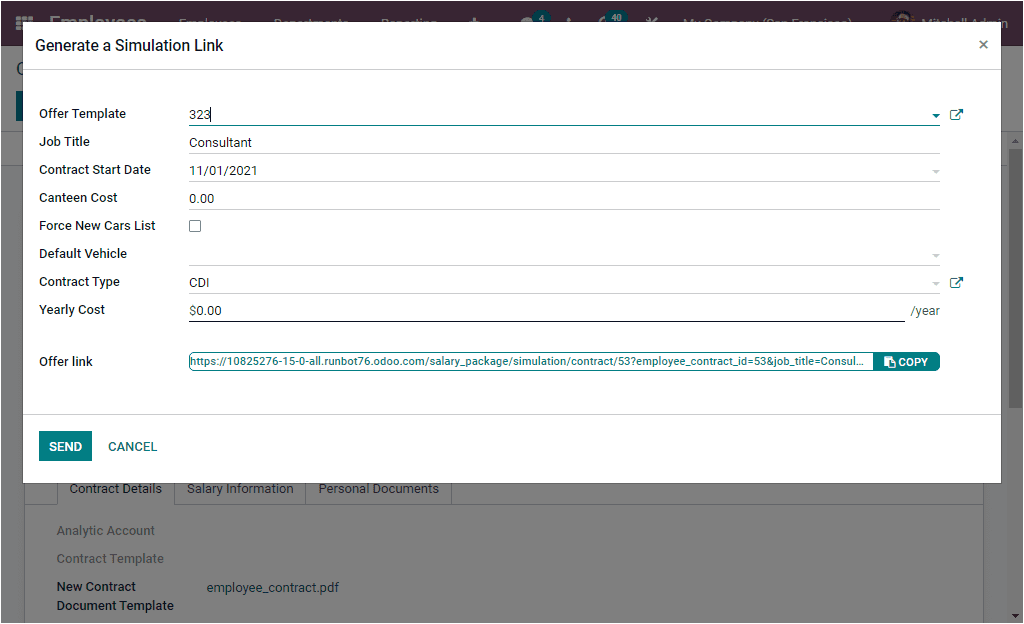
This pop-up window will include various details about the job such as Offer Template, Job Title, Contract Start Date, Canteen Cost, Force New Cars list, Default Vehicle, Contract Type, Yearly Cost, and Offer Link. Based upon these details, Odoo will automatically generate a simulation link, and you have the provision to send this offer to the employees.
Near the GENERATE SIMULATION LINK button, you can also view the SIGNATURE REQUEST button as highlighted in the below screenshot.
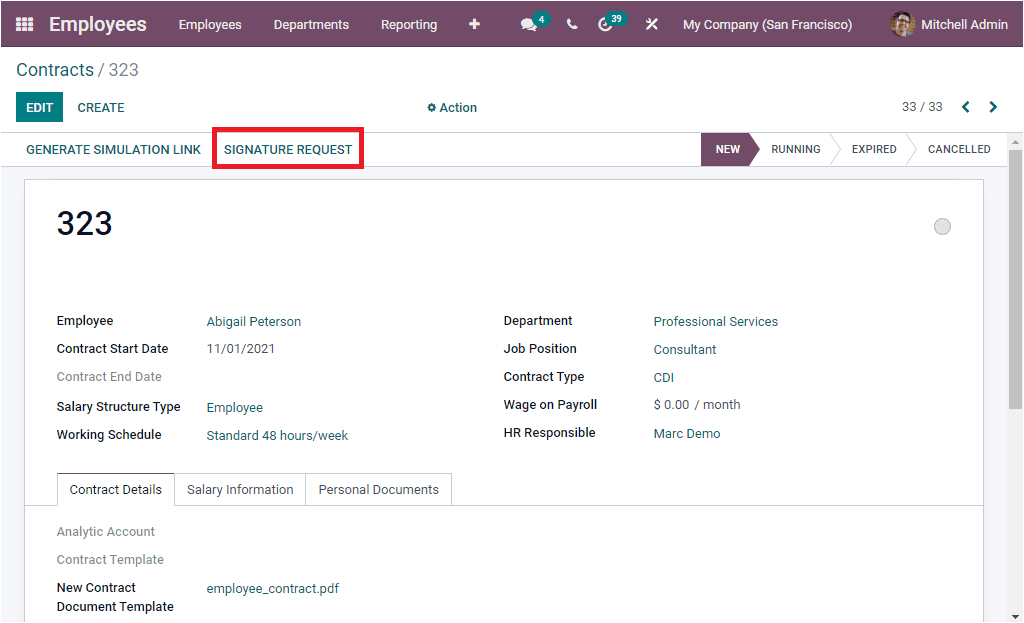
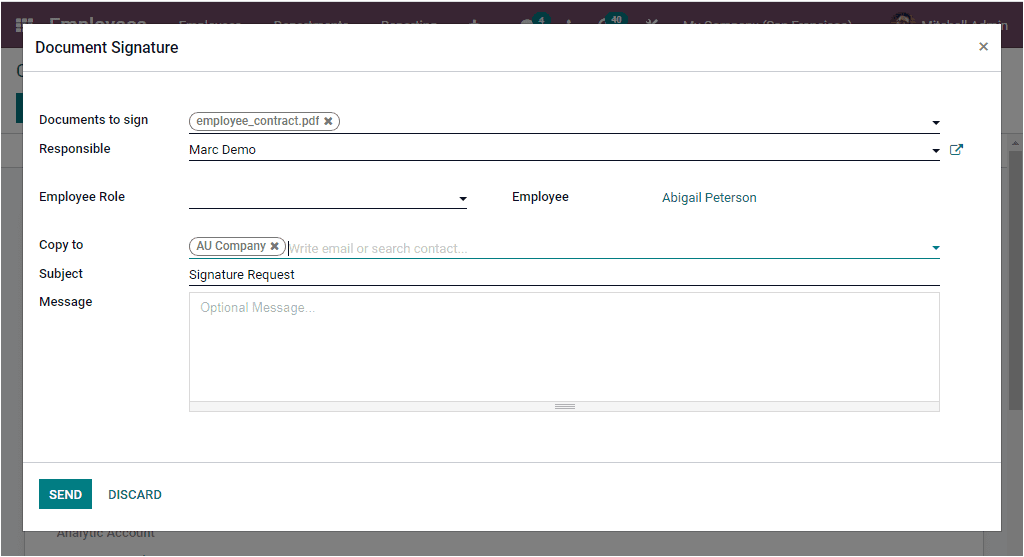
This button will allow you to send requests for a sign from the Employee through the Sign module. If you are installed in the Sign module, then only you are able to perform this action. This option is very helpful for signing the contract. If both parties sign the agreement, then only the terms and conditions in the contract will come into effect. Upon selecting the SIGNATURE REQUEST button you will depict an auto generated request mail where you can also include the Employee Role and optional message. You are also able to include more contacts under the Copy to field. The Other fields such as Documents to sign, Responsible, Employee and Subject will be auto allocated. After providing the details you can click on the SEND button to send the request mail. Now the mail will be sent to the person whose sign is needed for the document. The screenshot of the Request mail is displayed below.
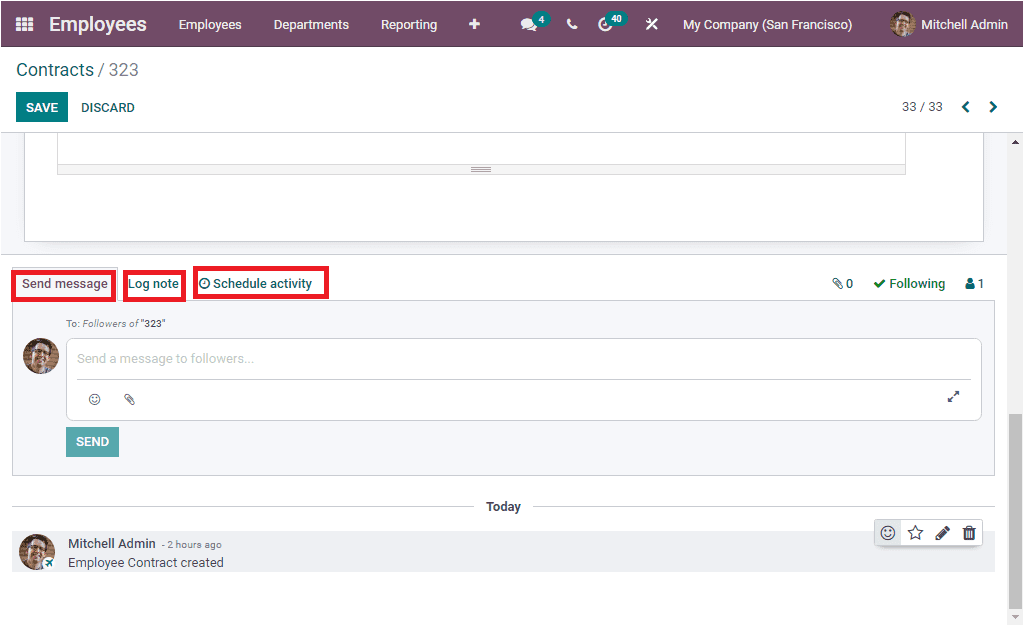
Back to the Contracts creation window, Odoo allows you to send direct messages and schedule appointments with the Employee. This can be done by using the Send message, Log note, and Schedule activity button available. For accessing this menu, you can scroll down the Contracts window as shown in the below image.
So far, we have been discussing the All Contracts window and now let us look into the Configuration options available under the Odoo Employee module.