-
- Abundante
- Adquirentes de pagos
- Ajustes
- Analítica
- Citas en línea
- Comercio Electrónico del Sitio Web de Odoo
- Configuración el Sitio Web de Comercio Electónnico
- Diseñe la Página de Su Sitio Web
- Gestión de Productos
- Gestión de Varios Idiomas
- Grupos
- Herramientas de fragmento
- Lista de precios
- Listado de productos
- Métodos de envío
- Múltiples compañías
- Múltiples sitios web
- Operaciones de blog en backd
- Pedido
- Personalización de la Página del Catálogo de productos
- Personalización del catálogo de productos
- Personalizar el menú y las apariencias
- Porcos
- Programas de cupón y promoción
- Publicar contenido específico para el sitio web
- RedirracionAmiento
- Salas de chat
- Sesión de Productos en la PESTAÑA CONFIGURACIÓN
- Sitio Web
- Tablero de Comercio Electrónico
- Tarjeta de Regalo
- Twitter Wall
- Visitantes
- Vistas de la Página
-
- Activo
- Adquirentes de pagos
- Biblioteca de contabilidad
- Catálogo de cuentas
- Conabilidad miscelána
- Configuración de Datos Bancario
- Contabilidad
- Contábilidad analíta
- Diario
- Estados de Cuenta Bancario
- Factura de Clientes al Pago
- Fechas de Bloqueo
- Fiscales de posiciones
- Gastos de Empleados
- Informa de de Socios
- Informa de seguimiento
- Informa en contabilidad
- Ingresos y Gastos Diferidos
- Mandatos de débito directo
- Notas de Crédito
- Pagos
- Pagos por lotes
- Presupuesto
- Reconciliatura
- Redondeo en efectivo
- Tablero de contabilidad
- Tipos de contabilidad
- Transferencias automáticas
- Términos de Pago
-
- Abundante
- Adquisico de Plomo
- CREACIÓN DE COTIZACIONES DE VENTAS
- CRM
- Caracteríssticas de Odoo 15 CRM
- Convertir LOS Cables en Oportunidades
- Cómo Odoo CRM Gestiona Las Oportunidades Perdidas
- FluJo de trabajo general de Odoo CRM
- Formulario de generación de plomo múltiples fuentes
- Funcionando -Con Clientes Potenciales
- Manejo de Liderazgo
- Nuevas Opciones en la ventana de configuración de Odoo 15
-
- Análisis de producción
- CREANDO CENTROS DE TRABAJO
- Fabricación
- Facturas de materiales
- Gestión de Chatarra
- Gestión de Mantenimiento
- Gestión de órdenes para no consultor
- Informe General de Efectividad del Equipo
- Pedidos de Fabricación
- Planificación de Pedidos Laborales por producción
- Planificación de órdenes de Trabajo por WorkCenter
- Programa de producció Maestra
- Órdenes de Trabajo
-
- Abundante
- Ajustes de Inventario
- Anuncios
- CARACTERÍSTICAS DEL MÓDULO DE INVENTARIO DE ODOO
- Categorizacia de productos
- Categorías de Almacenamiento
- Configuración del producto
- Confirmación de SMS en la Entrega
- Confirmación por Correo Electrónico en la Entrega
- Costos de Aterrizaje
- Empaquetado del producto
- Entrega
- Entregar Paquetes
- Estategias de Eliminación
- Gestión de Almacenes
- Gestión de Chatarra
- Integrando el Remitente de Terceros en Odoo
- Inventario
- Operaciones de inventario
- Planificadores
- Reglas de Caída
- Reglas y rutas
- Tiempos de Programació
- Trazabilidad del Producto
- Ubicacia
- Unidad de Medida
- Variantes de productos
-
- APEGO Salarial
- Abundante
- Configuración
- Contratos
- Entradas de Trabajo
- Estructuras salariales
- Información personal
- Nómina de Odoo
- OTROS TIPOS DE ENTRADA
- Parámetros de la regla salarial
- Reanudar
- Salarios de reglas
- Salpicaduras
- Tablero
- Tiempos de Trabajo
- Tipo de estructura salarial
- Tipos de Entrada de Trabajo
- Ventajas
Odoo Events- Odoo 15 Enterprise Book
Configuration
El menú de configuración del módulo de eventos en Odoo 15 incluye opciones avanzadas para configurar.Estas opciones lo ayudarán a mejorar el rendimiento del módulo.Echemos un vistazo a las opciones disponibles en el menú de configuración.
Event Templates
En Odoo, puede configurar plantillas adecuadas para eventos utilizando la opción de plantilla de eventos en el menú de configuración.Puede usar estas plantillas mientras crea un nuevo evento.Según el tipo de evento, puede crear varias plantillas en esta plataforma.Como puede ver en la captura de pantalla a continuación, puede usar una de las plantillas dadas o personalizar una nueva plantilla para su evento.

Puede crear nuevas plantillas usando el botón Crear.
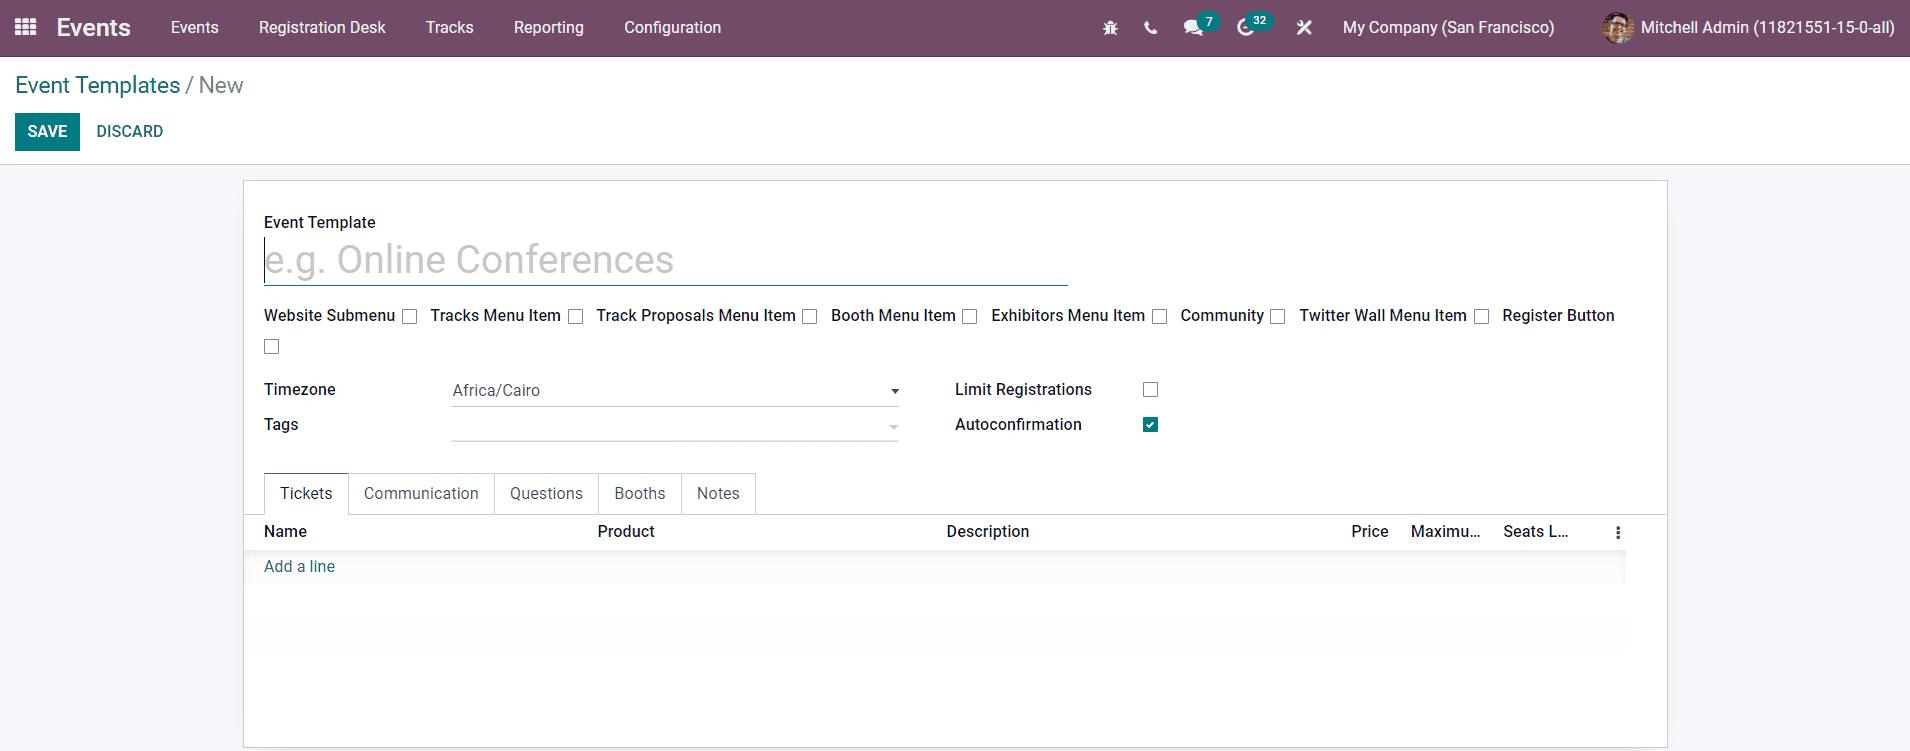
El nombre de la nueva plantilla se puede mencionar en el campo de plantilla de eventos.Los campos restantes son los mismos que los de la ventana de la nueva creación de eventos.Puede completar la plantilla proporcionando detalles sobre boletos, comunicación, preguntas, botas y nota tal como lo discutimos anteriormente en la sesión de eventos anteriormente en este capítulo.Puede usar estas plantillas recién creadas para eventos cuando crea un nuevo evento que pertenece a la misma categoría.
Event Stages
Es fácil clasificar y organizar eventos en el módulo de eventos asignando diferentes etapas para ellos en función del proceso que están pasando.La opción de etapas de eventos en el menú de configuración se puede usar para crear nuevas etapas para el evento.Todas las etapas configuradas para eventos en el módulo de eventos se pueden ver como se muestra en la imagen a continuación.

Use the Create button to add a new stage.
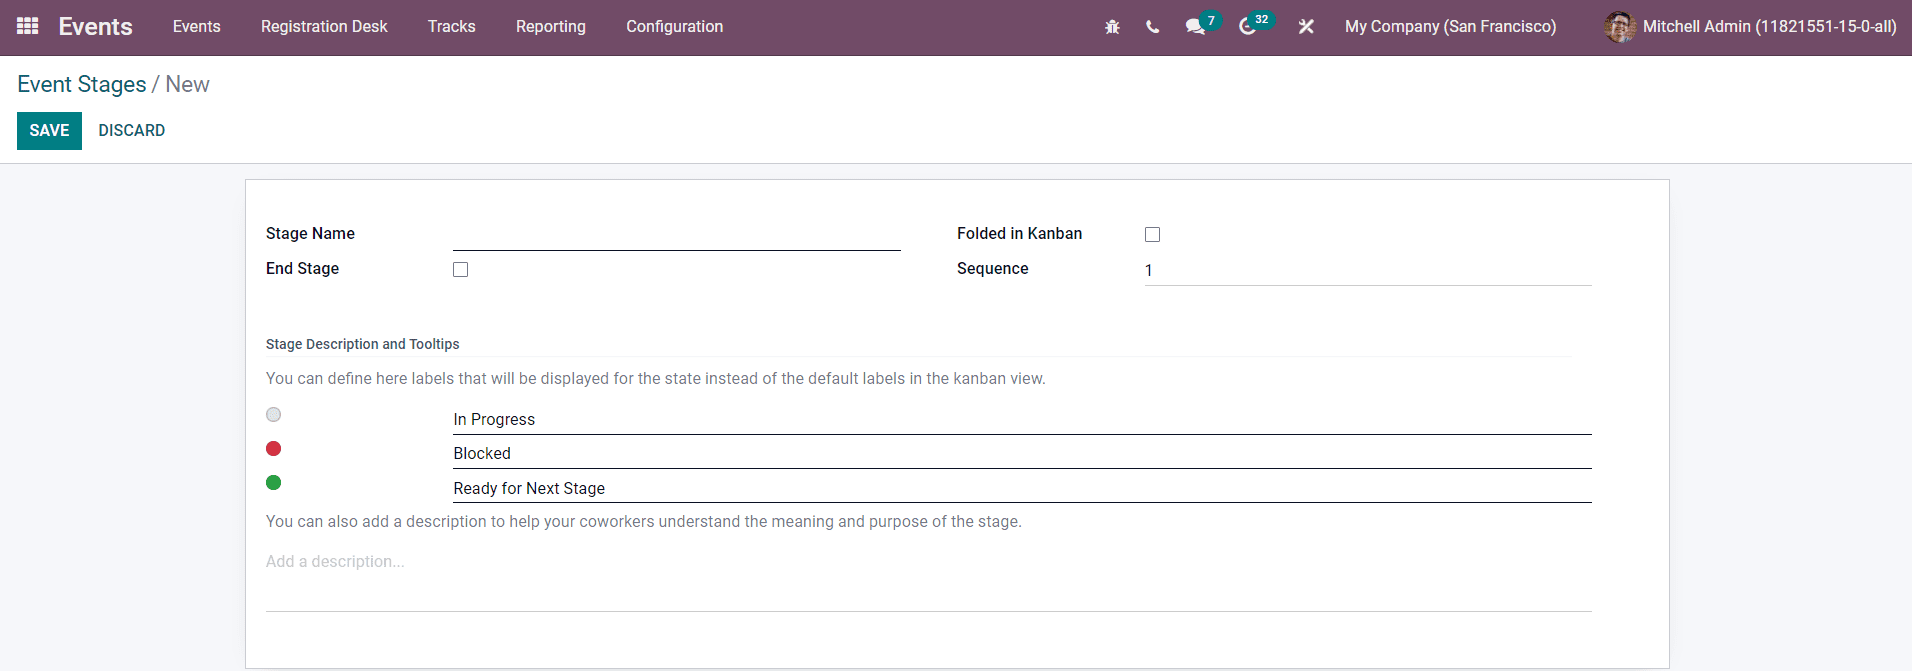
In the Stage Name, mention the name of the stage. By activating the End Stage, Odoo will automatically move the finished events to this stage. If you want to fold this stage in Kanban view, you are allowed to activate the Folded in Kanban. Set the Sequence number of this stage in the given field. You can set various labels for this stage and add a description about this stage in the Stage Description and Tooltips tab. Click the Save button after completing all fields.
Event Tags Categories
Odoo enables you to add suitable tags for the events in the Events module. These tags will help you in categorizing events easily and you can use the applied tags to search for a particular event. You can assign different categories for event tags also. Under a specific category, you can group tags using the Event Tags Categories option from the Configuration menu.

Here, you will get different categories for tags created in the Odoo Events module. The list includes the Name of the category, Tags included in each category, and also shows whether the tag category is visible on the website or not. Now, using the Create button, you can easily create a new category for the tags in the module.

You can mention the name of the tag category in the given space and activate the Show on Website option to make the tag category visible on the website. Using the Add a Line option, you can add tags under this category. Select suitable colors for each tag included in this category. Finally, you can use the Save button to add this new category to the existing list.
Events Mail Scheduler
While creating a new event in the Odoo Events module, we set Emails/SMS schedulers to send an email/SMS to the attendees as a reminder. You will get the list of all scheduled Emails and SMS under the Events Mail Scheduler menu.
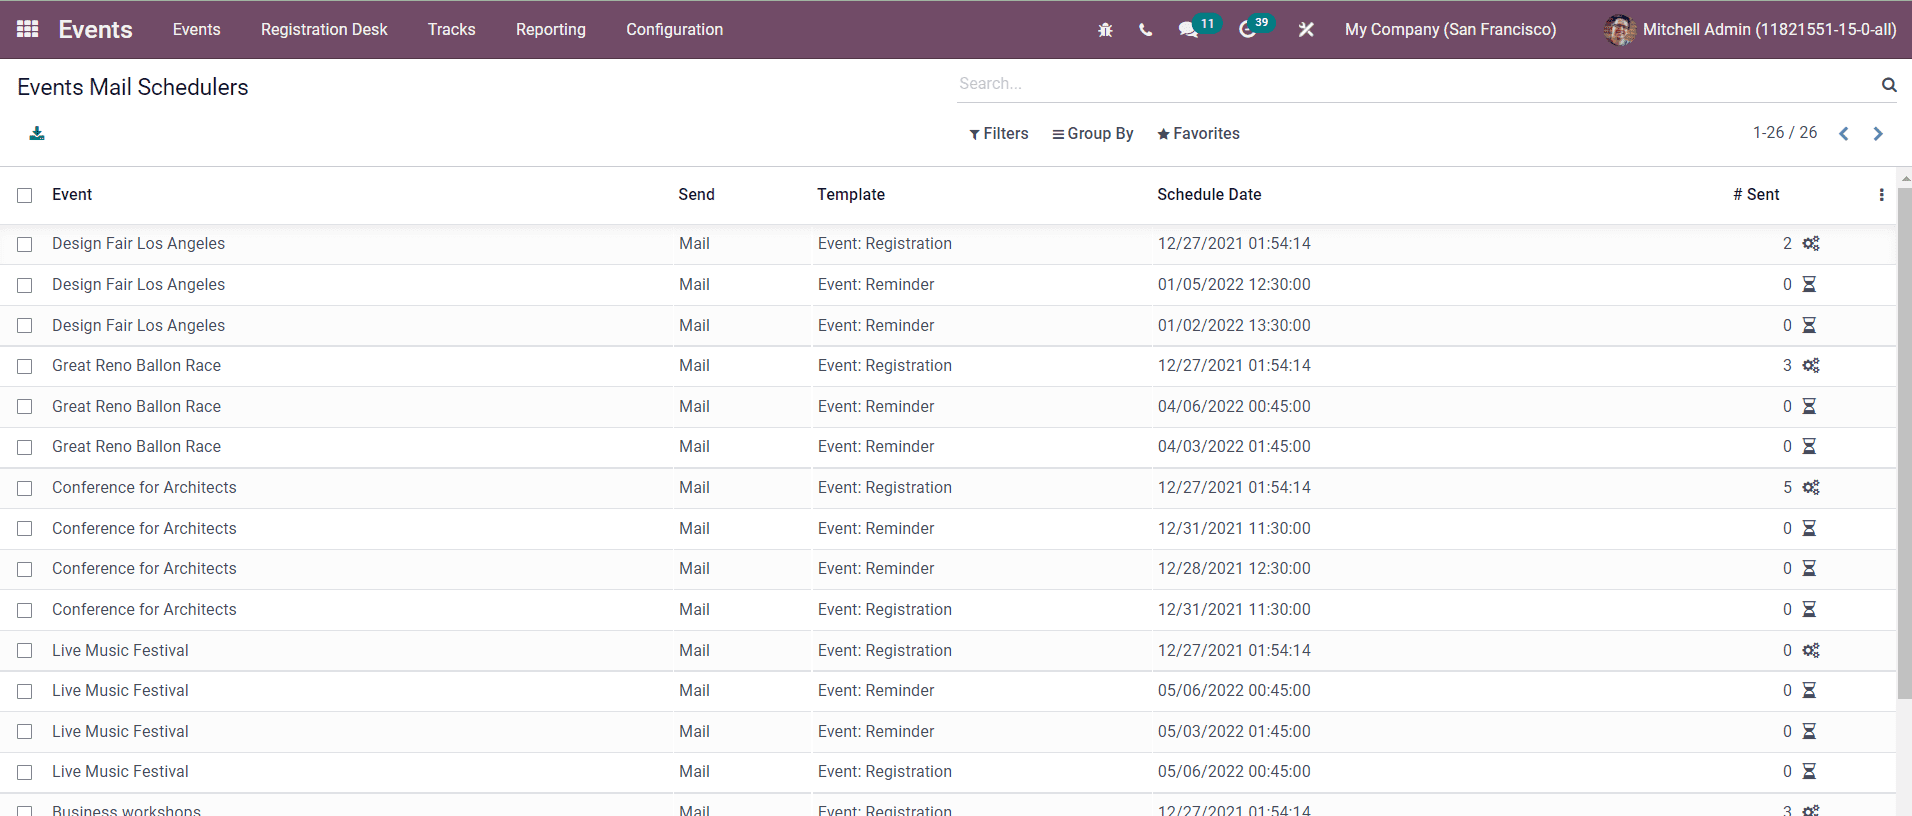
The preview of the list shows the Event name, Send, Template, Schedule Date, and the total number of mail/SMS sent.
Lead Generation
From the details of the attendees registered for an event, you can easily generate leads in Odoo. To set rules for lead generation, you can use the Lead Generation option available in the Configuration menu.

The list of already created Lead Generation Rules will be displayed on this platform. You will get the details about the Rule Name, Lead Generation Type, When to create the lead, Event Categories, Email, and Company. Use the Create button to set a new lead generation rule.
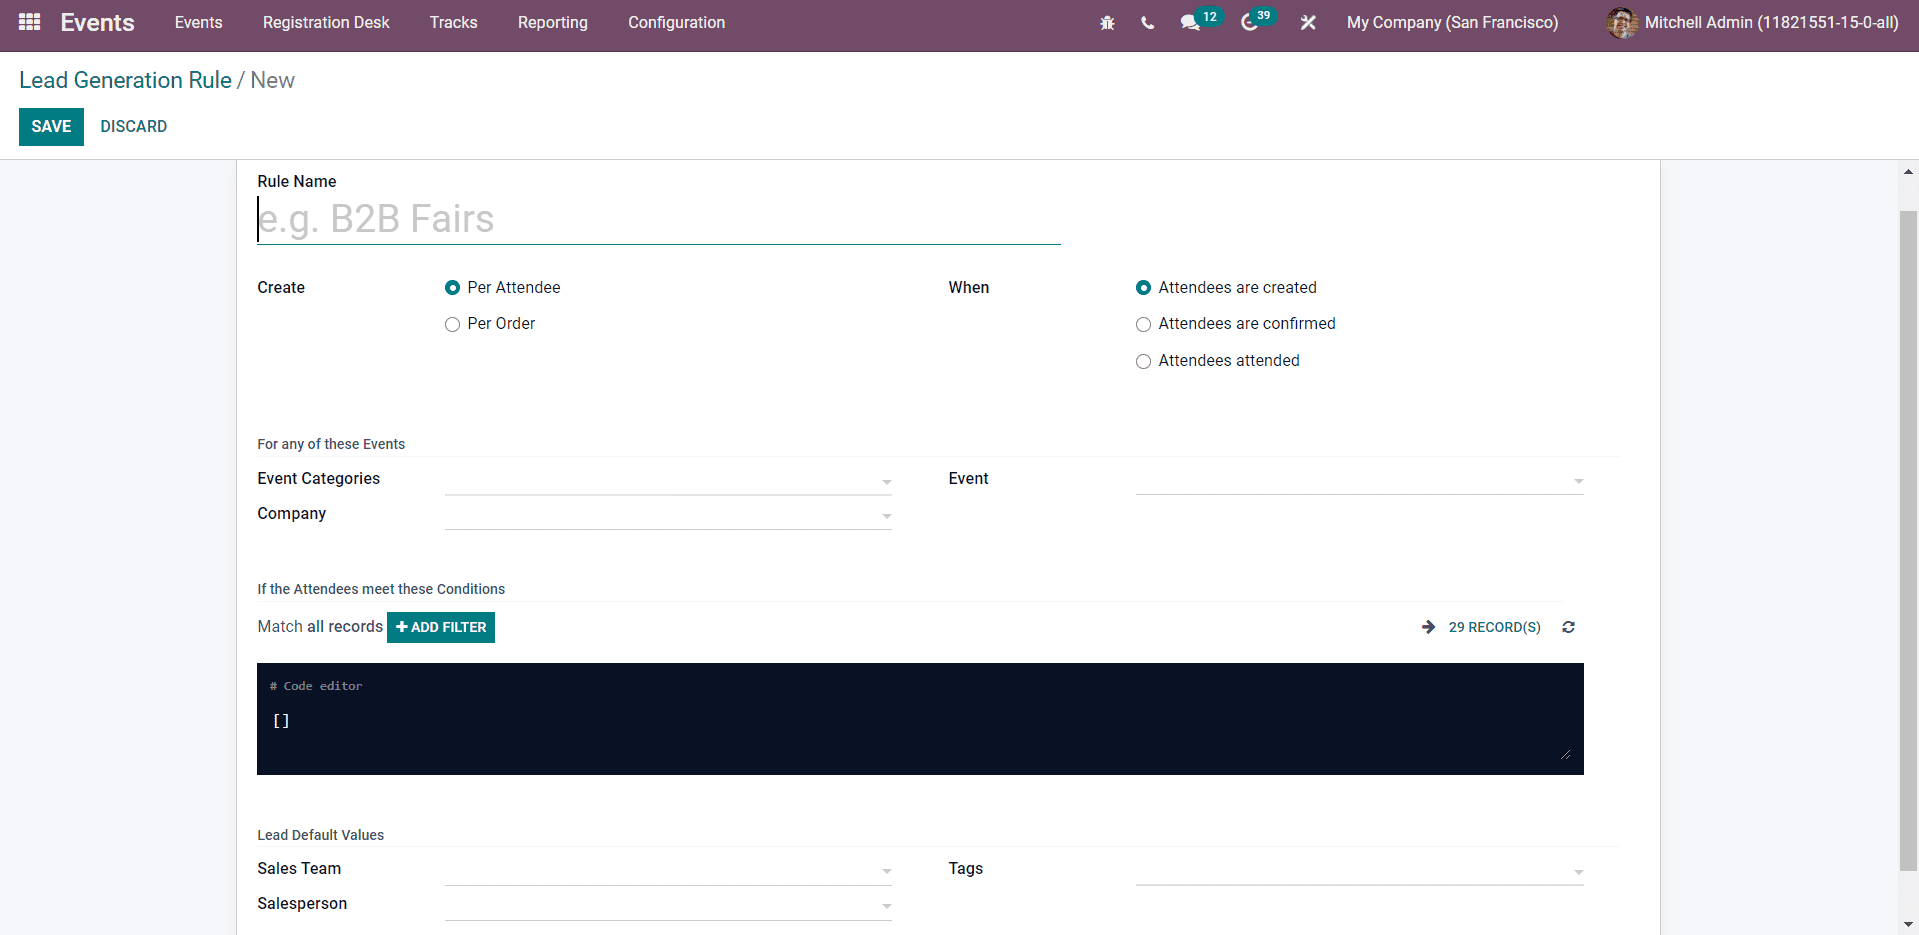
Initially, specify the Rule Name in the mentioned field. You can generate leads per attendee or per order. The lead can be created manually or automatically when the attendees are created, confirmed, or attended. These options can be set in the respective fields. You can mention a particular Event Category, Company, and Event, so that the Odoo can trigger this rule on all those attendees included in the mentioned event category, company, and event. Using the Add Filter option, you can also set conditions to filter attendees. To assign the created leads to a particular sales team and salesperson, you can mention them in the specified fields.
Similarly, you can also mention Tags for the leads in this window. Using the Save button, you can save the newly created lead generation rule.
Booths
You can configure booths for an event while creating a new event in the Odoo Events module. The configured booths will be available on the event web page. If any business firm or organization wants to promote or introduce their products or services to the attendees of a particular event, they can book a booth from the event web page. In the Events module, you can configure new booths from the Configuration menu.
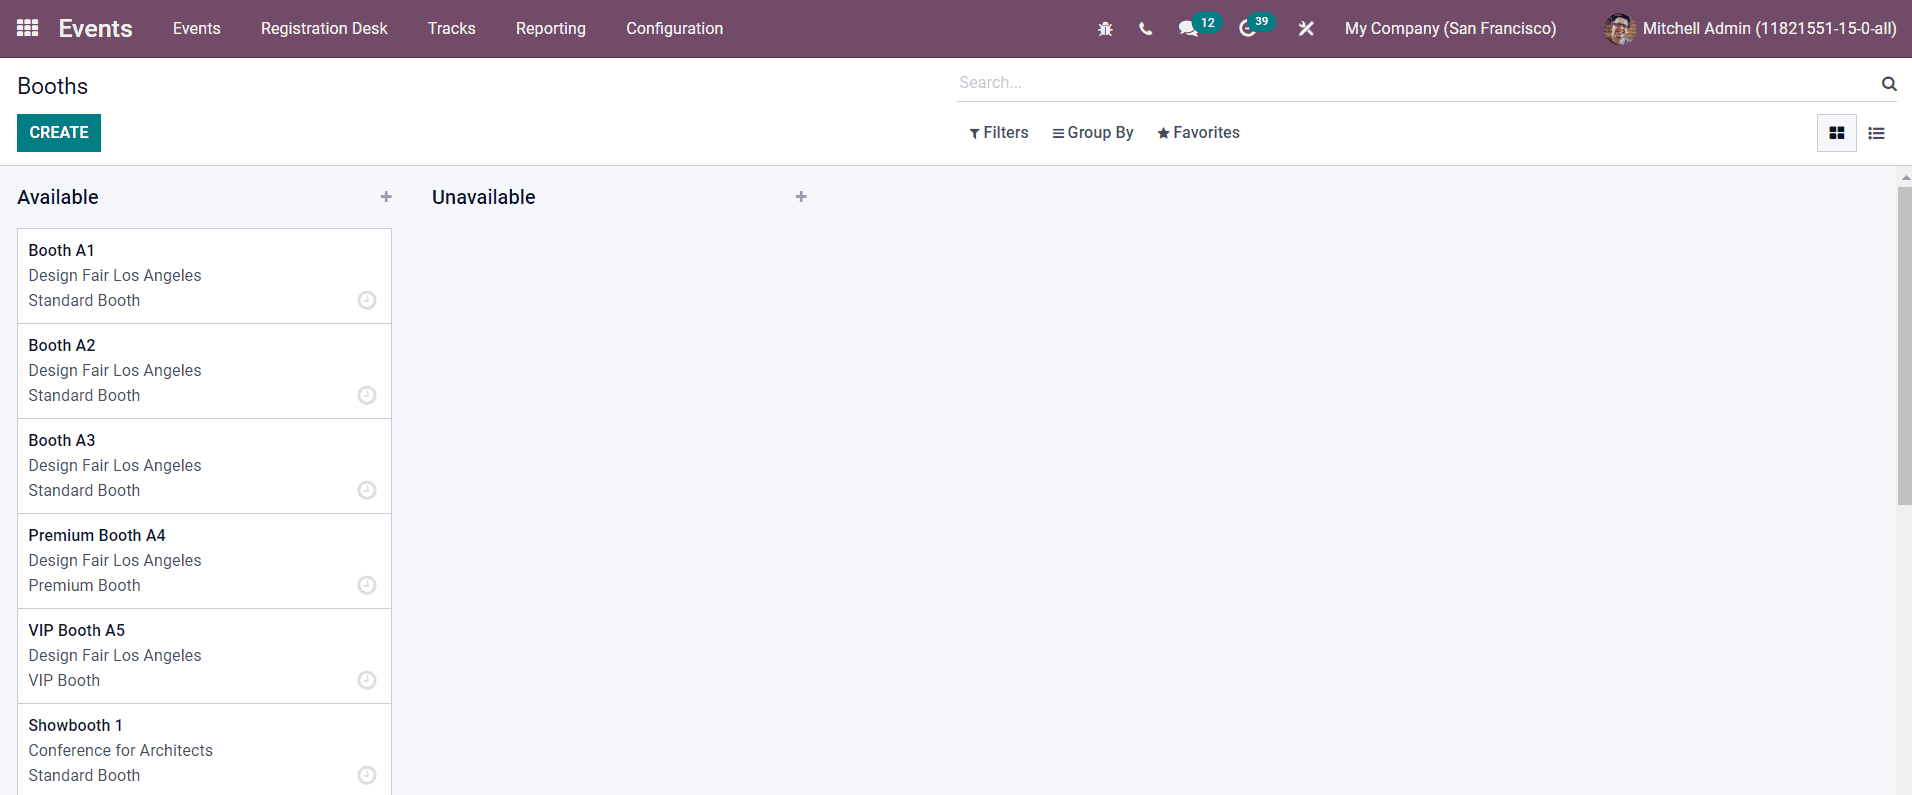
The Kanban view of the Booths window categorized the configured booths into Available and Unavailable categories. You are allowed to use the Filters and Group By options on this platform. It is easier to add a new booth to this window using the Create button.
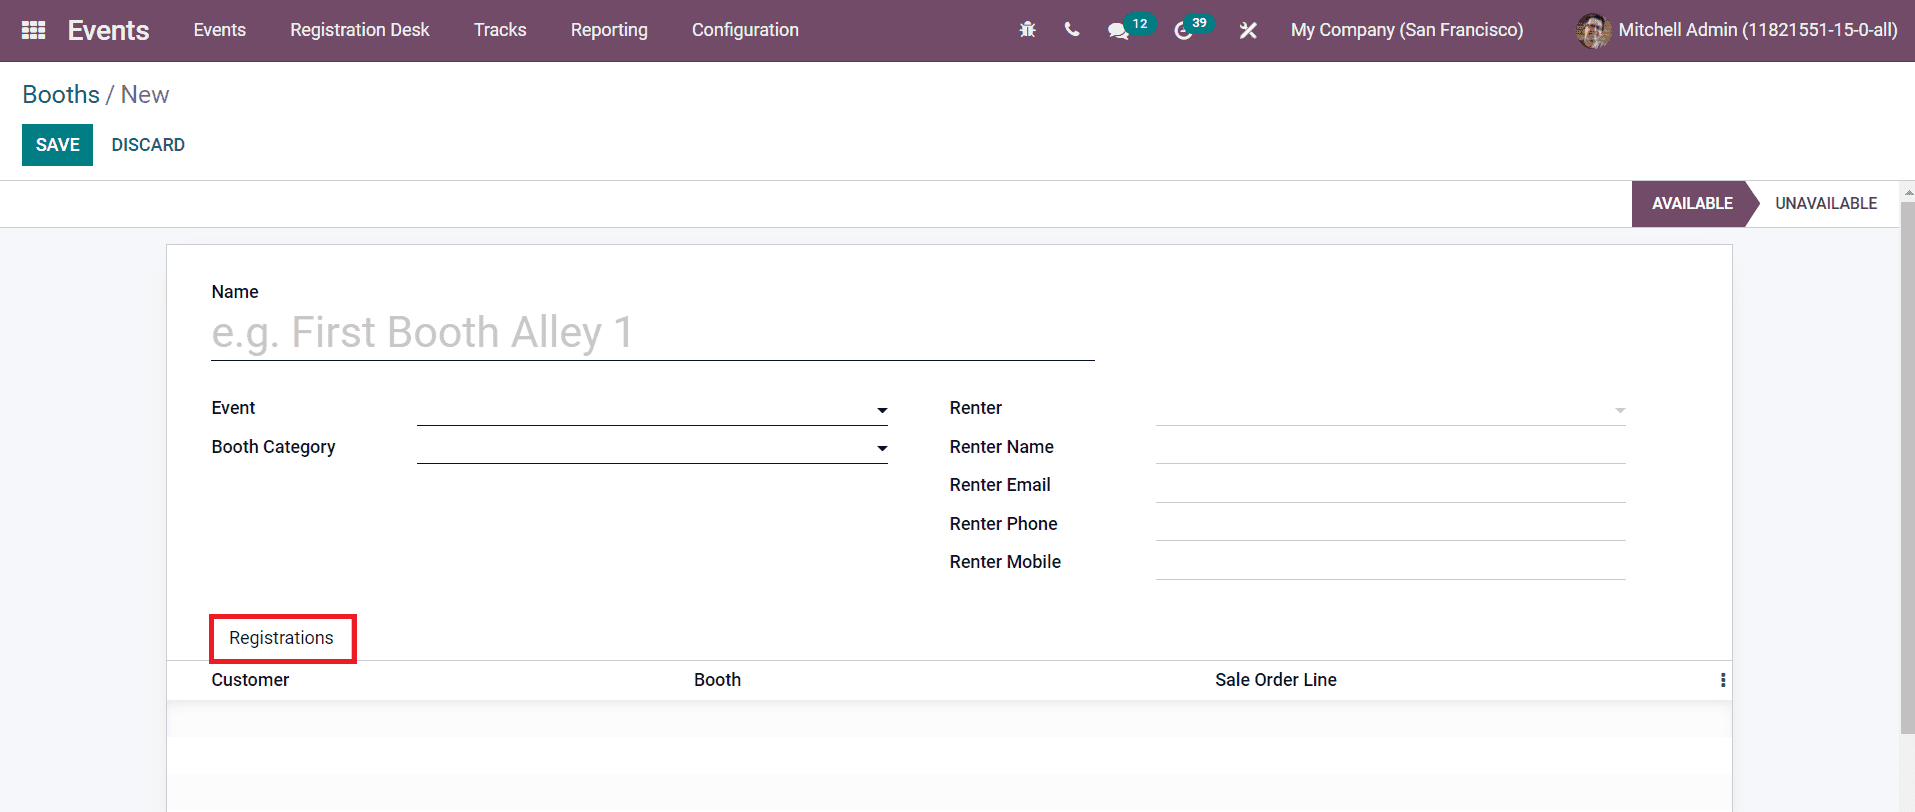
You can add the Name of the booth, Event, Booth Category, Renter, Renter Name, Renter Email, Renter Phone, and Renter Mobile in the corresponding fields. The details of customers who registered for this booth can be seen under the Registration tab. Click the Save button to save the new booth.
Booth Categories
In the Odoo Events module, you will get the Booth Categories option under the Configuration menu. This option can be used to categorize booths into different categories.

You will get the Name, Create Sponsor or not, Product, and Price details from this list. Click the Create button to create a new category for booths.
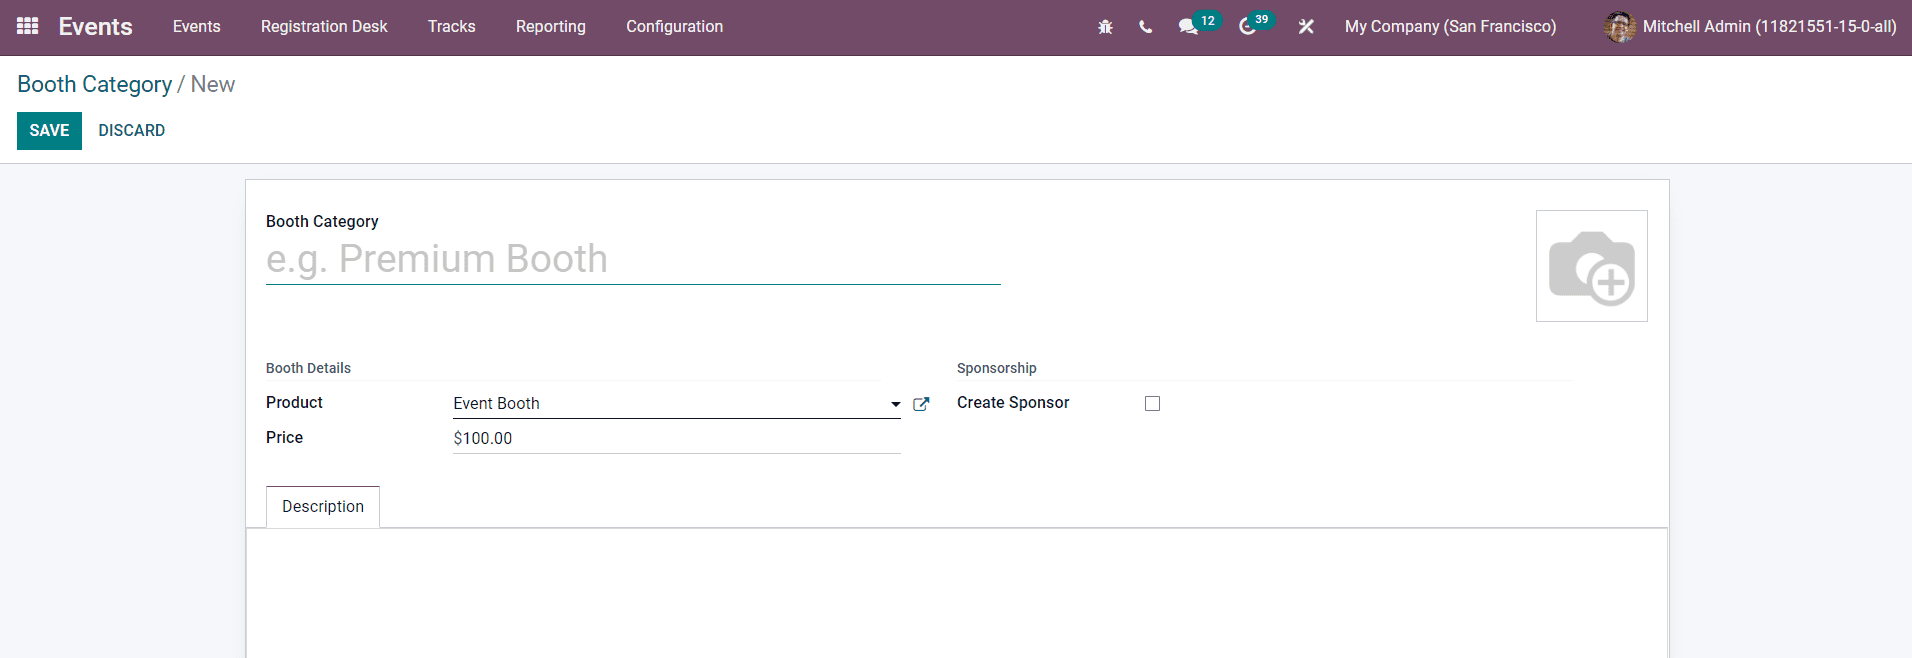
In this window, you can specify the Booth Category in the given space. In the Product field, you can configure the Event Booth as the product. Specify the Price of this booth category in the respective field. You can activate the Create Sponsor field. By doing so, a sponsor will be created when a user books a booth. Under the Description tab, you add more details about the booth category. The Save button can be used to save the new booth category.
Track Stages
Assigning different stages for the event tracks will provide a clear idea about the actions taken on an event track and where it has reached. In the Events module, you can use the Track Stages option from the Configuration menu to create and manage various stages for the tracks.

Already created stages can be seen in this window as shown in the screenshot above. Use the Create button to create a new stage.
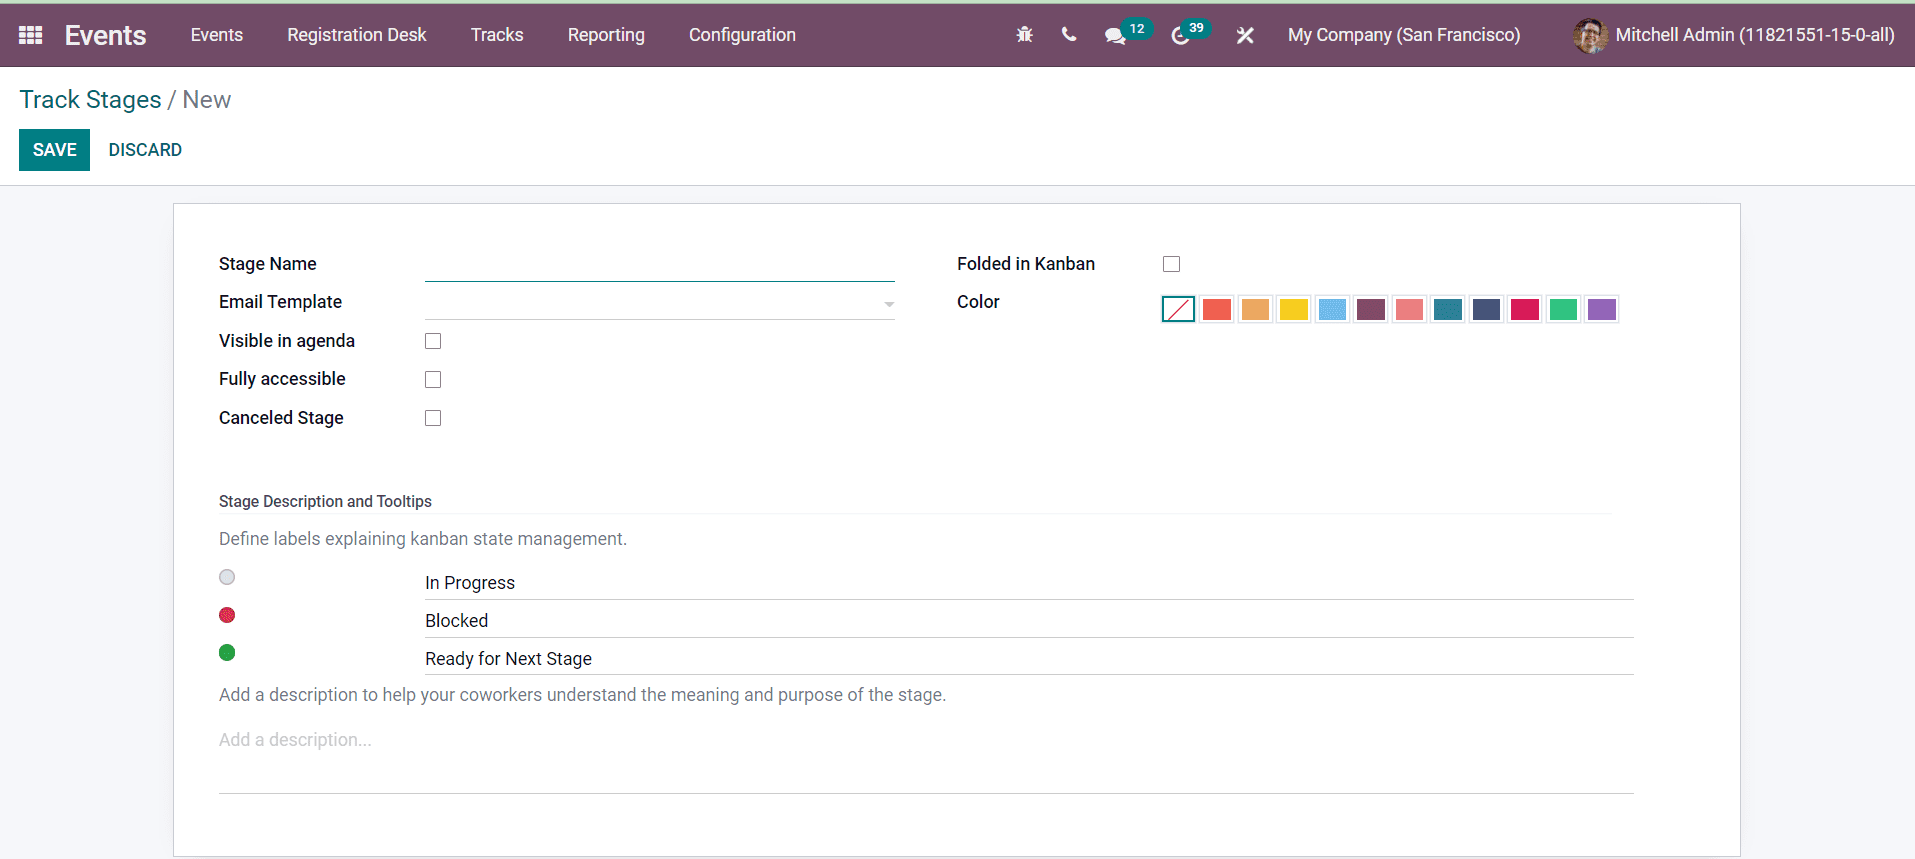
Define the Stage Name in the specified field. By adding an Email Template, Odoo will automatically send an email to the customer when an event reaches this stage. You can activate the Visible in Agenda field to make the related track visible in the frontend. The Fully Accessible field can be activated to provide access to the customers. If you activate the Canceled Stage, all canceled event tracks will be added to this stage. To fold this stage in Kanban view, enable the Folded in Kanban field. You can select colors for the stage from the Color option. Labels for the stage and Description of the stage can be defined under the Stage Description and Tooltips tab. After completing all fields, click the Save button.
Track Locations
When we create a new event or event track, it is very important to mention the location of the event. Such configured locations can be seen under the Track Locations menu.
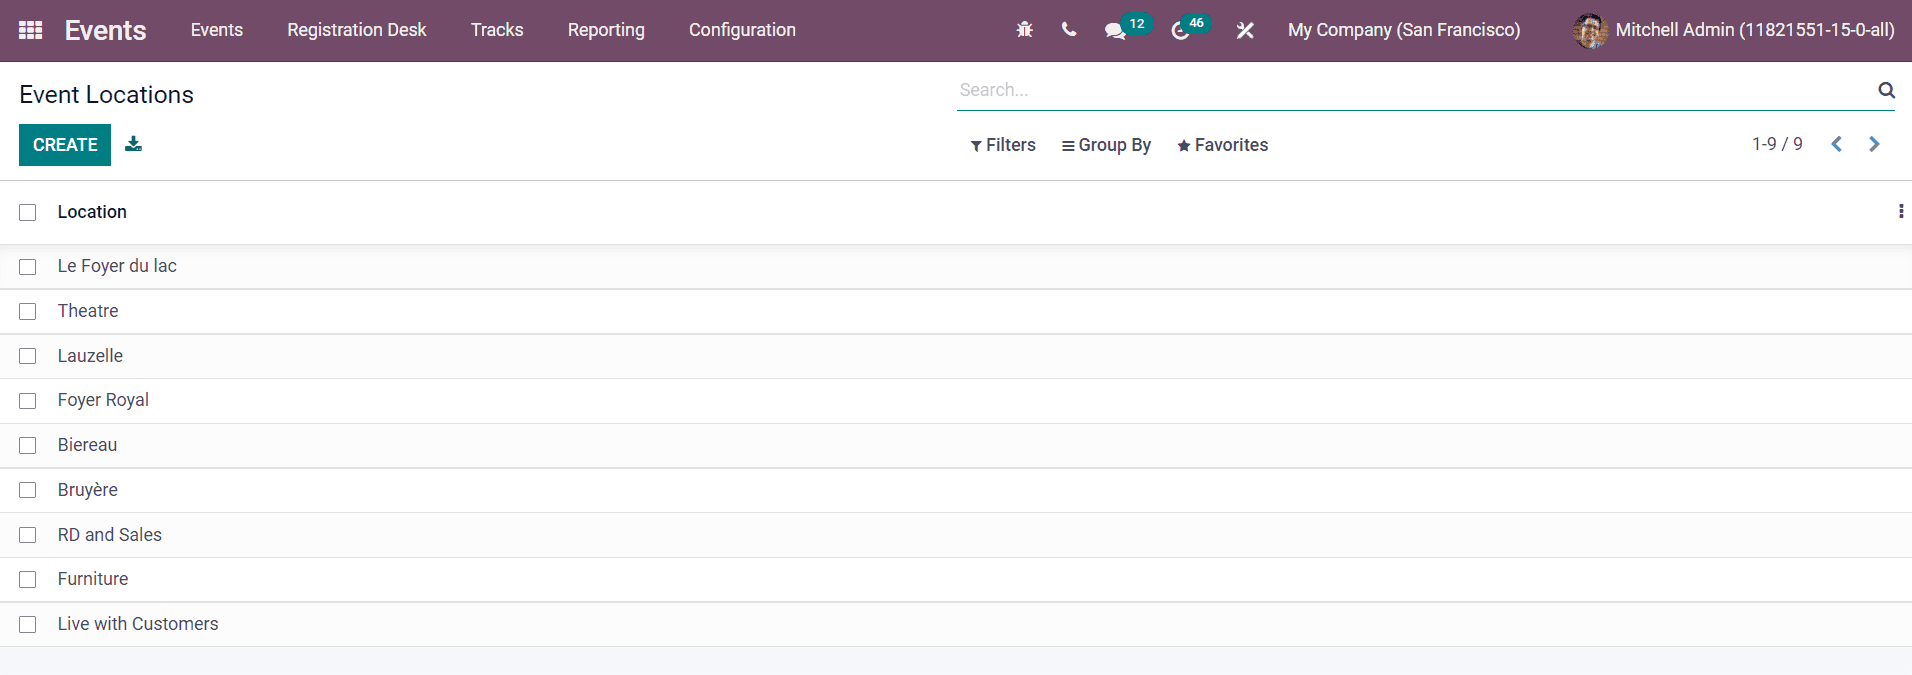
This list includes all locations of the events and event tracks created in the Events module.
Track Tag Categories
We already discussed the creation of Event Tag Categories earlier. Similarly, you can define categories for track tags also. For this, you can use the Track Tag Categories option from the Configuration menu.

The name of the category and tags included in each category can be seen on this platform as shown in the image above. Click the Create button to add a new track tag category.

You can specify the Name of the Category in the given field. Using the Add a Line, add tags for this category. After adding all details, click the Save button.
Now, using the Track Tags option from the Configuration menu, you can create and manage track tags easily.
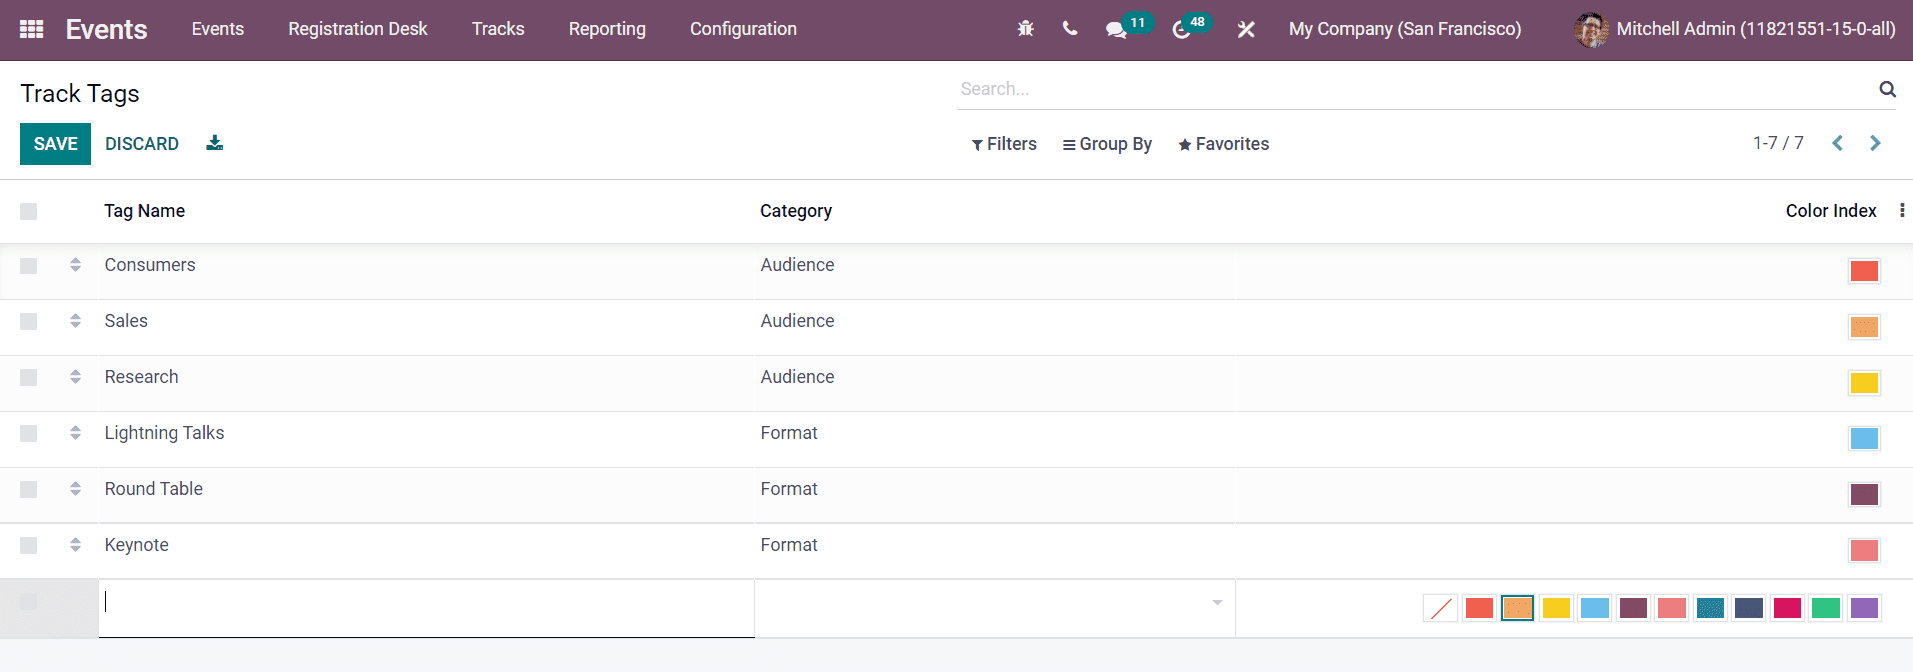
The list will show the Tag Name, Category, and Color Index. By clicking on the Create button, you will be able to get a new line below the existing list of tags where you can mention the name of the new tag. Select the category from the drop-down menu and add a color for the track tag. By clicking on the Save button, you can save the new tag.
Track Visitors
The Track Visitors option available under the Configuration menu will record the details of the visitors of a published track.

The list includes the Track Name, Visitor, Partner, and Quiz Points gained by each visitor. The âIs Wishlistedâ field will be marked as checked if the visitor added the track to their wishlist. You can see the âCompletedâ field as checked if the visitor completed the track.
Sponsor Levels
In the Events module, you can easily allocate different levels for the sponsors of the events. This can be done under the Sponsor Levels option given in the Configuration menu.

You will get the list of all levels created for the sponsors and their ribbon style as shown in the image above. Using the Create button, you can add a new level for sponsors.
Event Quizzes
Odoo will record all quizzes created for different events, under the Event Quizzes platform. You will get the list of all quizzes from various events as shown below.

You will get the Name, Event, and Event Track details of the quiz from the preview of the list.
The questions created for different quizzes can be obtained from the Event Quiz Question platform.

As you can see in the image, this window will show all questions and respective quizzes. You will also get the details of the number of points awarded for each question on this platform.
Website Menus
The Website Menus option in the Configuration menu will record the list of all menus that are configured on the webpage of the events created in the Events module.
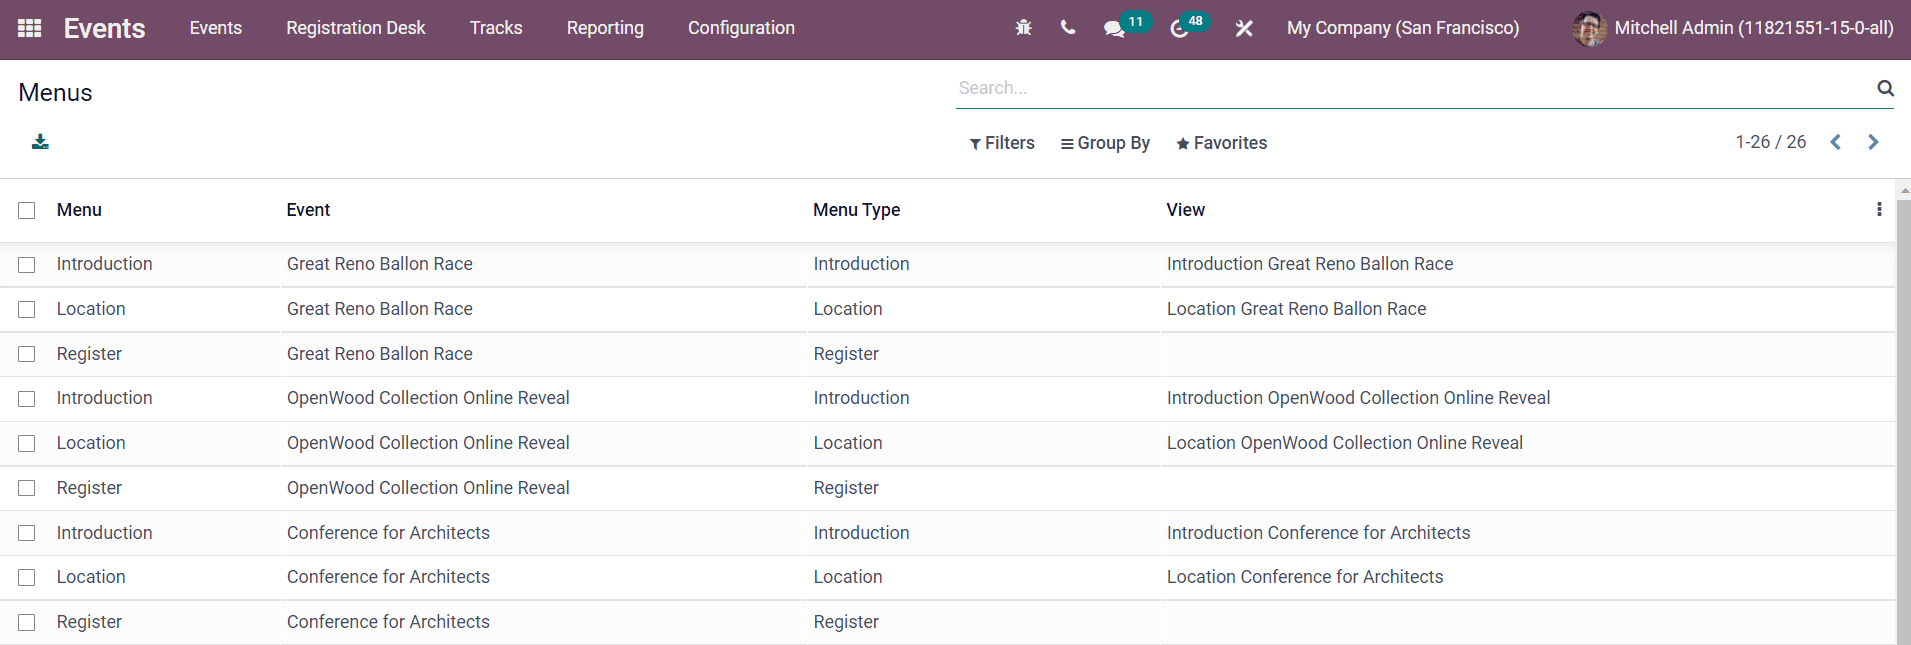
This list included the name of the Menu, Event, Menu Type, and View.
These are the configurations available in the Odoo Events module. Now, letâs detail the Reporting feature available in the module.