-
- Abundante
- Adquirentes de pagos
- Ajustes
- Analítica
- Citas en línea
- Comercio Electrónico del Sitio Web de Odoo
- Configuración el Sitio Web de Comercio Electónnico
- Diseñe la Página de Su Sitio Web
- Gestión de Productos
- Gestión de Varios Idiomas
- Grupos
- Herramientas de fragmento
- Lista de precios
- Listado de productos
- Métodos de envío
- Múltiples compañías
- Múltiples sitios web
- Operaciones de blog en backd
- Pedido
- Personalización de la Página del Catálogo de productos
- Personalización del catálogo de productos
- Personalizar el menú y las apariencias
- Porcos
- Programas de cupón y promoción
- Publicar contenido específico para el sitio web
- RedirracionAmiento
- Salas de chat
- Sesión de Productos en la PESTAÑA CONFIGURACIÓN
- Sitio Web
- Tablero de Comercio Electrónico
- Tarjeta de Regalo
- Twitter Wall
- Visitantes
- Vistas de la Página
-
- Activo
- Adquirentes de pagos
- Biblioteca de contabilidad
- Catálogo de cuentas
- Conabilidad miscelána
- Configuración de Datos Bancario
- Contabilidad
- Contábilidad analíta
- Diario
- Estados de Cuenta Bancario
- Factura de Clientes al Pago
- Fechas de Bloqueo
- Fiscales de posiciones
- Gastos de Empleados
- Informa de de Socios
- Informa de seguimiento
- Informa en contabilidad
- Ingresos y Gastos Diferidos
- Mandatos de débito directo
- Notas de Crédito
- Pagos
- Pagos por lotes
- Presupuesto
- Reconciliatura
- Redondeo en efectivo
- Tablero de contabilidad
- Tipos de contabilidad
- Transferencias automáticas
- Términos de Pago
-
- Abundante
- Adquisico de Plomo
- CREACIÓN DE COTIZACIONES DE VENTAS
- CRM
- Caracteríssticas de Odoo 15 CRM
- Convertir LOS Cables en Oportunidades
- Cómo Odoo CRM Gestiona Las Oportunidades Perdidas
- FluJo de trabajo general de Odoo CRM
- Formulario de generación de plomo múltiples fuentes
- Funcionando -Con Clientes Potenciales
- Manejo de Liderazgo
- Nuevas Opciones en la ventana de configuración de Odoo 15
-
- Análisis de producción
- CREANDO CENTROS DE TRABAJO
- Fabricación
- Facturas de materiales
- Gestión de Chatarra
- Gestión de Mantenimiento
- Gestión de órdenes para no consultor
- Informe General de Efectividad del Equipo
- Pedidos de Fabricación
- Planificación de Pedidos Laborales por producción
- Planificación de órdenes de Trabajo por WorkCenter
- Programa de producció Maestra
- Órdenes de Trabajo
-
- Abundante
- Ajustes de Inventario
- Anuncios
- CARACTERÍSTICAS DEL MÓDULO DE INVENTARIO DE ODOO
- Categorizacia de productos
- Categorías de Almacenamiento
- Configuración del producto
- Confirmación de SMS en la Entrega
- Confirmación por Correo Electrónico en la Entrega
- Costos de Aterrizaje
- Empaquetado del producto
- Entrega
- Entregar Paquetes
- Estategias de Eliminación
- Gestión de Almacenes
- Gestión de Chatarra
- Integrando el Remitente de Terceros en Odoo
- Inventario
- Operaciones de inventario
- Planificadores
- Reglas de Caída
- Reglas y rutas
- Tiempos de Programació
- Trazabilidad del Producto
- Ubicacia
- Unidad de Medida
- Variantes de productos
-
- APEGO Salarial
- Abundante
- Configuración
- Contratos
- Entradas de Trabajo
- Estructuras salariales
- Información personal
- Nómina de Odoo
- OTROS TIPOS DE ENTRADA
- Parámetros de la regla salarial
- Reanudar
- Salarios de reglas
- Salpicaduras
- Tablero
- Tiempos de Trabajo
- Tipo de estructura salarial
- Tipos de Entrada de Trabajo
- Ventajas
Creating New Applications in Odoo 15 Studio
Creating new applications with the Studio module
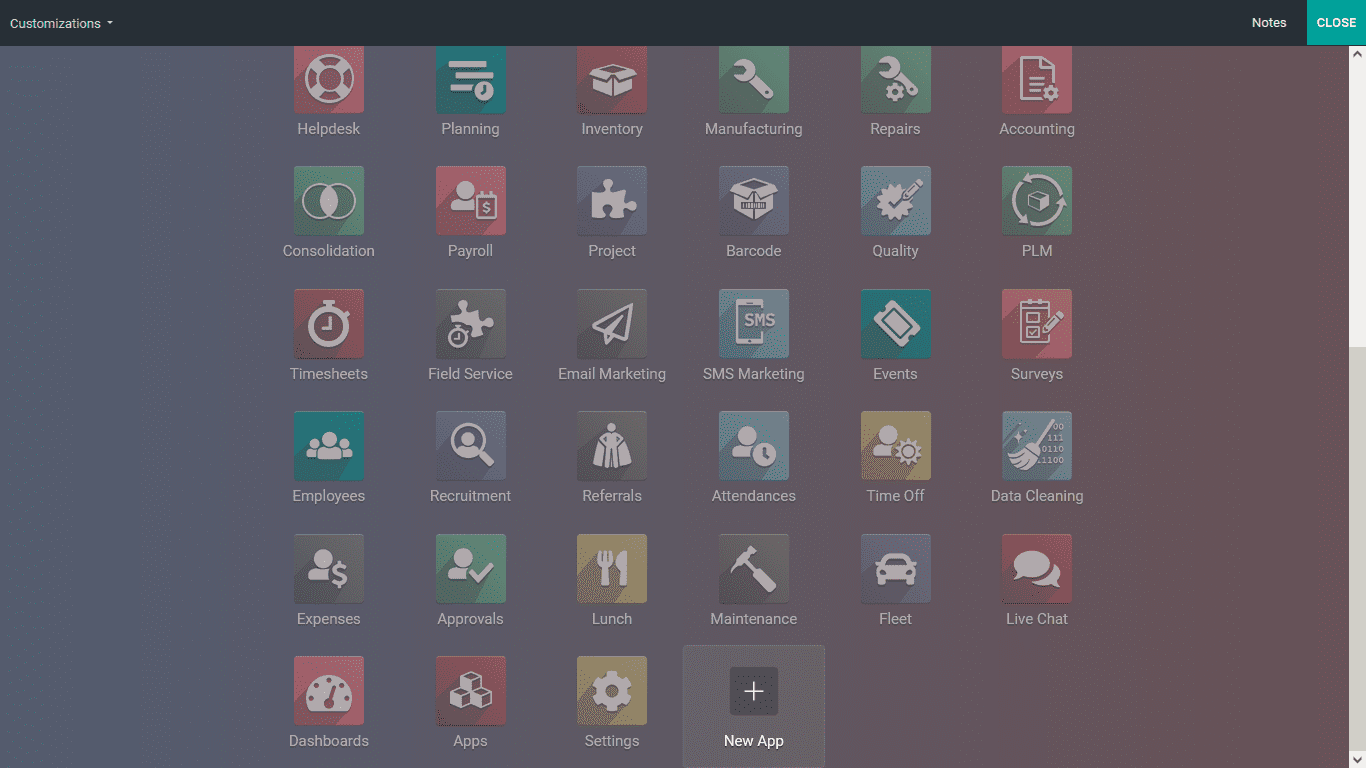
El módulo de estudio de Odoo viene integrado en la edición de Odoo Enterprise, que ofrece el Capacidad completa para crear y definir aplicaciones personalizadas basadas en la funcional requisitos.La infraestructura simple de arrastrar y soltar del módulo de estudio garantizará que múltiples capacidades se pueden definir en función de las necesidades funcionales de la plataforma. Además, con el módulo de estudio de Odoo, podrá crear varias aplicaciones basado en los requisitos operativos y funcionales de la operación.Para crear un nuevo Aplicación, puede seleccionar el módulo Studio y se representará con la opción Para agregar una nueva aplicación como se muestra en la siguiente captura de pantalla.
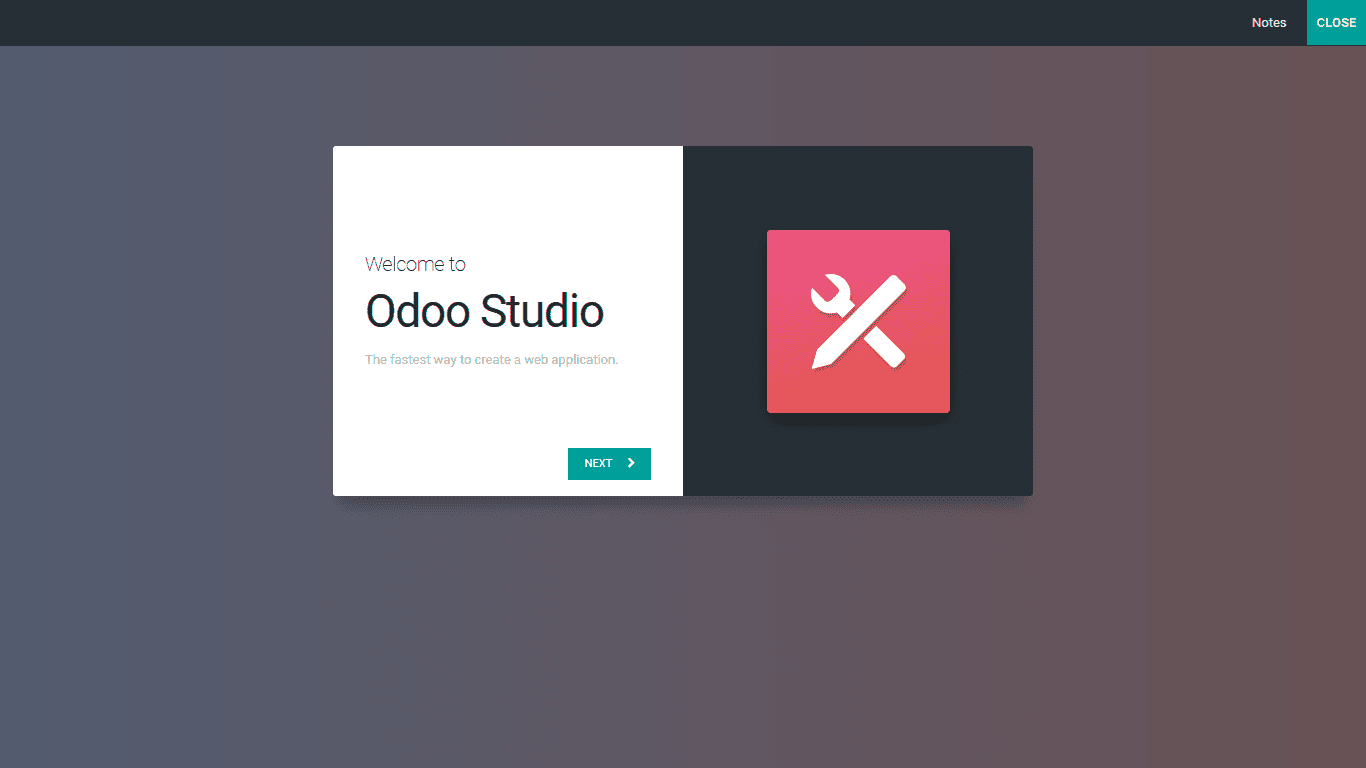
Al seleccionar la opción Agregar nueva aplicación, se lo representará con la ventana donde Odoo Studio le da la bienvenida a elaborar una nueva aplicación basada en sus necesidades.Seleccione el siguiente Opción disponible y comience a elaborar nuevas aplicaciones según sus necesidades.
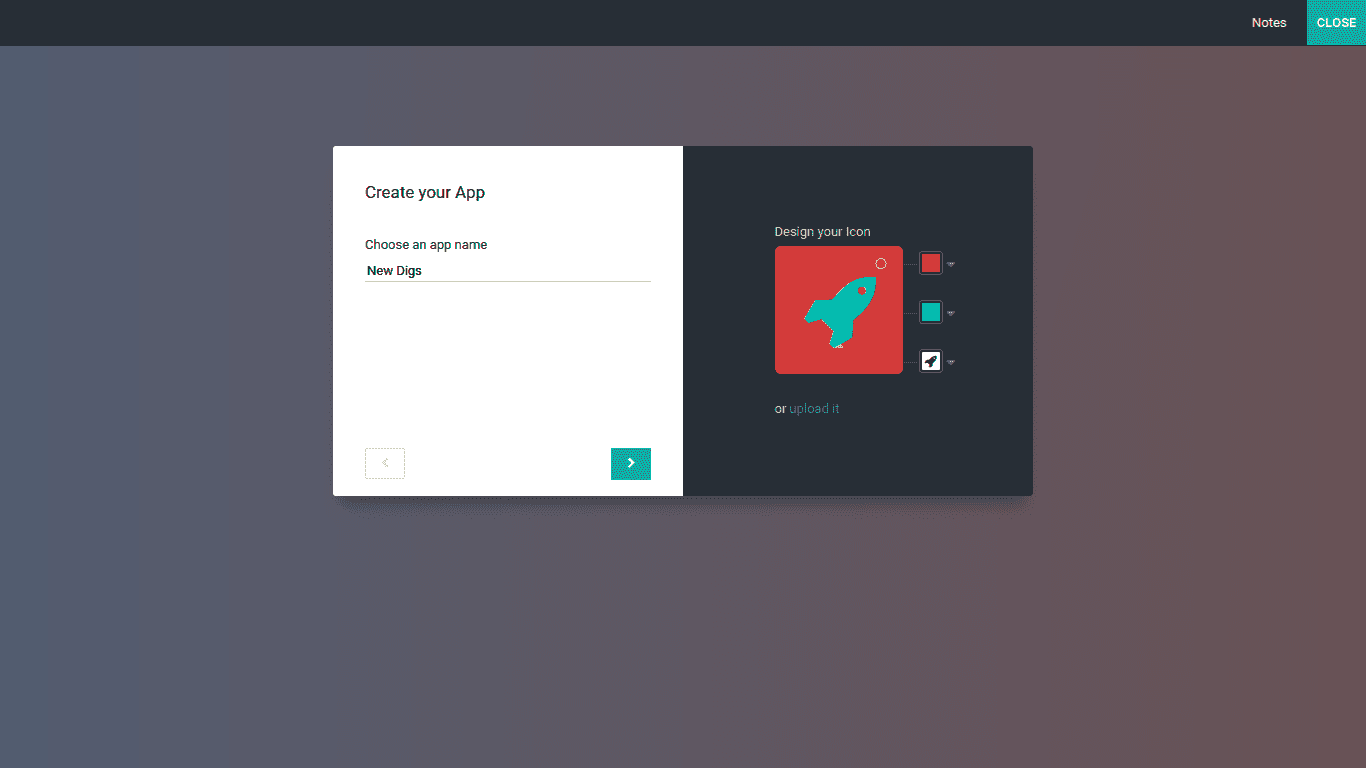
Inicialmente, debe proporcionar un nombre para sus nuevas aplicaciones y el icono para ello, que se puede crear con la ayuda de las herramientas predeterminadas disponibles, o una imagen puede ser Subido desde las ubicaciones del servidor local para ser el icono que le proporciona una autonomía completa y libertad para los aspectos de la nueva creación de aplicaciones.
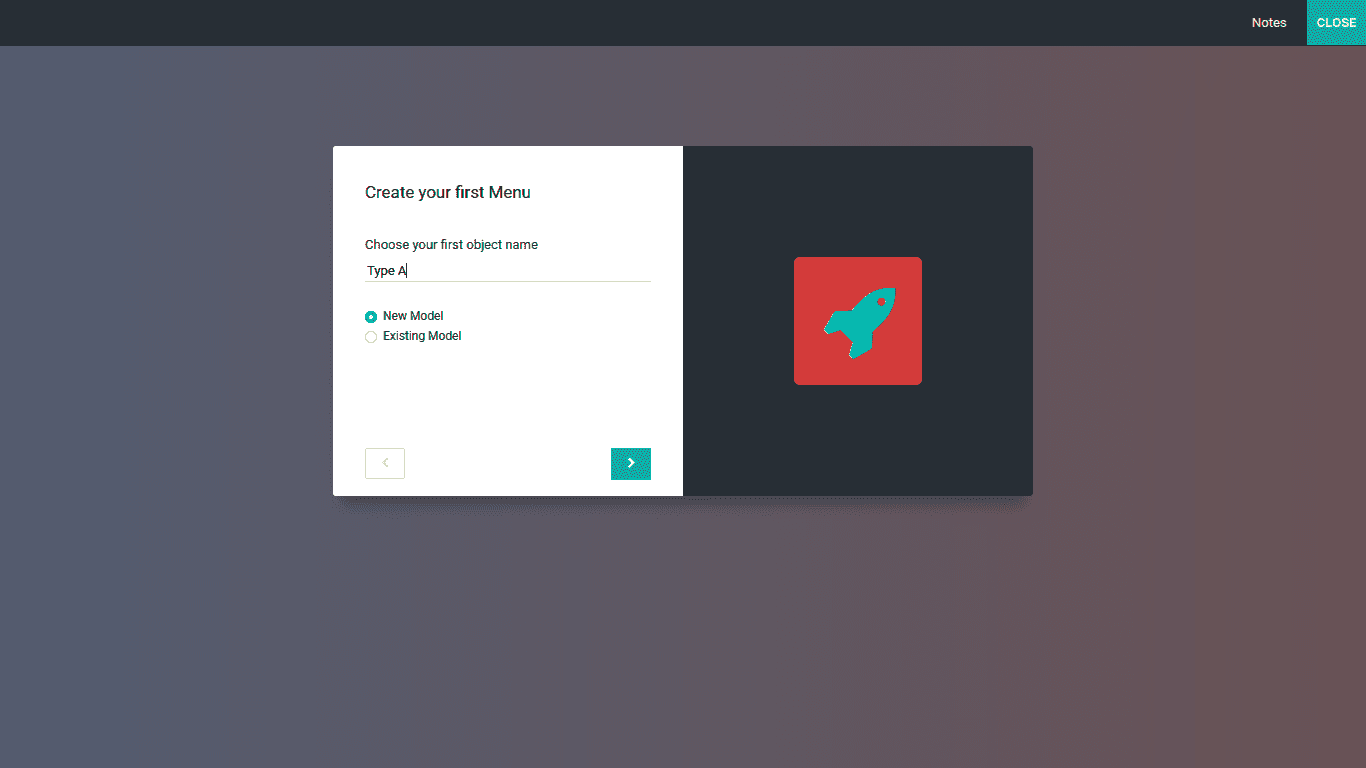
Una vez que el nombre y el icono de la nueva aplicación tienen lo siguiente existente, lo hará tengo que crear su primer menú, que se puede hacer después de seleccionar la siguiente flecha como representado en la captura de pantalla anterior.Aquí debe proporcionar el primer nombre del objeto en el Sección respectiva como se describe en la siguiente.Además, debe definir un modelo, Ya sea un nuevo modelo o un modelo existente.Y finalmente, seleccione la siguiente flecha Opción, que lo llevará al menú donde puede configurar el modelo.
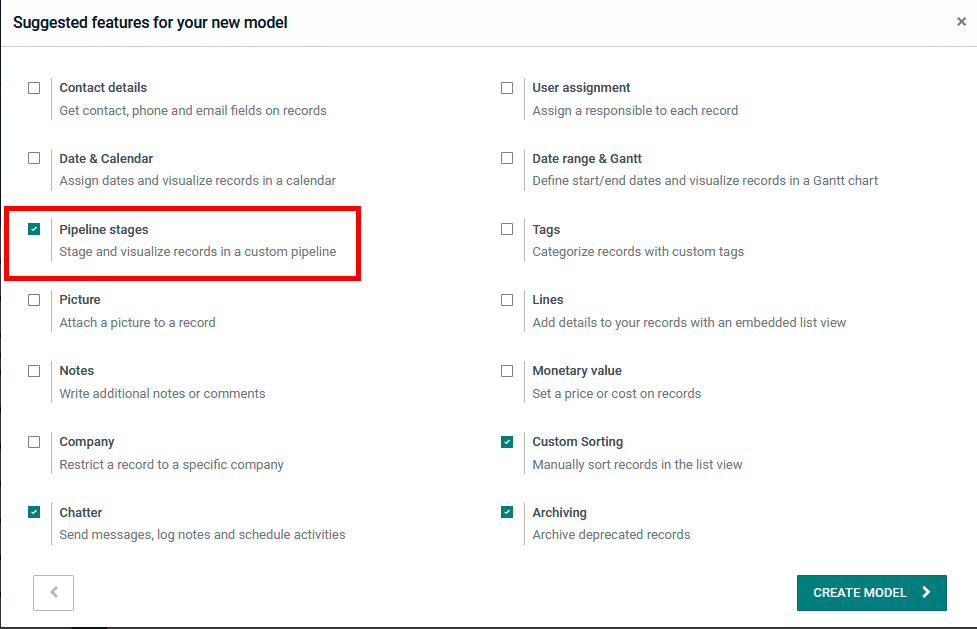
En el menú de configuración para el modelo, se lo representará con ciertos sugeridos características que se pueden incluir.Estas características se pueden habilitar o deshabilitar según el necesidades operativas y funcionales de la plataforma.Aquí puede habilitar o deshabilitar el Características como datos de contacto, asignación de usuario, fecha y calendario, rango de fecha y gantt, Etapas de tubería, etiquetas, imágenes, líneas, notas, valor monetario, empresa, clasificación personalizada, Chatter, Archiving y muchos más basados en las sugerencias proporcionadas.
The Contact Details feature can be enabled to a definite Field where the Contact Details can be defined for the respective menu which will be helpful if the customer fills in their information in the application. With the User assignment feature, you will be able to assign a dedicated User i.e. an employee of the organization to be responsible for maintaining and checking on the record. The Date & Calendar field can be used to define the date through the calendar which will be opened up to be selected by the user. The Date range & Gantt will be helpful in describing the start Date as well as the End Date of the respective aspects along with a view of the dates in a Gantt view. This will be helpful in knowing a clear insight on the Dates which have been defined. The Pipeline stage is a Field that has been defined in operations depicting the stage of respective entries which have been defined. This will provide information of the entry in the respective menu thus indicating the current stage which can be changed by selecting the stages. Moreover, the stages of the Pipeline can be custom-defined based on the operational need.
The Tags field can be described in the new application window which will ensure that the entries which are being defined have tags associated with them which will be helpful in the filtration as well as grouping aspects. In the Picture field the picture of the respective entry whether itâs a product or the contact information. In the Lines section, the respective lines of information or a description of any aspects can be defined, this may be the product description, address lines, terms, and conditions, or any other aspects in concern to the entry which is being described. In the Notes Field, the defined notes on the entries can be described which will provide information to the users as well as other users when they are functioning with the respective entry. The Monetary value Filed where the Value of the product or an asset can be described, this feature will help to define the price of the respective entry let it be a product, service, or an entry of any form.
The Company Field will allow you to define the company in which the respective entry is associated. This will be helpful for the operations of the business where there are multiple companies of functioning being defined. The Custom Sorting aspect of the entries being defined will be helpful in the menu where all the entities are defined. Moreover, the respective Custom Sortings can be saved based on the need and altered at times. Chatter functionality can be enabled which will ensure that the users or the customer have a chatter field where the users can communicate with each other. The Archiving field will ensure that the respective entries will be Archived for it to be used at a specified time of operation by Unarchiving it.
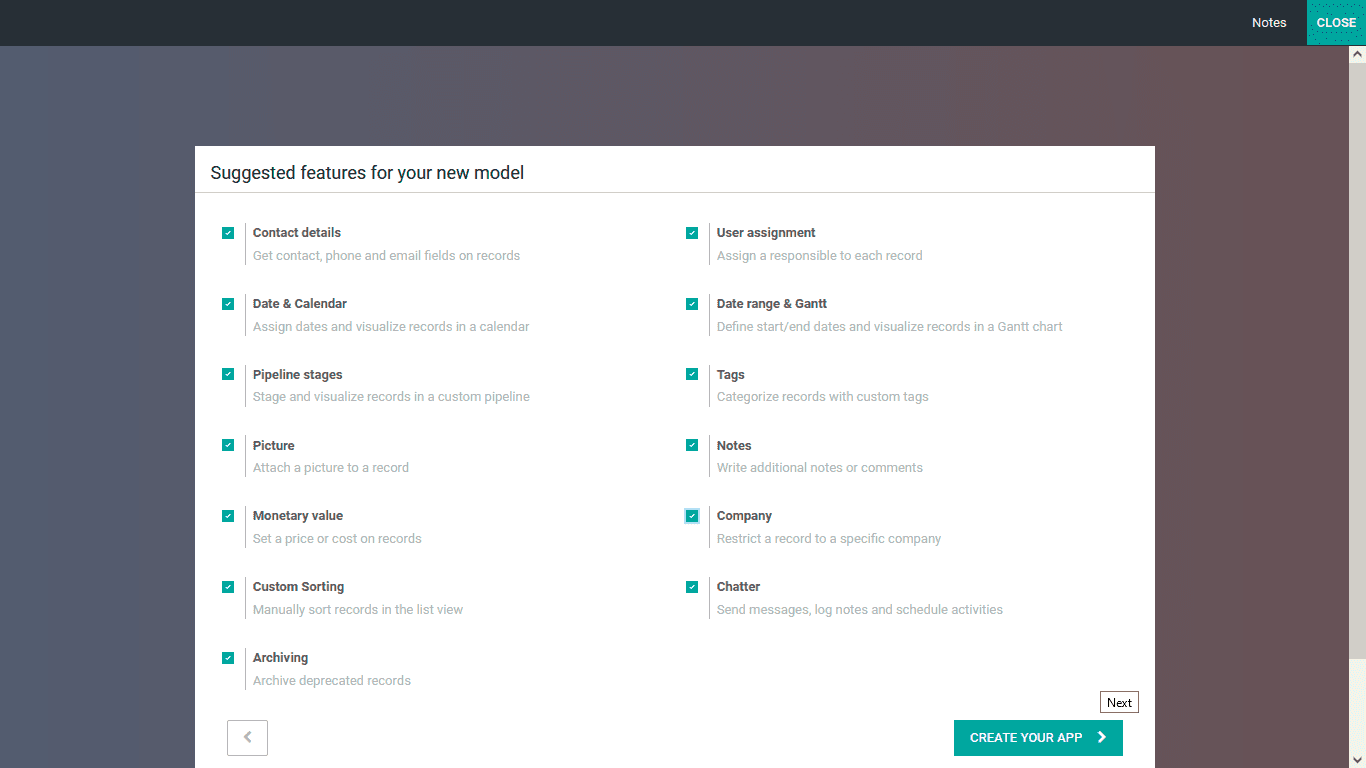
Once the configuration-based options are undefined and the ones that are enabled, the next stage will move further with the aspects of the creation of the new applications. You can select the Create Your App option available as depicted in the above image. You will be driven to the App configuration window, as shown in the following screenshot.
Here you will have the provision to add the Field based on the operationâs needs. Initially, the components required for the applicationâs operations, either Tabs or Columns, can be selected, dragged, and dropped in the desired location of the Application window as depicted on the right side of the following screenshot. You can add in the New Fields by selecting the respective icon from the menu and drag and dropping it in the desired location of the application. If you have chosen an existing model for your application, you will be depicted with the Existing Fields, where all the defined fields can be viewed and used again based on the modifications needed.
Furthermore, the stages of operation of the menu of the respective application can also be changed based on the need, and the Log aspects of the menu of the respective application, which is depicted on the lower side of the menu, can also be crafted based on the needs.
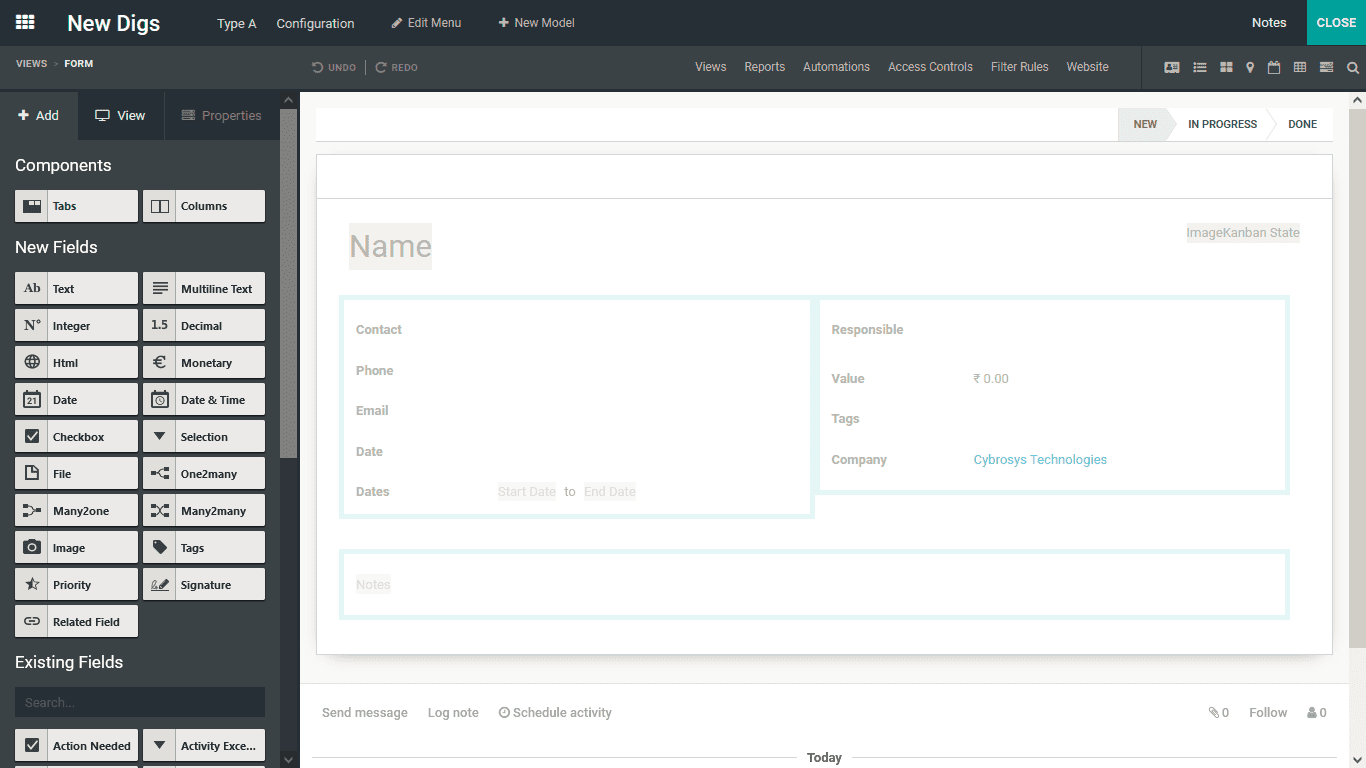
The + Add functional menu available will help you bring new elements to the application window based on the need. Initially, you can add the Tabs and Columns based on the applicationâs functional requirements. The Tabs are helpful in collaborating multiple information to the application which has been developed. Moreover, the available options in the application can be sorted based on the operational and functional needs on the respective tabs. These can be custom build tabs based on the applicationâs requirements and usage.
Further, the different Columns of operations can be defined where the various sections in each of the application menus can be described. This will bring a distinctive style and an arrangement to the tabs and the menus, along with the related options. Moreover, the Columns can be configured based on the operational needs of the application and what the creator intends to do with it.
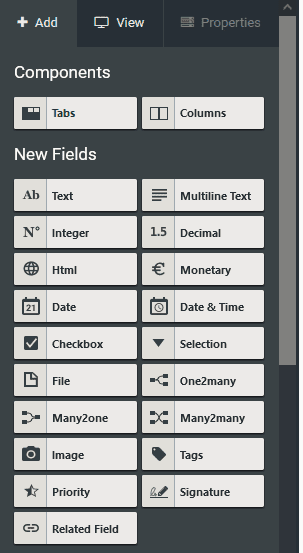
Once the Tabs and Columns are being described which can be done by selecting the respective one and dragging and dropping into the operations are of the application. The further configuration aspects of the respective Tab and the Column which is being defined will ensure that the operational aspects are based on your functional needs The next step is to define the Fields, where you can bring in New Fields and define the Existing Fields and create new ones based on them. All the Fields that are not described in the application will be depicted in the New Fields section. The Existing Fields are the ones that are already defined in the model which you have selected if the model is already existing in the Studio application. However, if you are selecting a new model to be in operation, there won't be any Existing Fields to be depicted. You can simply select each of the Fields and drag and drop it to the desired location in the application window, specify and use multiples based on the functional and operational needs of the application. You can add fields such as Text, Multiline Text, Integer, Decimal, Html, Monetary, Date, Date & Time, Check Box, Selection, File, One2many, Many2one, Many2many, Image, Tags, Priority, Signature, Related Fields any many more can be defined. All the Fields which are not being defined in the New Fields will be defined in the Existing Fields.
As we have selected an Existing module for the application developed, the Existing Fields will be defined. All the defined Fields of the module will be depicted in the Existing Fields section over here. You can define the Fields such as Action Needed, Activity Execution, Activity Stage, Activity Type, Attachment, Created by, Created On, Display Date, Followers, High Priority, Icon, ID, Is Follower, Last Updated Date, Last Updated Time, Mian Attachment, Message Delivered, Next Activity, Next Activity Date, Number of Execution, Responsible Person, Sequence SMS Delivery, Unread Message, Website Message and many more.
These Fields have already been defined in the model that we have selected. Moreover, each field can be used multiple times regarding the operation tools functions based on the needs.
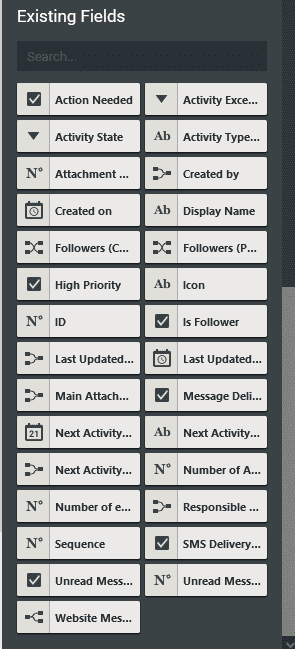
You can define the required Fields, whether following an existing Field or a New Field, into the application by dragging and dropping them to the required spaces of the application window. Moreover, the functional configuration aspects regarding the operations of the applicational options can be effectively done by an Odoo developer if the user has the right on the operational aspects of the various Fields as operational and configurational aspects. The following screenshot describes the Fields defined in the application.
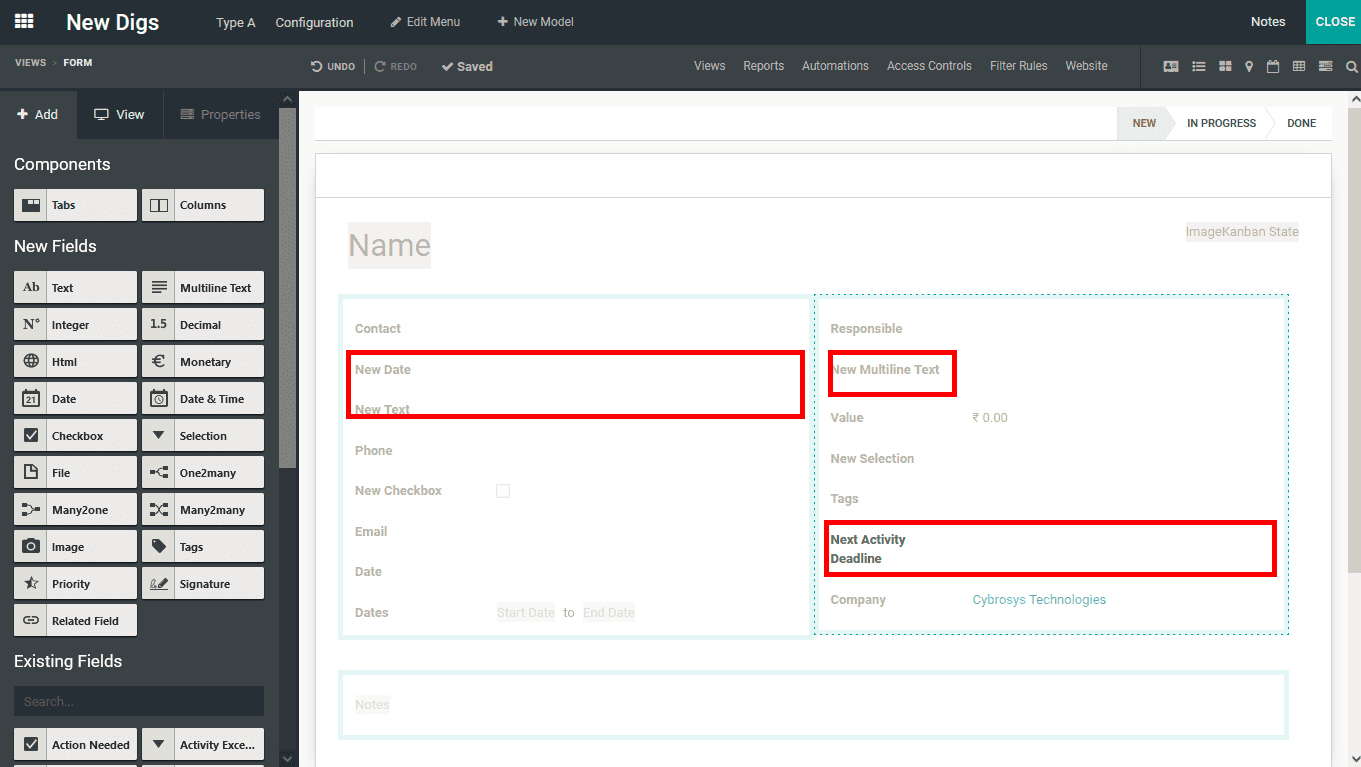
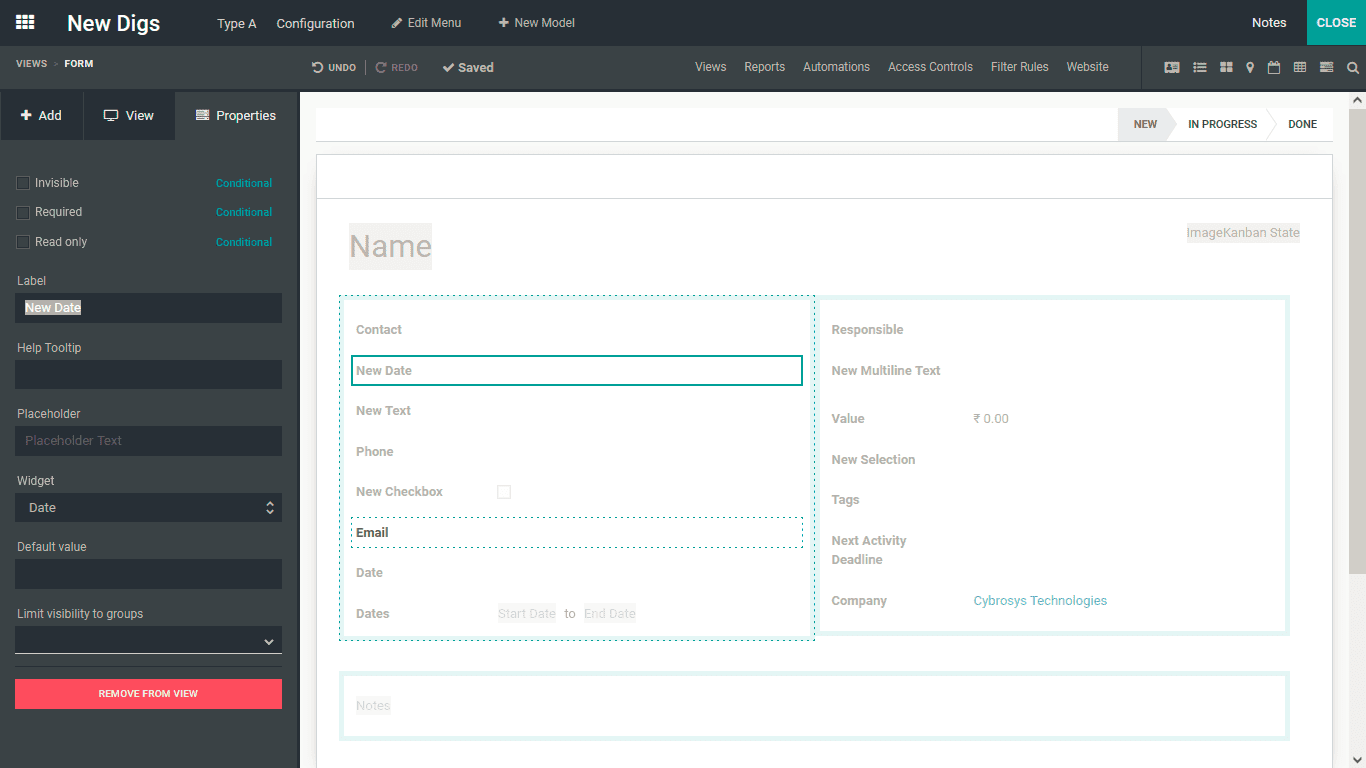
To modify the aspects and configure the Field, you can select the respective Fields and will be depicted with the Properties window where all the configurational elements in regards to it can be defined. The respective Field can be selected as;
- Invisible- Wish will ensure that the Field is invisible to the users until it is made visible by the authorized user or if a user has the authorization.
- Required- Enabling this Field will ensure that the respective one is required to be described in the applications menu while the entries are being described.
- Read Only- Once this property is enabled for a Field that is being described the users will only be able to read the Content and will not be provided with the provision to modify or contribute to it.
- Label- Defining the label will ensure that the Field is being labeled based on the description provided.
- HelpTooltip- Enabling this will ensure that the Users are provided with Helpful tips to fill in the respective field that is being described in the menu.
- PlaceHolder- The element which is depicted initially in a text box where the Visitors can type in the details. Moreover, it provides information to the viewer on which details should be filled in.
- Widget- The widget that should be described in the menu can be selected over here for the users to select them for the entry.
- Default Value- The Default value of a Field can be defined for the menu where the application will be depicted with it.
- Limit Visibility to Groups- The respective Groups to which the visibility of this field hat should be restricted can be defined here.
Additionally, a Remove From View Option is available, which will delete the Field from the application.
As of now, you will understand how the new application is crafted with the help of the Odoo Studio Module and especially with the use of the Fields, Tabs, and Columns of operation. Let's now move on to undertaking the further aspects of the configuration of the new application with the Odoo Studio Module. Let's now move on to understand how the Smart Tabs can be defined using the Odoo Studio in a respective menu.
How can smart tabs be added to form views?
The use of Smart tabs in the Odoo applications plays a huge role in the aspects of instant actions which can be performed. With the help of the Odoo Studio module, you will be able to define multiple smart tabs of operations that can be used for direct functions. To define the Smart Tab you can select the Studio applications for any module and you will be depicted with the editing window just as depicted in the following screenshot. Here, the + icon available as highlighted in the below screenshot can be selected.
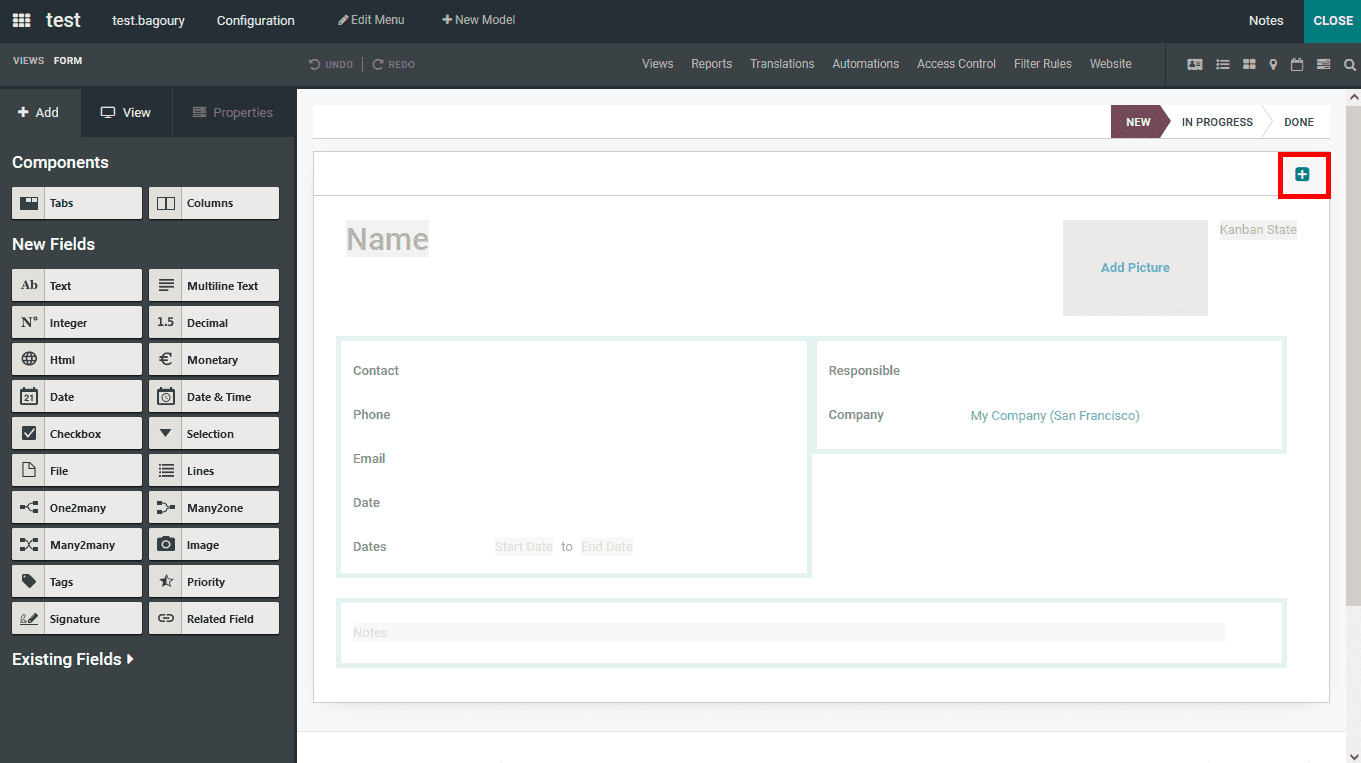
Upon selecting the + icon to add the Smart tabs you will be depicted with the configuration window. Here initially the Label can be defined and the Icon can be selected. Further, Select a related Field from the ones which have been defined for the platform where the smart tab action will be based on.
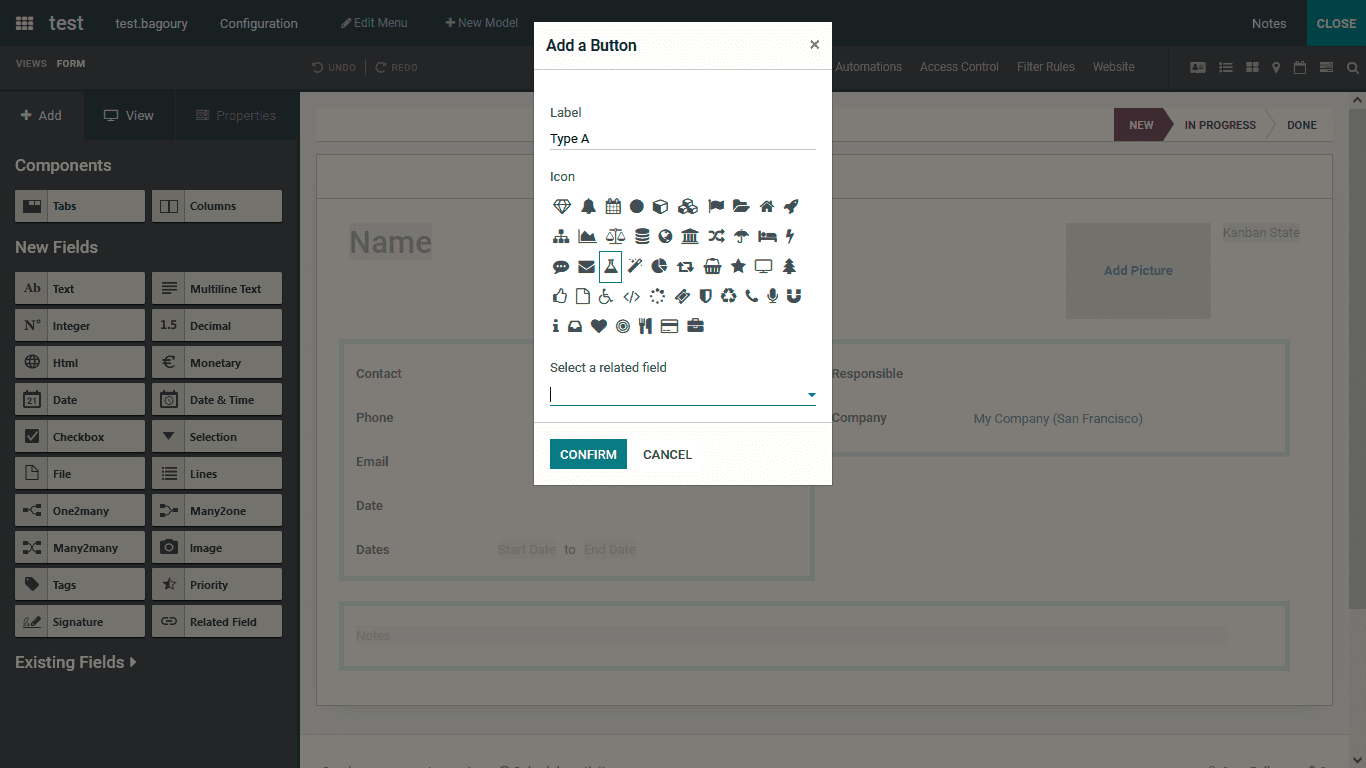
Finally, upon selecting the Confirm button the respective Smart tab will be defined. Moreover, with the Studio module, you will be able to configure multiple smart buttons to a defined mnu of the application developed as well as the already existing applications. Letâs now move on to the next section where the Pipel Stage Configuration capabilities of the Odoo Studio module have been defined.
How can the pipeline stages be set?
The Pipeline based operations of the Odoo platform will allow you to categorize the entries based on the stages of operations they are at currently. These Stages can be custom-defined in the Odoo platform however, for these stages to be defined the Stage options should be enabled and configured before they are to be described. Upon describing the model of the applications which has been created using the Odoo Studio the Pipeline Stages option should be enabled.
Upon enabling the Pipeline Stages option once you select the Form view for the configurations you will be depicted with the default stages which are being defined. Upon selecting it you will be depicted with the Configuration options window as depicted in the following screenshot. Here, the Invisible, Required, and the Read-Only options can be enabled. Furthermore, the Label, HelpTooltip, Domain, Context, and the Limit Visibility to Groups option can be enabled. There is also an option that can be selected to Remove the respective Field from View.
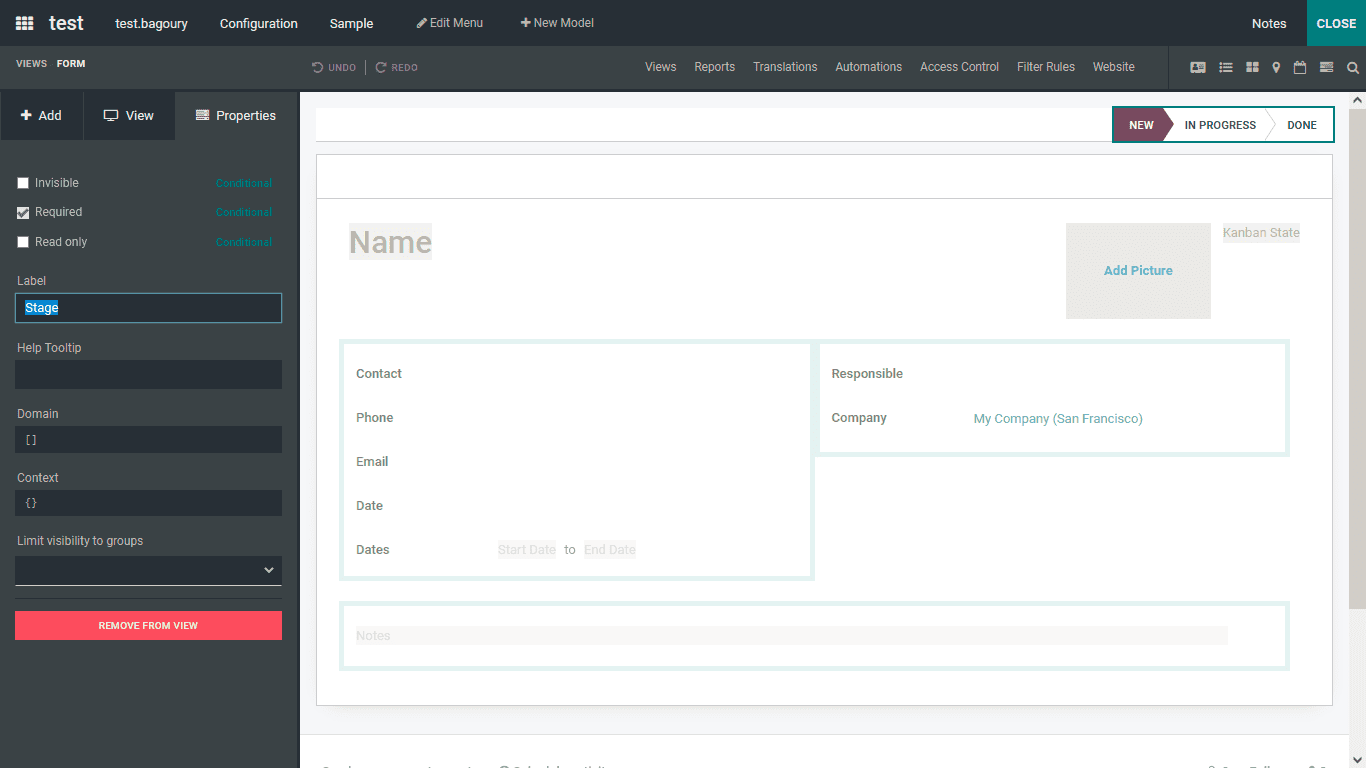
Once the Stages are configured you can select to define them from the Odoo platform directly and not from the Studio configuration window. Moreover, the Stages of the Pipeline can be custom-defined based on the need and the defined Pipeline states will be depicted in the menu. Lets now move on to the next section where the configuration of the Sorting operations in the List View is done with the help of the Odoo Studio module.
How data on the List view can be sorted?
The data depicted in the List view will provide the complete information of the respective entry and it is considered as one form of view where detailed information has been depicted. The configuration of the List view can be done for any new applications which have been developed using the Studio Module. Moreover, the existing List view of all the applications available in Odoo can also be configured with custom aspects with the help of the Odoo Studio module. In the List View of an application select the Studio module option and you will be depicted with the configuration window. Under the view menu, the Sort By options are available where they can be selected as Order Reference, Creation Date, Customer, Salesperson, Activities, Company, Total, Status, and Currency options which are available.
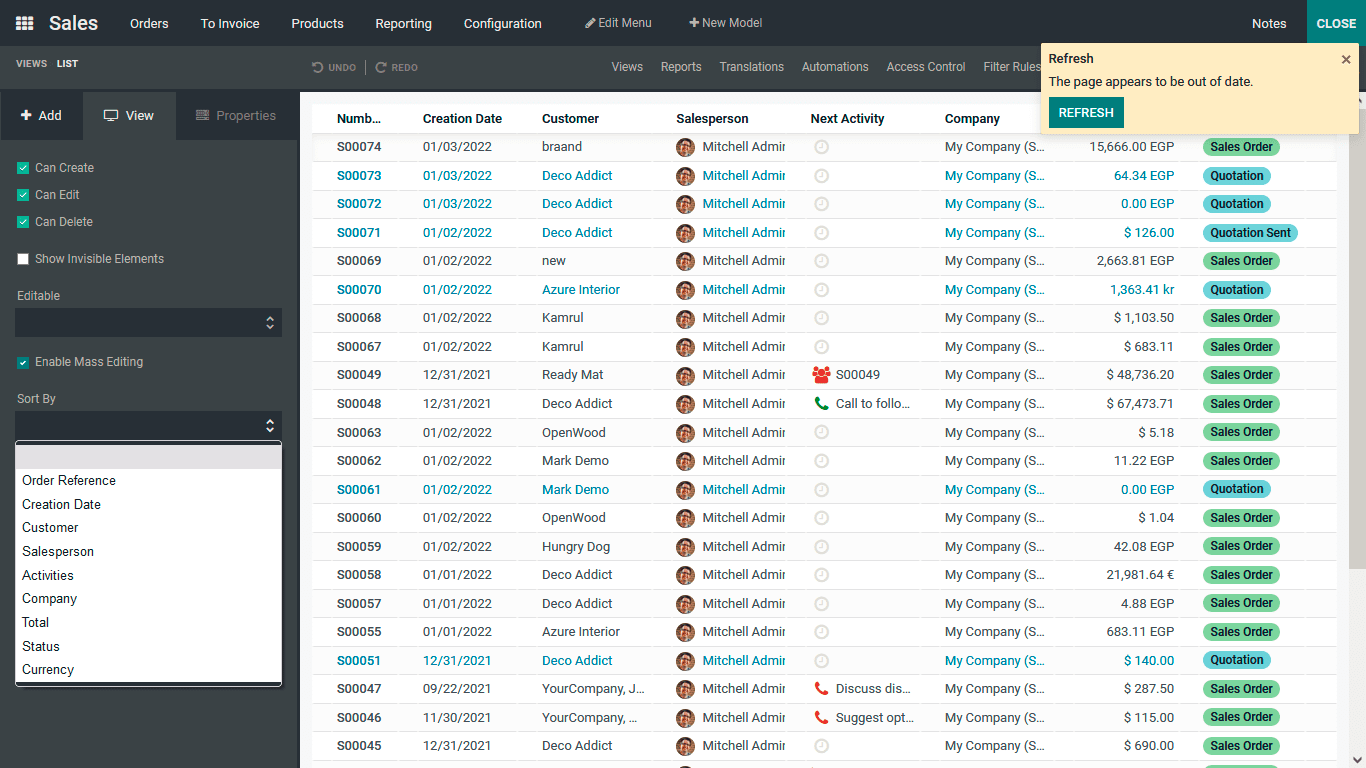
Once the Sorting operation is enabled based on the distinctive options you have selected and the Studio Module is saved then the entries defined in the List View will be sorted based on the sorting option defined. In the next section, the Mass Editing functionality of the Odoo Studio module is defined.
How to avail mass editing?
Editing the content as a whole is an easy task and the Odoo platform supports the operations of mass editing of the entries which are being defined. With the help of the Odoo Studio module, the aspects of Mass Editing can be configured. In the View menu of the Odoo Studio, you will have the option to Enable Mass Editing which will provide the user with the capability to undergo any form of Mass Editing.
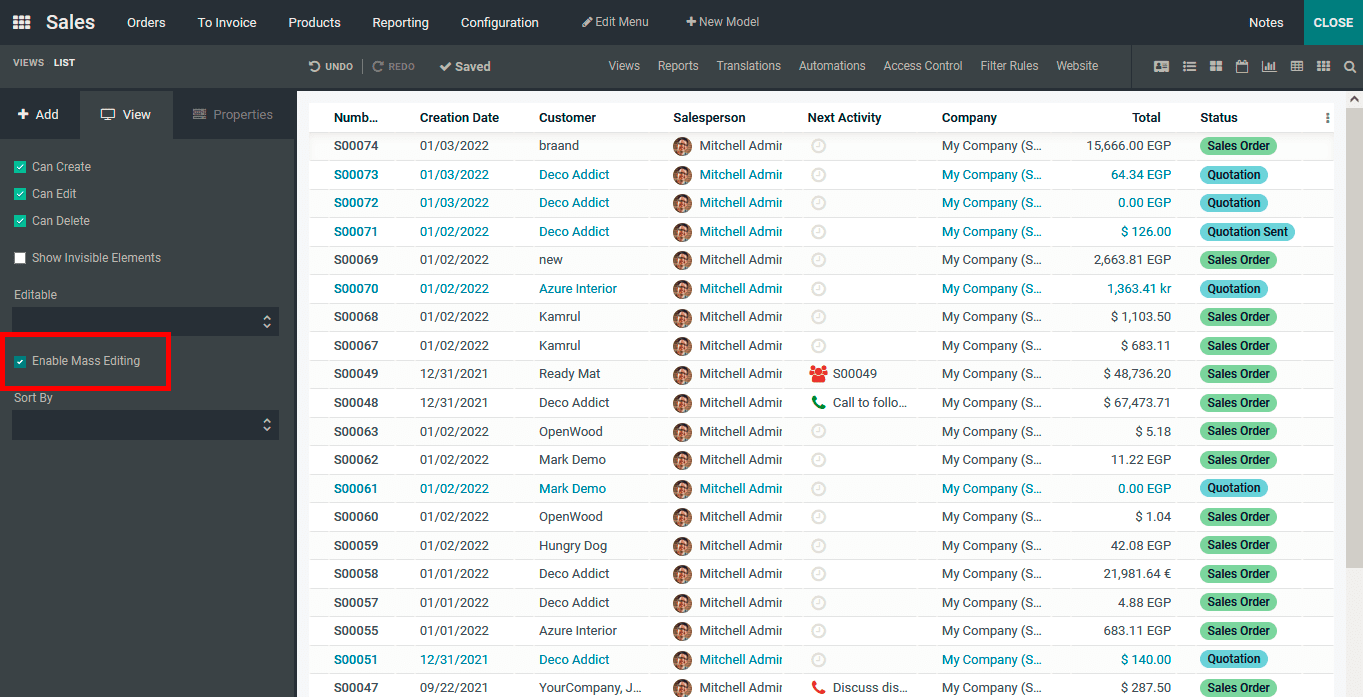
Once the Mass Editing option is enabled and saved in operation then once you select the respective entries in the window just as depicted in the following screenshot and you need to change the Sales person for the entries you can select an entry by choosing the salesperson and you will be depicted with the all Sales persons available to choose form.
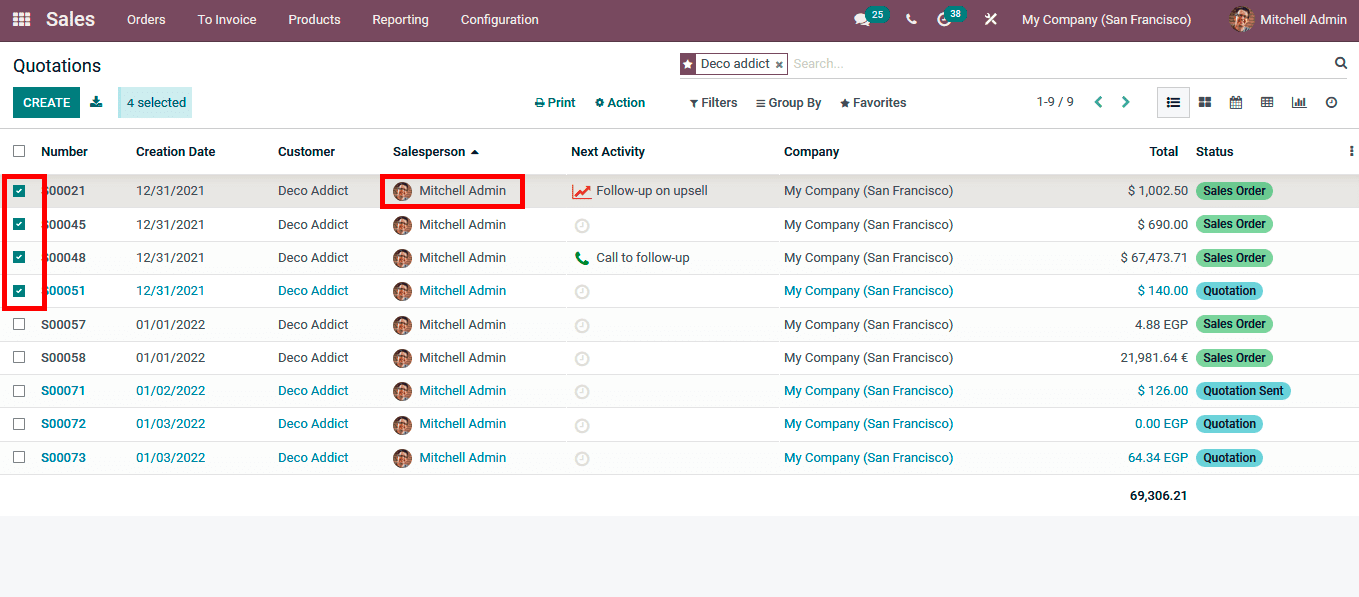
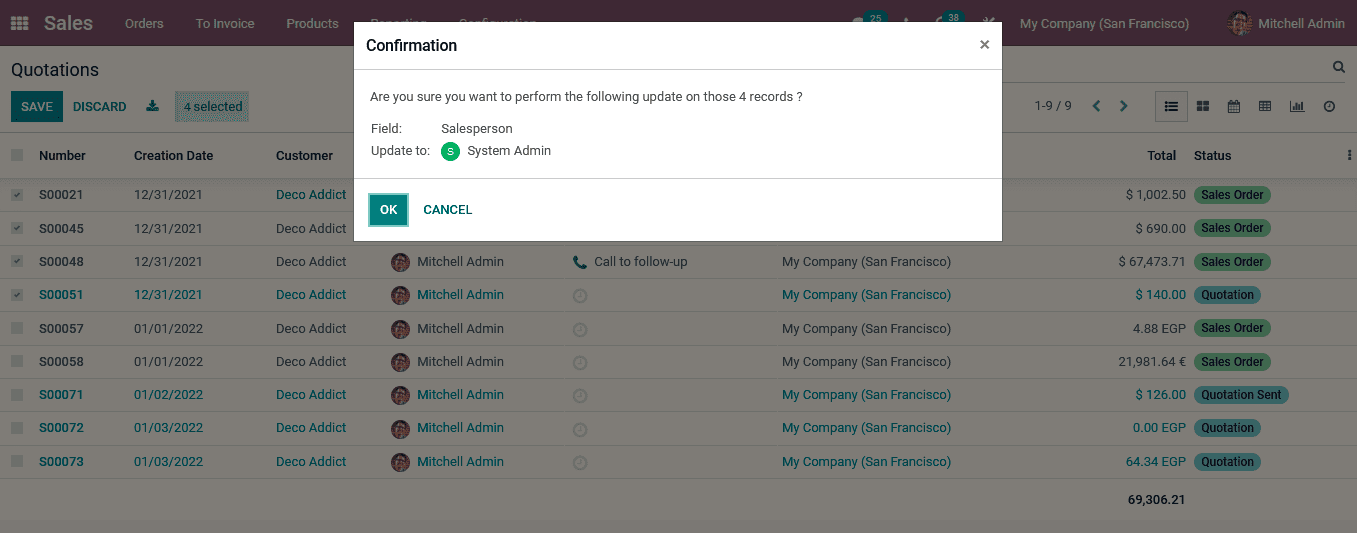
Once the respective Sales person is chosen you will be depicted with a Confirmation window just as depicted in the following screenshot. Here the selected entries will be updated with the respective Sales person entry which will be changed by selecting the OK option that is available.
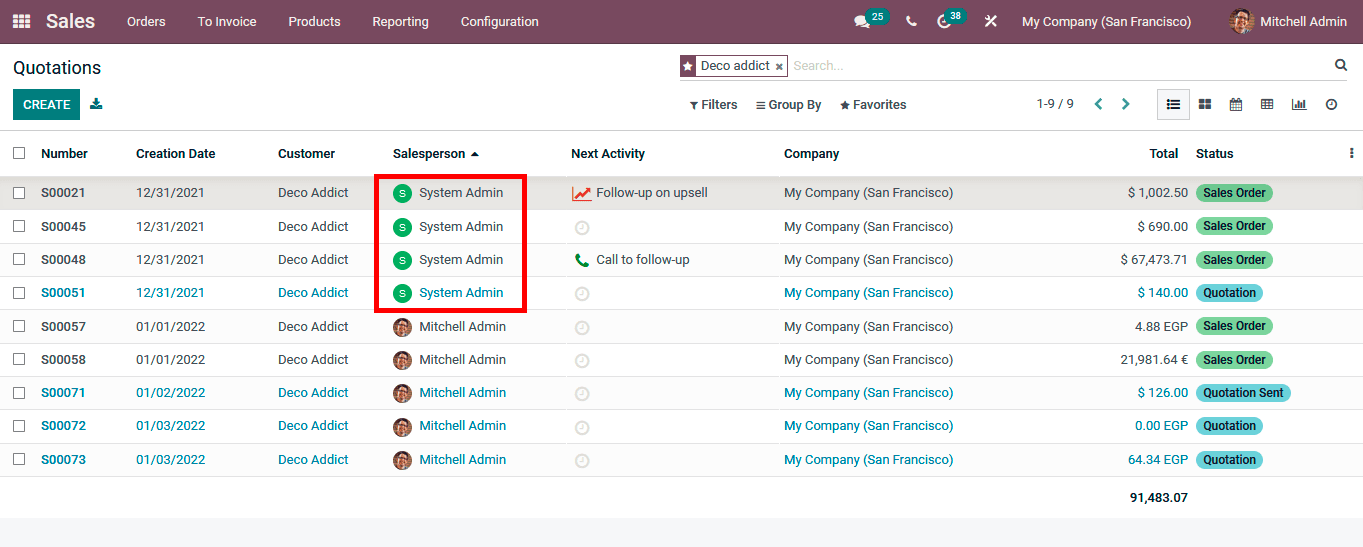
As depicted in the following screenshot the entries which are being defined and selected for the Mass Editing will be changed which is highlighted below.
The next section will detail the Configuration menus of the Odoo Studio module and how its operational ability will help you craft exceptional solutions and operational tools in your Odoo application.