-
- Abundante
- Adquirentes de pagos
- Ajustes
- Analítica
- Citas en línea
- Comercio Electrónico del Sitio Web de Odoo
- Configuración el Sitio Web de Comercio Electónnico
- Diseñe la Página de Su Sitio Web
- Gestión de Productos
- Gestión de Varios Idiomas
- Grupos
- Herramientas de fragmento
- Lista de precios
- Listado de productos
- Métodos de envío
- Múltiples compañías
- Múltiples sitios web
- Operaciones de blog en backd
- Pedido
- Personalización de la Página del Catálogo de productos
- Personalización del catálogo de productos
- Personalizar el menú y las apariencias
- Porcos
- Programas de cupón y promoción
- Publicar contenido específico para el sitio web
- RedirracionAmiento
- Salas de chat
- Sesión de Productos en la PESTAÑA CONFIGURACIÓN
- Sitio Web
- Tablero de Comercio Electrónico
- Tarjeta de Regalo
- Twitter Wall
- Visitantes
- Vistas de la Página
-
- Activo
- Adquirentes de pagos
- Biblioteca de contabilidad
- Catálogo de cuentas
- Conabilidad miscelána
- Configuración de Datos Bancario
- Contabilidad
- Contábilidad analíta
- Diario
- Estados de Cuenta Bancario
- Factura de Clientes al Pago
- Fechas de Bloqueo
- Fiscales de posiciones
- Gastos de Empleados
- Informa de de Socios
- Informa de seguimiento
- Informa en contabilidad
- Ingresos y Gastos Diferidos
- Mandatos de débito directo
- Notas de Crédito
- Pagos
- Pagos por lotes
- Presupuesto
- Reconciliatura
- Redondeo en efectivo
- Tablero de contabilidad
- Tipos de contabilidad
- Transferencias automáticas
- Términos de Pago
-
- Abundante
- Adquisico de Plomo
- CREACIÓN DE COTIZACIONES DE VENTAS
- CRM
- Caracteríssticas de Odoo 15 CRM
- Convertir LOS Cables en Oportunidades
- Cómo Odoo CRM Gestiona Las Oportunidades Perdidas
- FluJo de trabajo general de Odoo CRM
- Formulario de generación de plomo múltiples fuentes
- Funcionando -Con Clientes Potenciales
- Manejo de Liderazgo
- Nuevas Opciones en la ventana de configuración de Odoo 15
-
- Análisis de producción
- CREANDO CENTROS DE TRABAJO
- Fabricación
- Facturas de materiales
- Gestión de Chatarra
- Gestión de Mantenimiento
- Gestión de órdenes para no consultor
- Informe General de Efectividad del Equipo
- Pedidos de Fabricación
- Planificación de Pedidos Laborales por producción
- Planificación de órdenes de Trabajo por WorkCenter
- Programa de producció Maestra
- Órdenes de Trabajo
-
- Abundante
- Ajustes de Inventario
- Anuncios
- CARACTERÍSTICAS DEL MÓDULO DE INVENTARIO DE ODOO
- Categorizacia de productos
- Categorías de Almacenamiento
- Configuración del producto
- Confirmación de SMS en la Entrega
- Confirmación por Correo Electrónico en la Entrega
- Costos de Aterrizaje
- Empaquetado del producto
- Entrega
- Entregar Paquetes
- Estategias de Eliminación
- Gestión de Almacenes
- Gestión de Chatarra
- Integrando el Remitente de Terceros en Odoo
- Inventario
- Operaciones de inventario
- Planificadores
- Reglas de Caída
- Reglas y rutas
- Tiempos de Programació
- Trazabilidad del Producto
- Ubicacia
- Unidad de Medida
- Variantes de productos
-
- APEGO Salarial
- Abundante
- Configuración
- Contratos
- Entradas de Trabajo
- Estructuras salariales
- Información personal
- Nómina de Odoo
- OTROS TIPOS DE ENTRADA
- Parámetros de la regla salarial
- Reanudar
- Salarios de reglas
- Salpicaduras
- Tablero
- Tiempos de Trabajo
- Tipo de estructura salarial
- Tipos de Entrada de Trabajo
- Ventajas
Expense - Odoo 15 Enterprise Book
Expense Reports
La pestaña Informes de gastos en el módulo de gastos de Odoo incluye varios submenú, comoReports to Approve, Reports to Post, Reports to Pay, and All Reports.
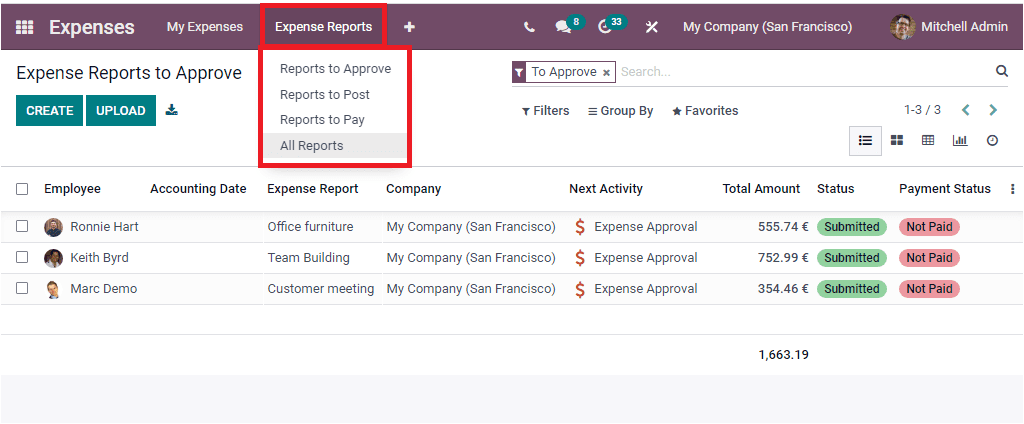
Let us discuss each of them below.
Reports to Approve
When you click on the Reports to Approve menu, you will be directed into the Expense Reports to Approve window, as shown below.
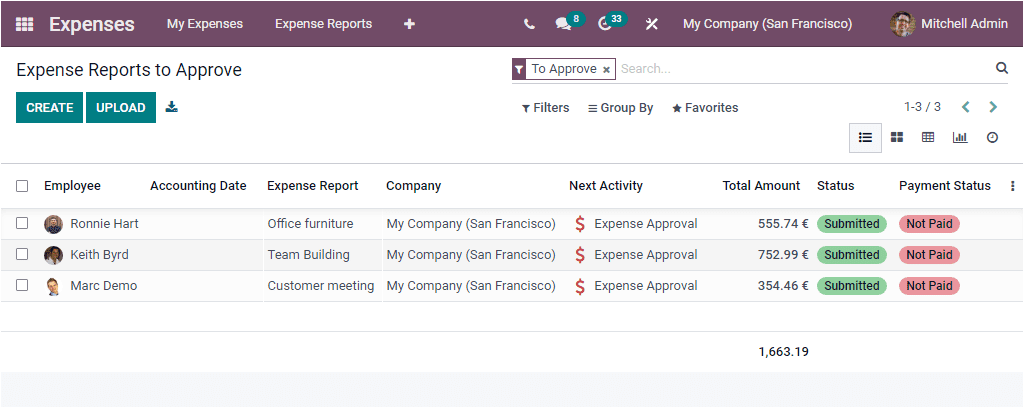
This window will open you a list of all the expense reports that have been submitted and are waiting for approval. All the reports included in the window are the reports that the employee submitted their expense reports to the concerned authority or manager and waiting for approval. The manager can easily view the reports and inspect the reports to take suitable action. The further steps in Odoo can be done effortlessly just with some clicks. When you look at the status of each of the reports, it will be in the Submitted state. And also, the payment status shows as âNot Paid.â When you open any of the records, you can view the APPROVE and REFUSE buttons as highlighted in the below images.
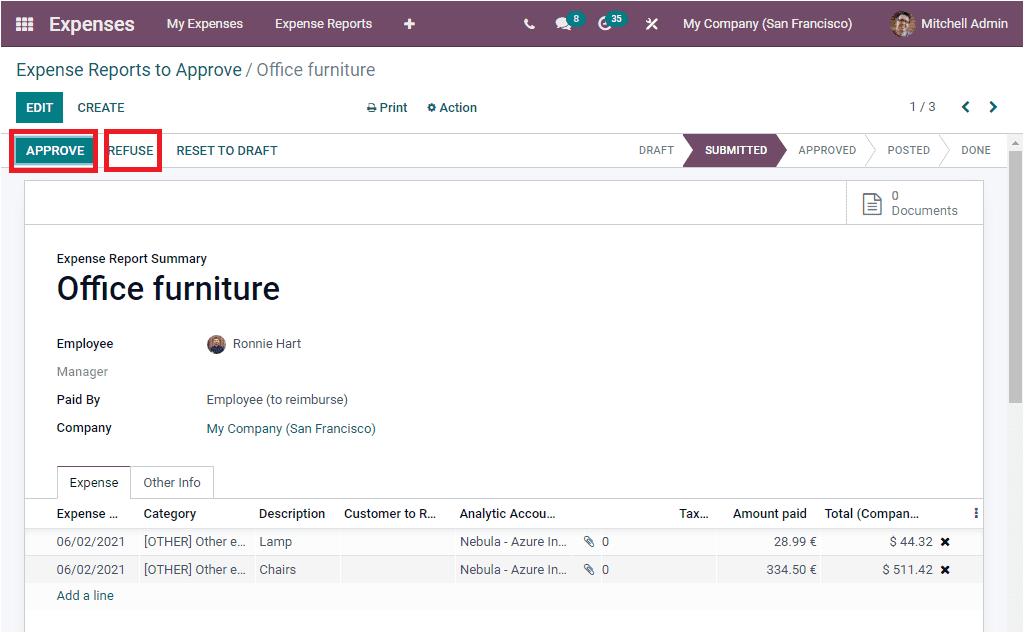
Now we can go to the following menu âReports to Post.â
Reports to Post
Once the submitted expense report has been approved, the expense management process will not get finished. The next step in the expense report management is to post the expense reports. That is, the expense report should be posted in a journal to document the report. So all the expense reports must be uploaded after getting approval from the concerned authority. All these expense reports that are ready for posting will be enlisted in the Expense Reports to Post window. For accessing this window, you can go to Expenses -> Expense Reports -> Reports to Post. The image of the window is depicted below.
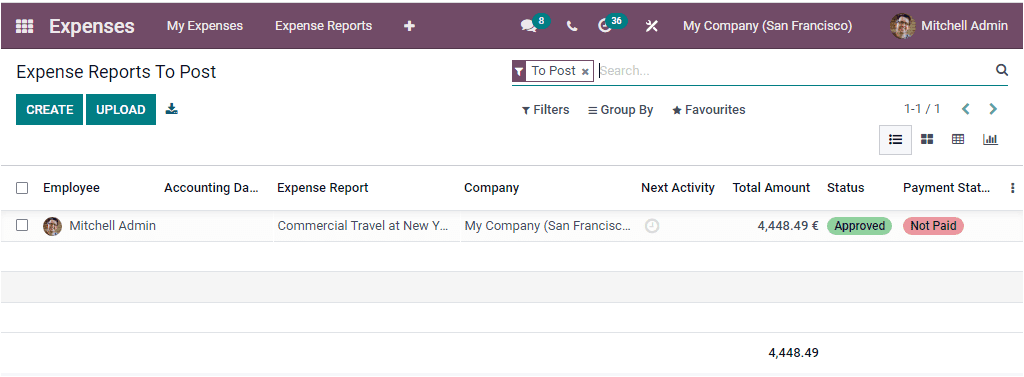
The status of every record in the window is defined as Approved. And you can click on the required report to upload. So that you can have the detailed view of the window as shown in the below image.
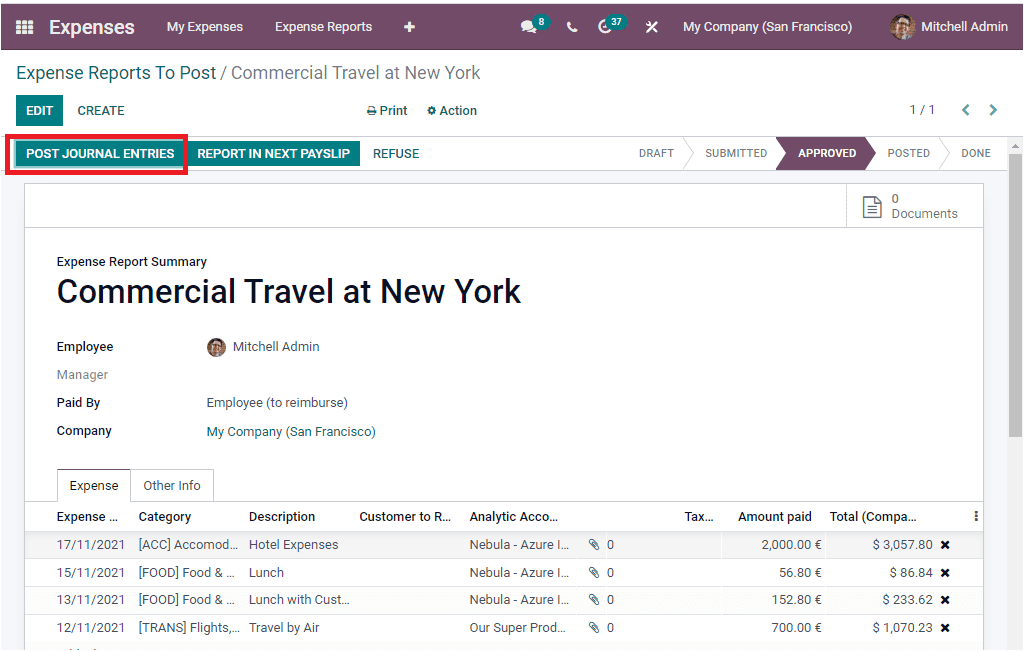
You can see the POST JOURNAL ENTRIES button on the top left corner of the window which is also highlighted in the above image. The Odoo 15 Expense module includes the new feature that allows you to compute the expenses in the next payslip. This option is very advantageous for handling the expense reports that are submitted after generating payslips (at the end of a month) . To do this, you can click on the REPORT IN NEXT PAYSLIP button available near the POST JOURNAL ENTRIES button. Upon selecting the POST JOURNAL ENTRIES button, you will be entered into another window where you can view the Expense report stage, and it will be converted from APPROVED to the POSTED state, as shown in the below image.
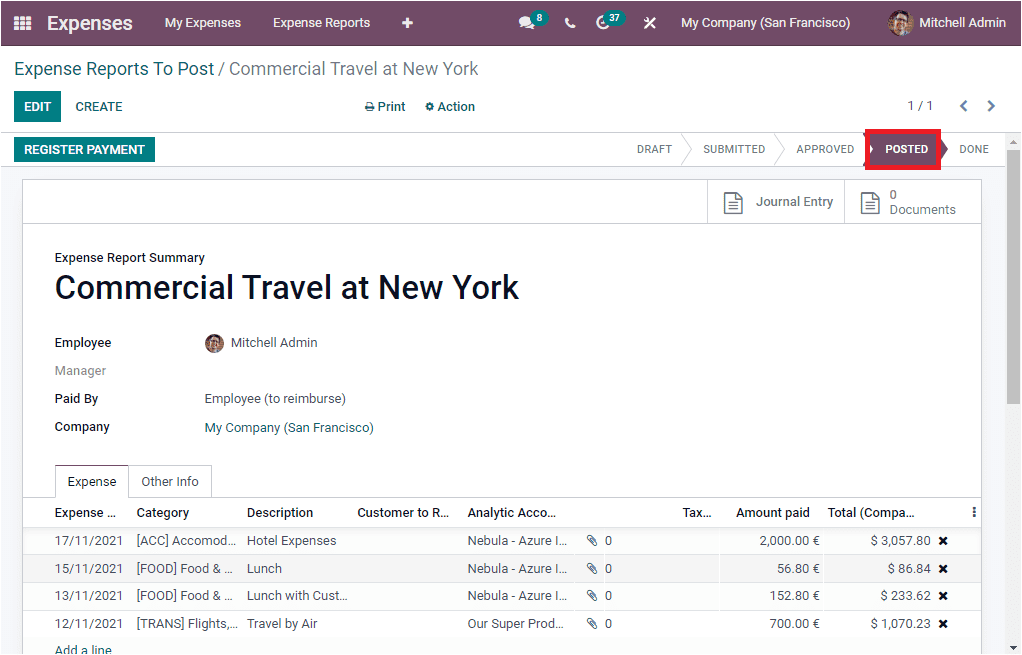
Once you complete these steps, the expense reports will be sent for the payment procedures. So let us have a look at the Reports to Pay menu.
Reports to Pay
The Reports to Pay menu available under the Expense Reports tab of the Odoo Expenses module allows you to view and manage all the expense reports that are waiting for the payment procedures.
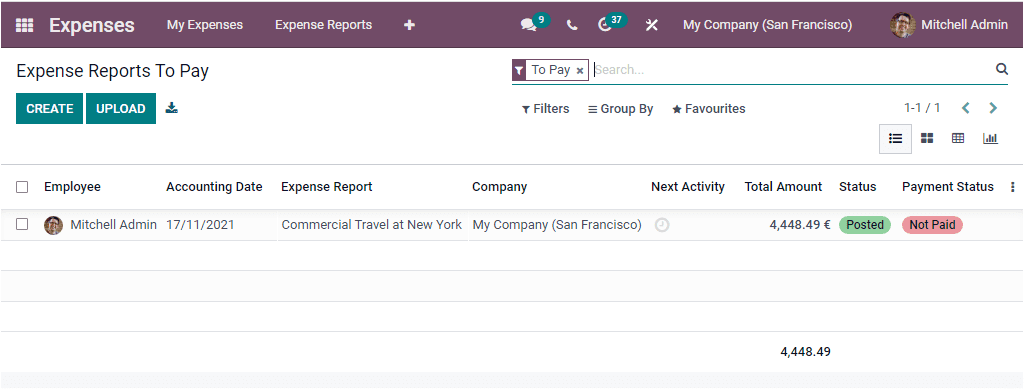
You can click on the defined expense report in this window to view its details. After viewing and confirming the details, you or the concerned authority can register payment by clicking on the REGISTER PAYMENT button as highlighted in the below image.
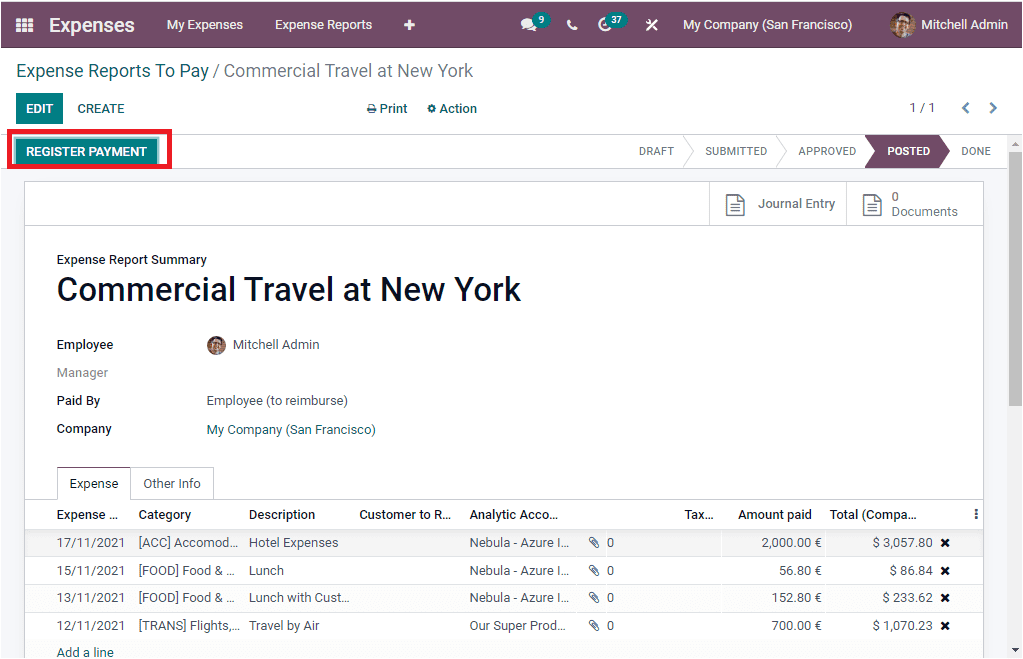
This window also depicts two smart buttons such as Journal Entry and Documents, which act as the direct link to the respective window. These windows will be displayed based on the modules you installed in your Odoo system. Once you click on the REGISTER PAYMENT button, you will automatically open a pop-up window where you should include the details required for registering payment.
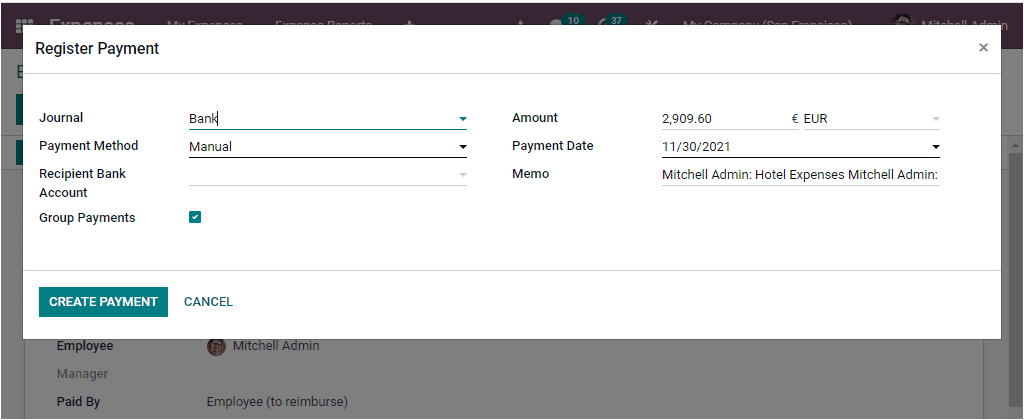
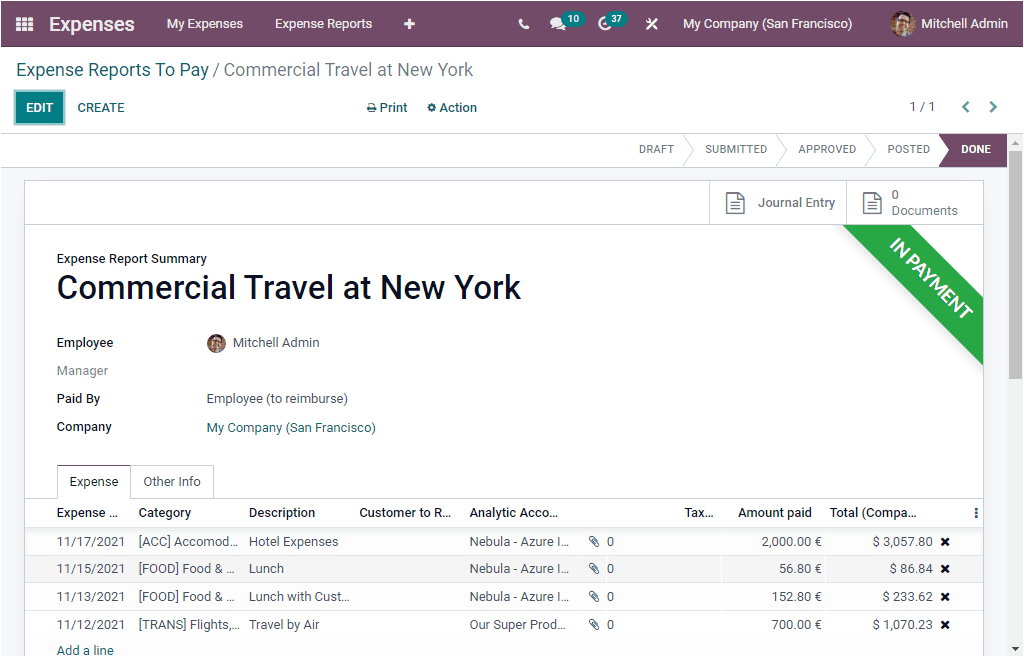
Here in the window, include various details. The Journal can be chosen either Bank or Cash. Then the Payment Method can be specified using the drop-down menu available. The Amount, Payment Date, and Memo can be defined. After providing all these details, you can click on the CREATE PAYMENT button to REGISTER PAYMENT. Now the expense report stage will be changed from POSTED to DONE. The report will show an IN PAYMENT ribbon in a green ribbon.
All Reports
The last menu available under the Expense Reports tab will allow you to view all the expense reports in different stages in a single window, as depicted in the below image.
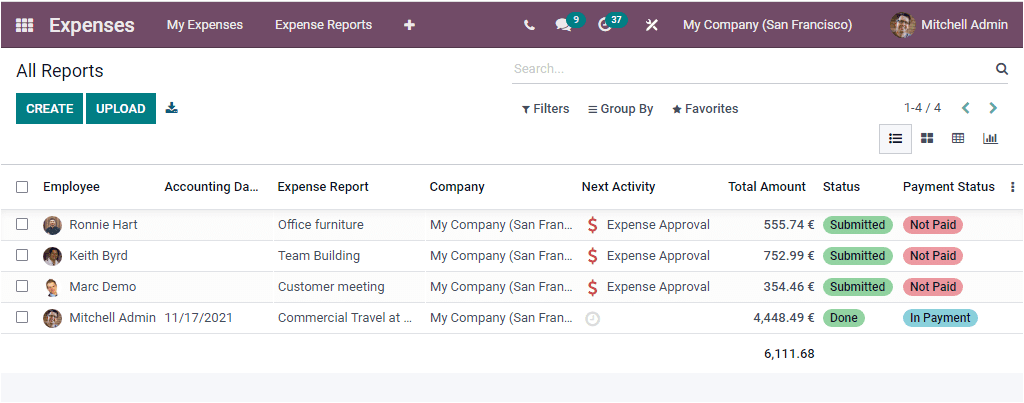
The window will display all the reports along with the respective employee name, Accounting Date, Expense Report, Company, Next Activity, Total amount, their respective Status, and the Payment Status.
We can move on to the Configuration tab of the module