-
- Aviones recurrentes
- CREACIÓN DE CITAS
- CRM
- Caracteríssticas del CRM
- Enriquecimiento de plomo
- Etiqueta
- Gestión del equipo de ventas
- Informes en CRM
- Manejo de liderazgo
- Mi gestión de actividades
- Minería de Plomo
- Oportunidadas de las Nueva Creando un Partir de Plomo
- Programar actividades
- Razones Perdidas
- Visita a la conversión de leads
-
- Acordador una cuenta bancaria
- Adquirentes de pagos
- Ajustes
- Análisis de facturas
- Catálogo de cuentas
- Contabilidad
- Diario
- Diario de corte
- Envío de factura
- Factura de probador
- Facturas de los clientes
- Fiscal de posición
- Fábrica
- Gastos de Empleados
- Impuestos
- Incoterms
- Modelos de reconciliatura
- Monedas
- Métodos de Redondeo en Efectivo
- Notas de Crédito
- Panel de configuración
- Registro de Pago
- Términos de Pago
-
- Ajustes de Inventario
- Categorías de Almacenamiento
- Confirmación de Correo Electrónico
- Confirmación de sms
- Costos de aterrizaje
- Ejecutar el Planificador
- Envío
- Fecha de Caducidad
- Firma
- Gestión de Almacenes
- Gestión de Chatarra
- Gestión de productos
- Informar
- Informe de recepción
- Inventario
- Muchos Números de Serie
- Métodos de envío
- Operaciones de inventario
- Paquetes de Entrega
- Programació Avanzada
- Reglas de Caída
- Reglas de reordenamiento
- Reposiciónico
- Rutas y reglas
- Tipos de Operación
- Transferencia de olas
- Transferencia por lotes
- Transferir
- Ubicacia
-
- Ajustes
- Blogs
- Comercio Electrónico
- Constructor Del Sitio Web de Odoo
- Gestión de Productos
- Informar
- Lista de precios
- Múltiples Lenguas
- Múltiples sitios web
- Personalizacia de aparencia
- Porcos
- Programas de cupón de promoción
- Publicar Contenido para el Sitio Web
- RedirracionAmiento
- Sitio Web
- Tablero
- Visitantes
Inventory - Odoo 15 Community Book
Product Management
El sistema Odoo ERP le dará una plataforma eficiente para configurar nuevos productos en el sistema.Puede agregar fácilmente productos al módulo de inventario utilizando los productos " Menú disponible en la barra de menú principal.La vista Kanban de los productos mostrará todos productos disponibles en el módulo y también puede cambiar la vista de los productos en un Vista de la lista usando la opción de lista dada en la ventana.Se le permite usar la creación botón para crear un nuevo producto para inventario.

Los filtros y el grupo por opciones se pueden usar para clasificar los productos sobre la base de Varias funciones de clasificación predeterminadas y personalizables.Esto también lo ayudará a reducir el Dificultad para localizar cualquier producto en particular para realizar operaciones relacionadas con el inventario. La vista previa del producto mostrará el nombre y la imagen junto con el precio del producto.Al hacer clic en un producto, le dará una vista detallada del producto en particular.
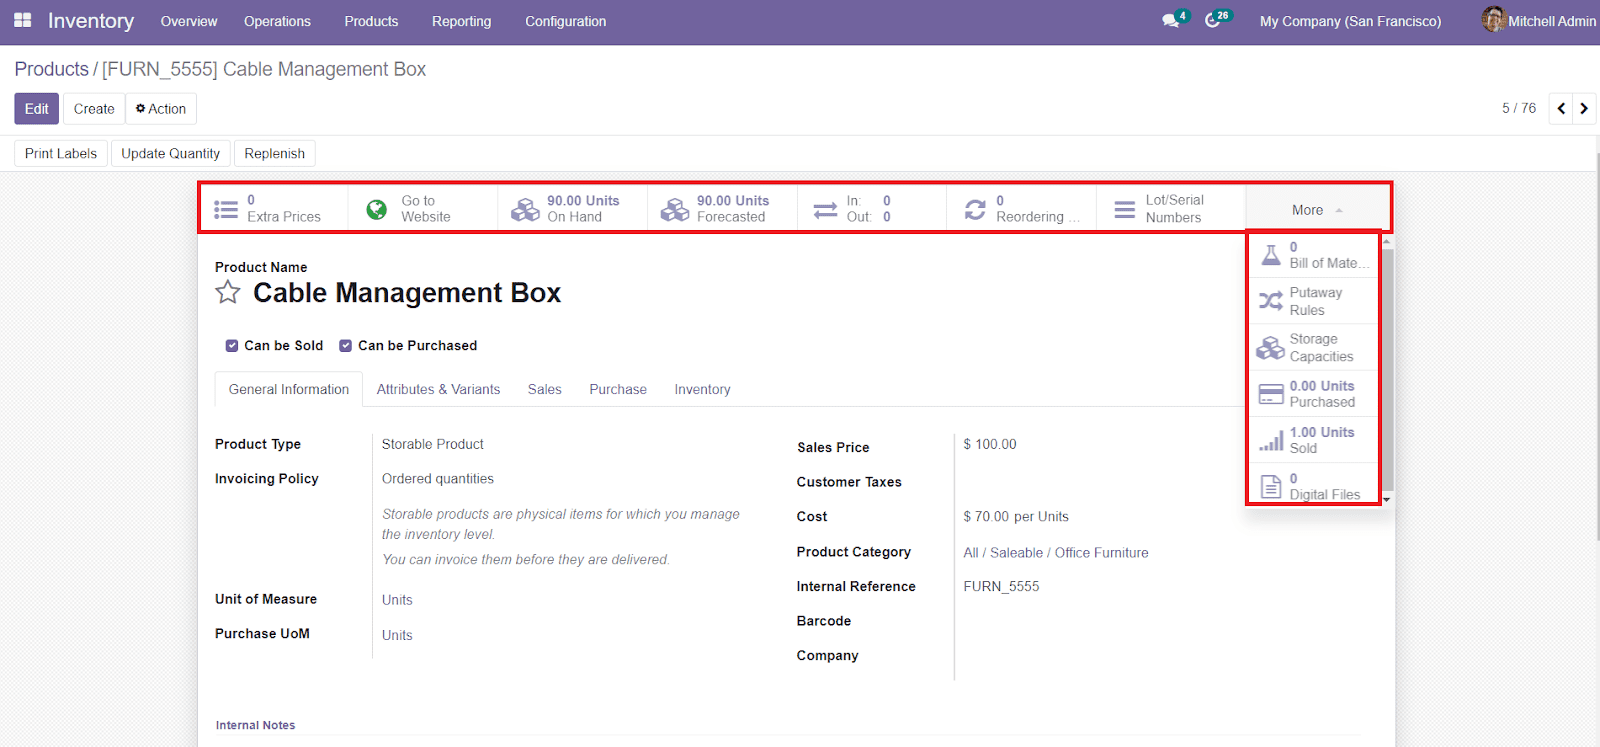
Junto con los detalles sobre el producto, la descripción del producto también contiene campos para operar precios adicionales, ir al sitio web, unidades disponibles, unidades previstas, movimientos de productos, Reglas de reordenamiento, números de lote/serie, factura de materiales, reglas de desbandado, almacenamiento Capacidades, unidades compradas, unidades vendidas y archivos digitales.
Al hacer clic en el botón Crear en el tablero de inicio de los productos, estará dirigido a una nueva ventana donde debe agregar la información necesaria como General Información, atributos y variantes del producto, ventas, compra e inventario.Puedes usar el icono de estrella cerca del nombre del producto, para agregar este producto en particular a su favorito lista.
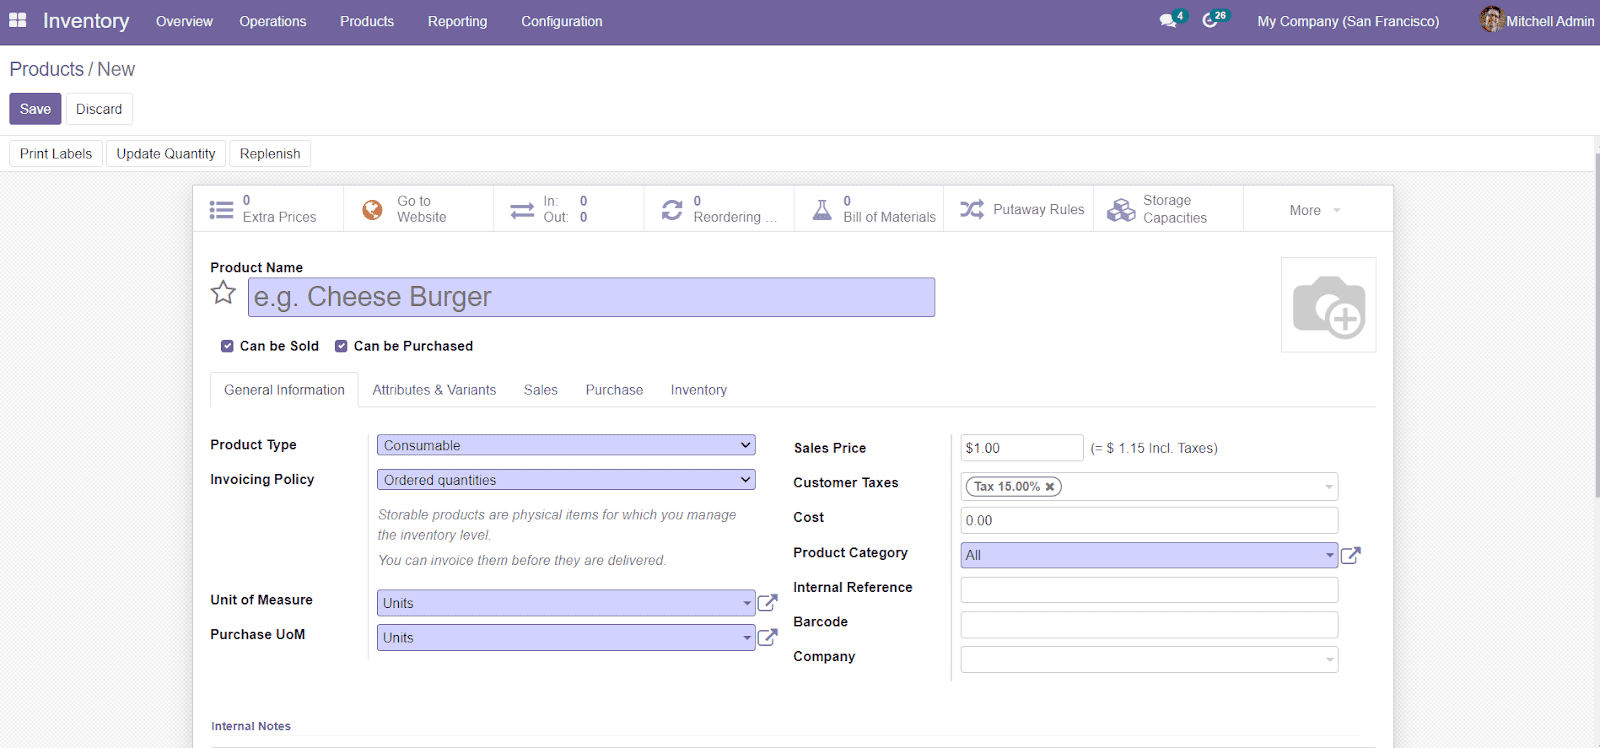
Puede dar el nombre del producto y una imagen del mismo en los campos respectivos. Además, también puede decidir si el producto se puede vender o comprar.Por debajo La pestaña GeneralInformation, puede definir el tipo de producto de la lista dada.Puede Sea consumible, servicio, tarjeta de regalo, productos almacenables, boletos de eventos o cabina de eventos.
Consumable Product: This type of product is a physical product but stock is not managed. You can receive and deliver it.
Services Product: The Services Product is the type of non-material product that you provide. It is an intangible commodity.
Storable Product: we can manage the stock of Storable Products.
Gift Card: Gift Cards are service products that can be configured as normal products to sell on eCommerce.
Event Ticket: This type of product includes the tickets of an event. You can configure the tickets of an event using the Event Ticket as Product Type.
Event Booth: This type of Product will include the Booths for events.
You can set the Invoicing Policy on the Ordered Quantities or Delivered Quantities. Invoicing Policy on Ordered Quantities means the user can create invoices for the Ordered Quantities from Sales Order after confirming the Order for Quotation. On the other hand, the Invoicing Policy on Delivered Quantity is the policy of creating invoices on the Delivered Quantity.
Specify the Unit of Measure, Purchase UoM, Sales Price, Customer Taxes, Cost, Product Category, Internal Reference, Barcode, and Company name in the respective fields. You can also add an Internal Note regarding the product under the General Information tab.
The Attributes & Variants tab can be used to add different variants of the particular product.

You can click on the âAdd a Lineâ button to add various attributes of the product and respective values.
The sales-related details of the product can be configured under the Sales tab.
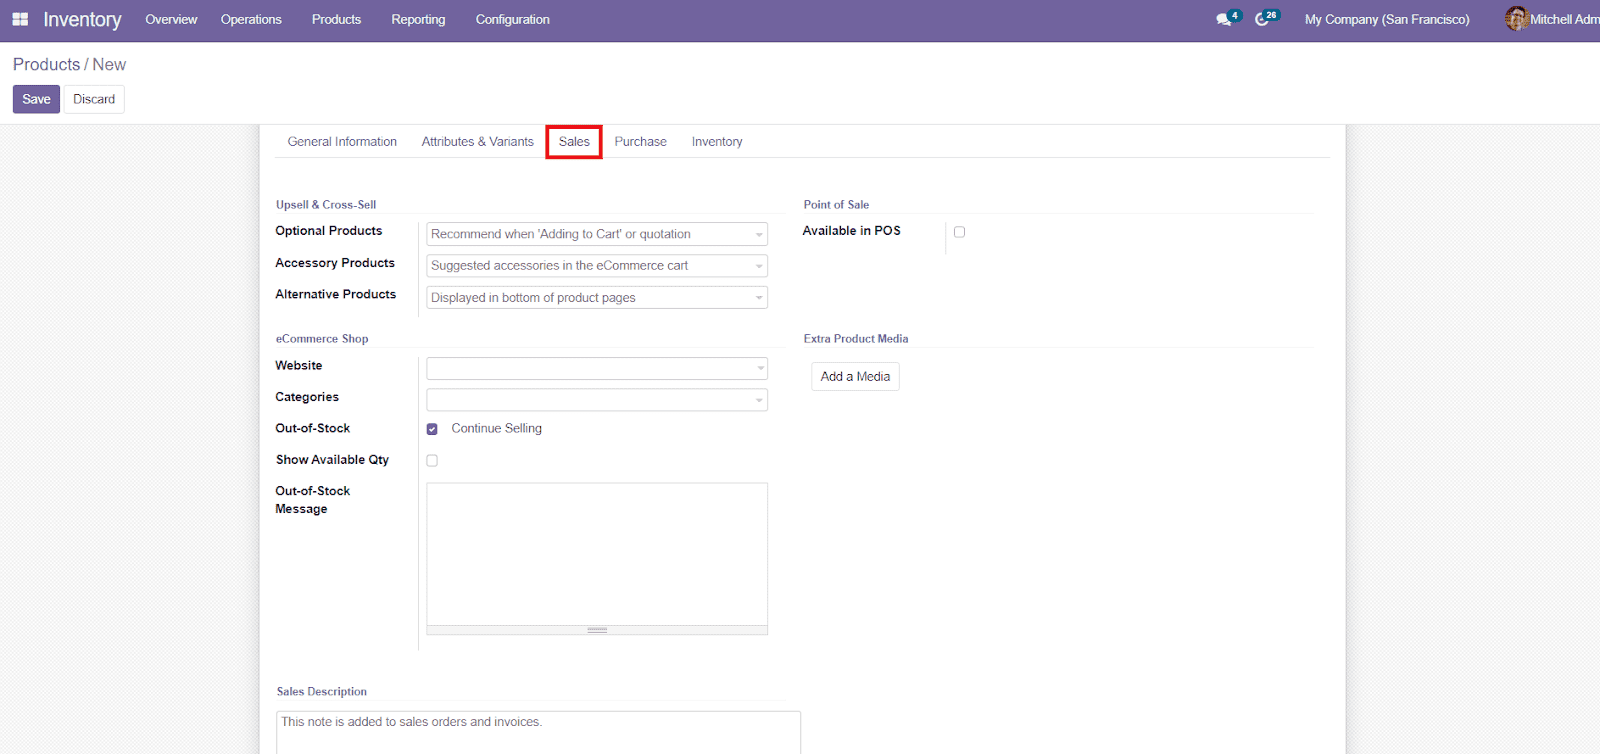
By defining Optional Products, you can offer additional products to the customer while doing online purchases on your company website. This will be recommended when adding a product to the cart or creating a new quotation with the particular product. Similarly, you can add Accessory Products and Alternative Products in the given fields. These are helpful to increase upselling and cross-selling processes. Alternative Products are the products that appear as an alternative suggestion for the main product to the customer on the product page on your eCommerce Website. On the other hand, Accessory Products show up when the customer reviews the cart before payment.
In the eCommerce shop, you can add Website, Categories, and enable the Out-of-Stock field. You will also get an additional field to add Out-of-Stock Message. You can enable the Show Available Quantity to get the number of products available. To make the product available in Point of Sale, you can activate the Available in POS field. In the Extra Product Media, Odoo allows you to add additional media by clicking on the âAdd a Mediaâ button.
You will be able to add notes under the Sales Description field which will be later added to sales orders and invoices. In the Configuration menu, you will get an option to enable the Sales Warnings under the Settings option as shown below.
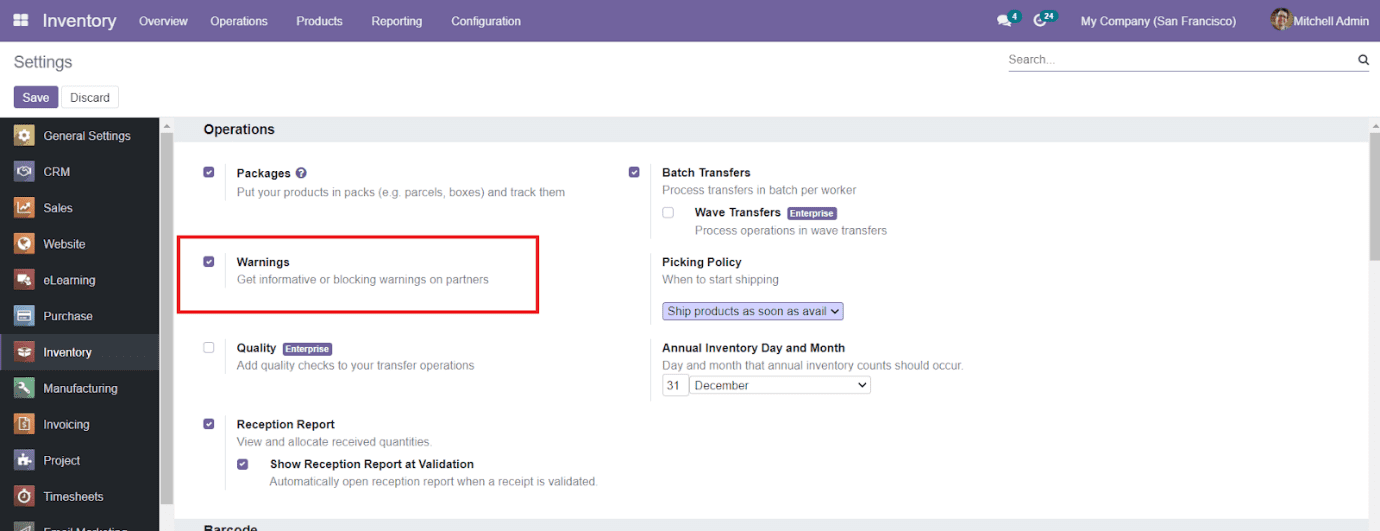
By enabling this field, you can generate Sales Warnings under the Sales tab of the product configuration when selling this product.

Under the Purchase tab, you can add vendors for a particular product. You can easily configure vendors to a product by clicking on the âAdd a Lineâ button.
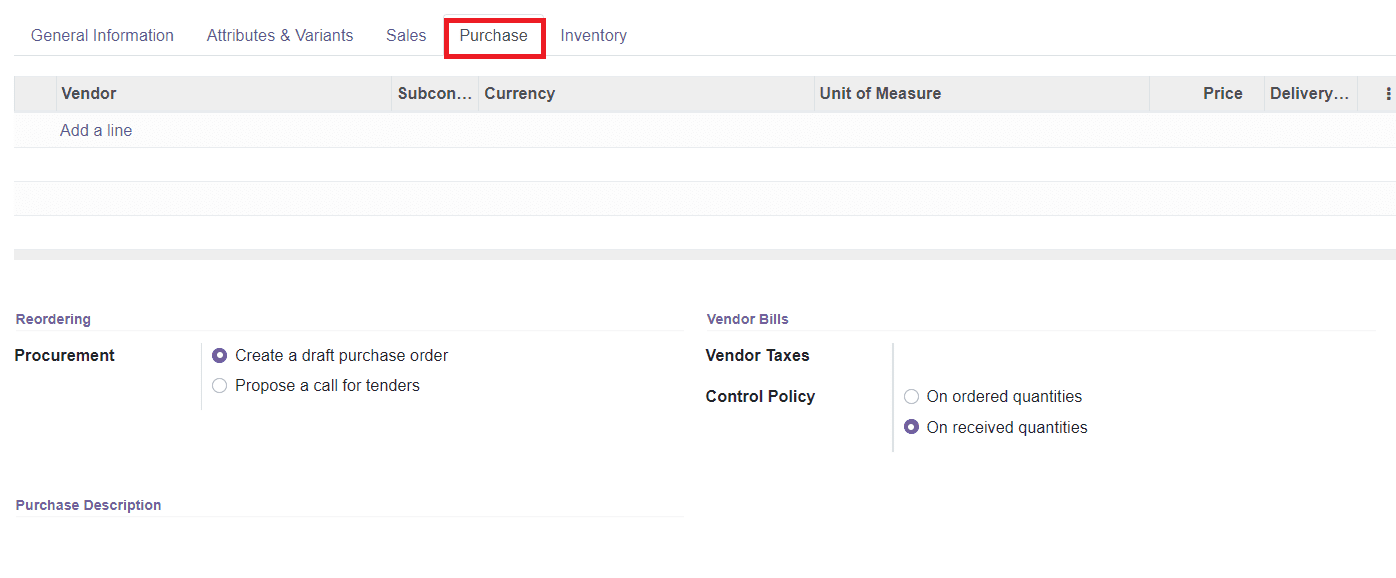
You can mention the name of the Vendor, Currency, Subcontracted, Unit of Measures, Price, and Delivery Lead Time of the product. Delivery Lead Time is the lead time in days between the confirmation of the Purchase Order and the receipt of the product in your warehouse. The field Subcontracted can be seen as enabled only when you select the vendor same as that you configured under the Bill of Material of the corresponding product in the Manufacturing module.
You can also add additional fields to improve the visibility of the data by clicking on the three dots available on the top right side of the window.
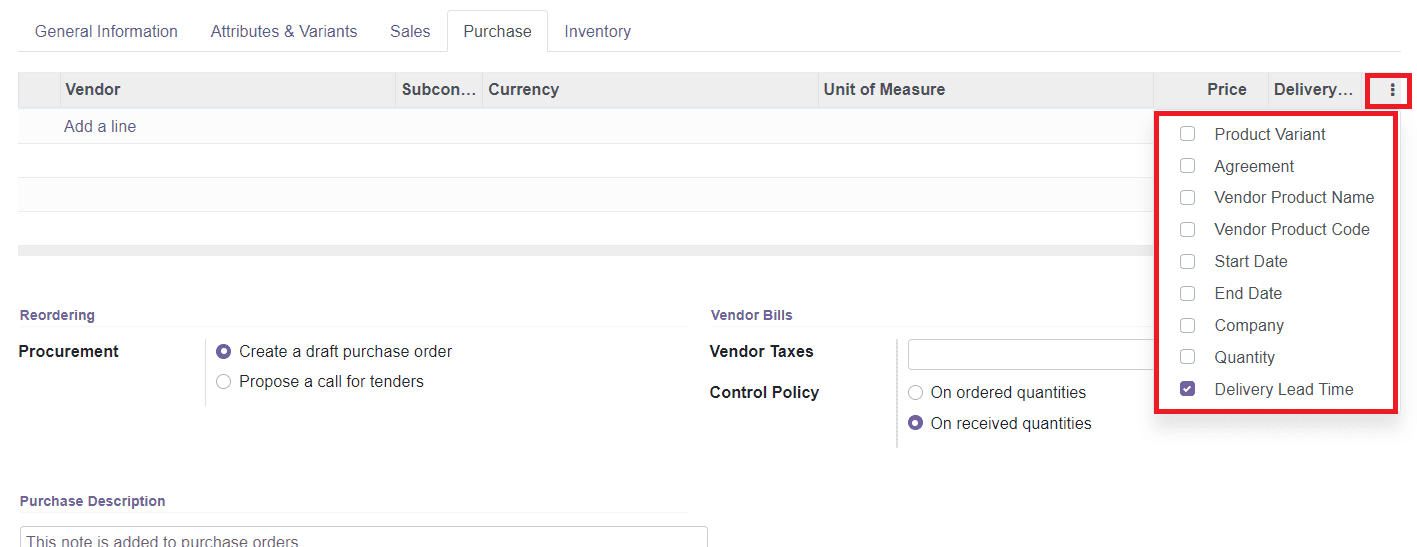
In the Reordering menu, you can set the Procurement as Create a draft purchase order or Propose a call for tenders. You can add Vendor Taxes and define the Control Policy under the Vendor Bill menu. There are two types of Control Policies available, On Ordered Quantities and On Received Quantities. Control Policy On Ordered Quantities will help you to create bills based on the ordered quantities and Control Policy On Received Quantities will create bills on received quantities.
Additionally, add a Purchase Description about the product in the specified space.
Under the Inventory tab, you can define the Route Operations of the product. In the Logistics menu, you can add the Responsible employee for the inventory actions of the product, Weight, Volume, Manufacturing Lead Time, Customer Lead Time, and HS Code in the respective field. Manufacturing Lead Time is the average lead time in days required to complete the manufacturing of this product. The Customer Lead Time is the delivery lead time in days promised to the customers. HS Code is a standardized code used for international shipping.
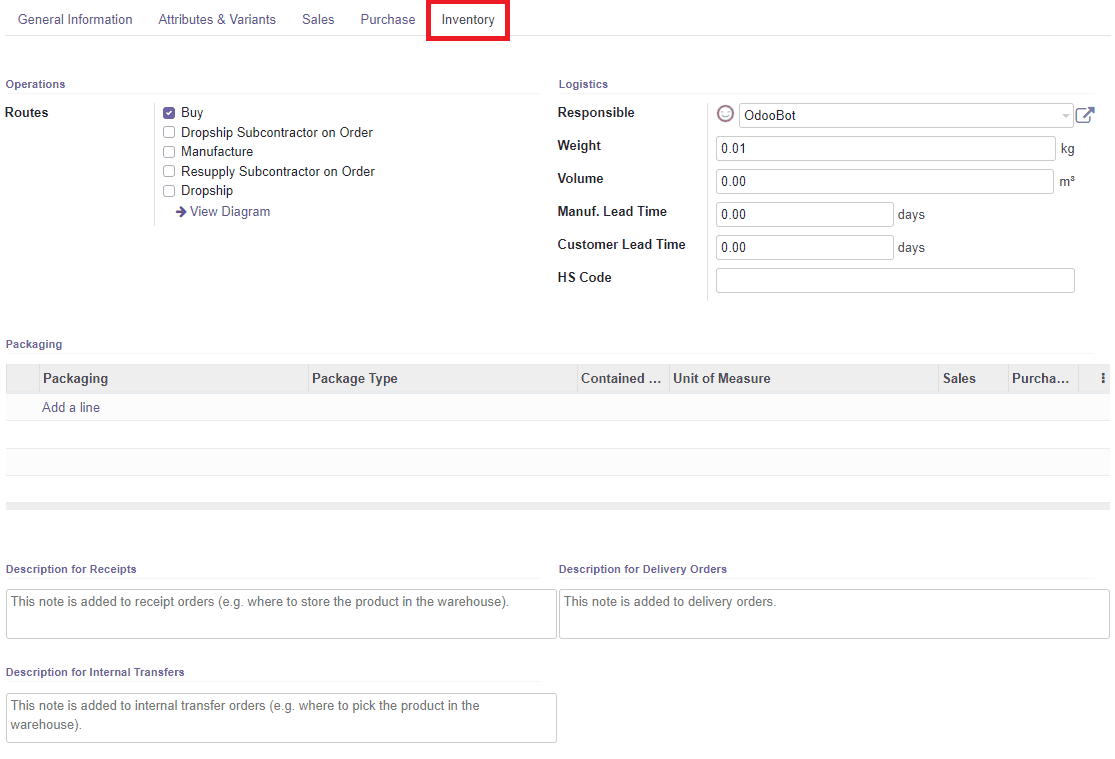
You can mention different packaging methods for the product by selecting the âAdd a Lineâ button. You can add the Package Type, Contained Quantity, Unit of Measure, Sales, Purchase, Barcode, and Company in the Packaging field. This page also contains fields to add descriptions for receipt, delivery orders, and internal transfers.
After adding all necessary data to the product creation window, you can click the âSaveâ button to save the product to the module.
Product Variants
Sometimes, a product will have different variants with different attributes and you can easily configure the variants of the same product under the Product Variants menu in the Inventory module. In order to get access to this platform, first, you have to enable the Variants option under the Product field in the Settings menu of the Inventory module as shown below.

When you click on the Product Variants menu, you will get a view of all available product variants in the field. The list view of the product can be also changed into Kanban views. Like any other Odoo platform, this field also contains sorting options such as Filters and Group By options. The preview of the list includes details about the Internal Reference, Name, Website, Variant Values, Sales Price, Cost, Quantity On Hand, Forecasted Quantity, and Unit of Measures.

You can also expand the list by using the additional options given under the three dots on the top of the right corner of the list. In order to add a new product variant to the list, you can click on the âCreateâ button.
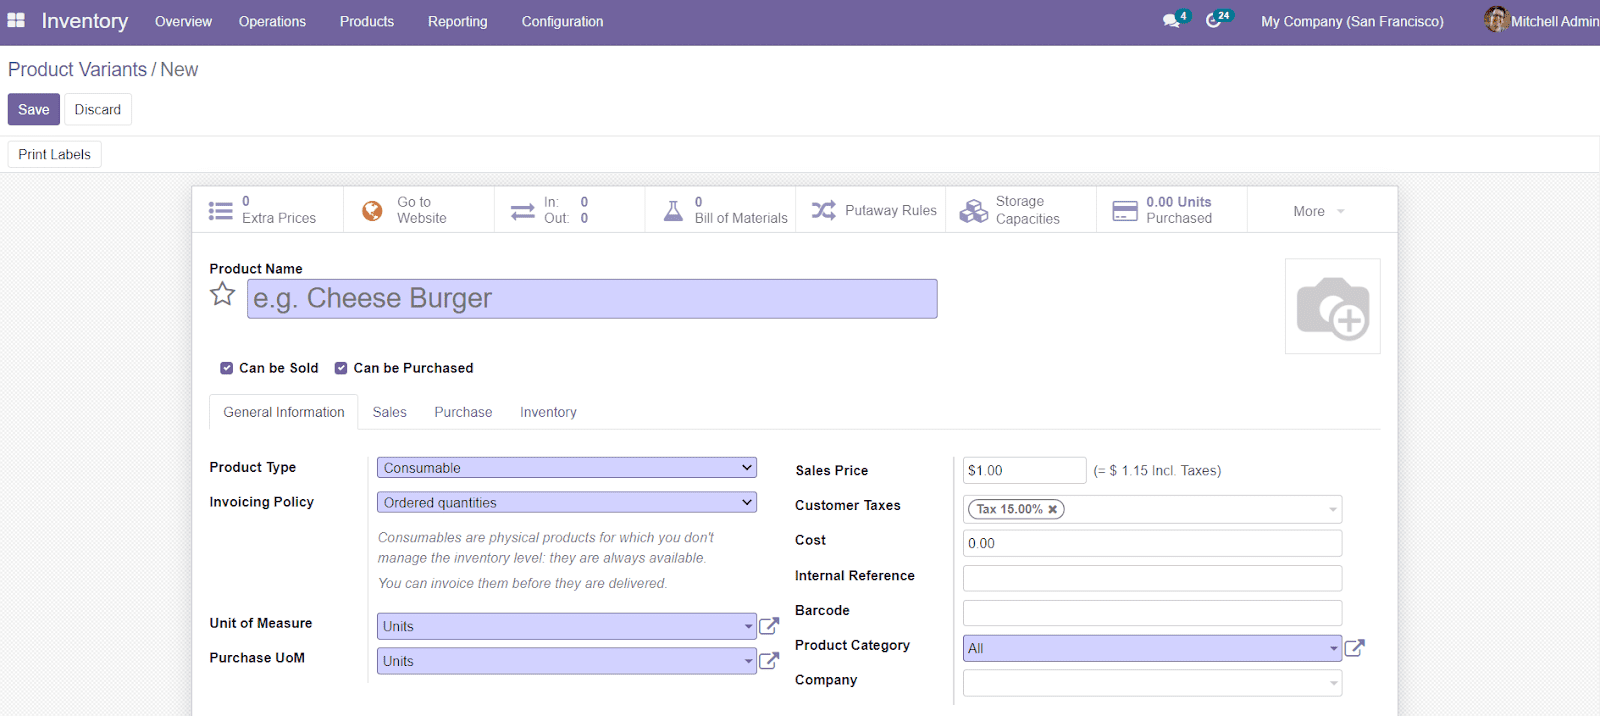
You can add details about the product just as we have done in the product configuration part.
Product Attributes
You can find the Product Attributes menu from the Configuration menu of the Inventory module. This platform will display all configured attributes in the system.

The list will show the Attribute, Category, Display Type, Variants Creation Mode, and eCommerce Filter Visibility. Click the âCreateâ button to add a new attribute.
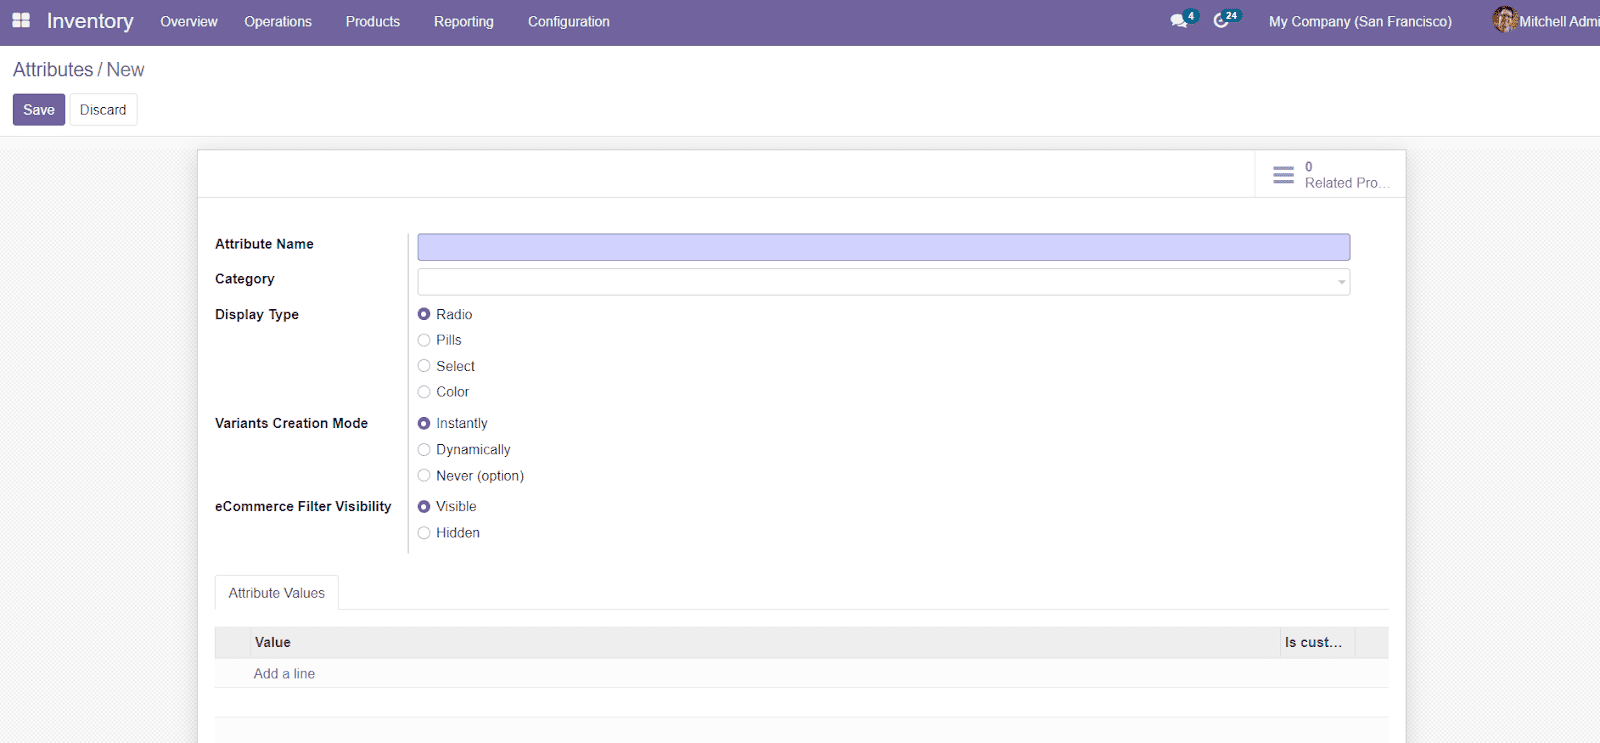
Add the Attribute Name and the Category of the product in the given fields. You can define the Variants Creation Mode, Display Type, and eCommerce Filter Visibility from the given options. In order to describe the Attribute Values, you can use the âAdd a Lineâ button to specify the respective values of the attributes.
Product Categories
To define specific categories for the products in the Inventory module, you will get the Product Category options under the Configuration menu.

This window will display the existing Product Categories and you can use the âCreateâ button to create a new one.
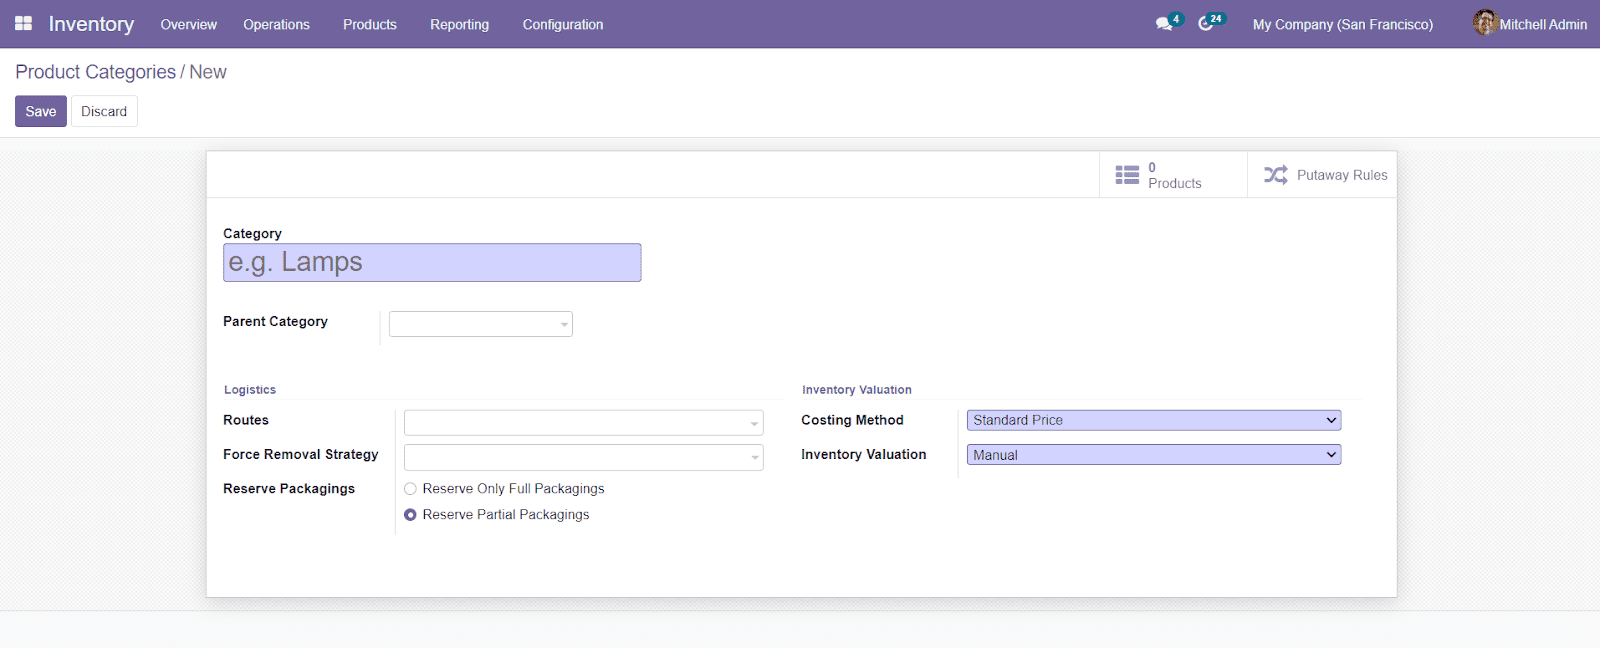
You can specify the Category and Parent Category of the Product in the given field. Under the Logistics menu, you can add Routes, Force Removal Strategy, and Reverse Packaging. Add Costing Method and Inventory Valuation type in the form and save the data by clicking the âSaveâ button.
Product Packaging
To define various product packaging methods, Odoo has enabled a specialized platform in the Inventory module. The Product Packaging option under the Configuration menu will give you access to the platform where you can define various product packaging methods.

The âCreateâ button will help you to create a new packaging method.

In the new creation window, you can define the Packaging, Product, Routes, Package Type, Contained Quantity, Barcode, and Company. You can also enable the packaging for Purchase as well as Sales. Save the new product packaging by clicking the âSaveâ button and you can use this data while creating new sales orders and quotations.
In order to define the Package Type, you are allowed to use the Package Type option from the Configuration menu.

This field will show all available package types in the platform along with the Carrier, Package Type, Height, Length, Maximum Weight, and Carrier Code details. You can easily create a new package type by using the âCreateâ button.

The new Package Type creation window includes the fields to add Package Type, Size, Maximum Weight, Barcode, Carrier, and Carrier Code. You can define different Storage Category Capacities of the particular packing type by using the âAdd a Lineâ button. Save the data and use this while creating new product packaging methods.
Units of Measurement
While defining different types of products, it is important to specify the units in which the products should be measured. The unit of measure will change in accordance with the type of the product. The settings menu of the module will show you the field to enable the Unit of Measure platform in the Inventory module.
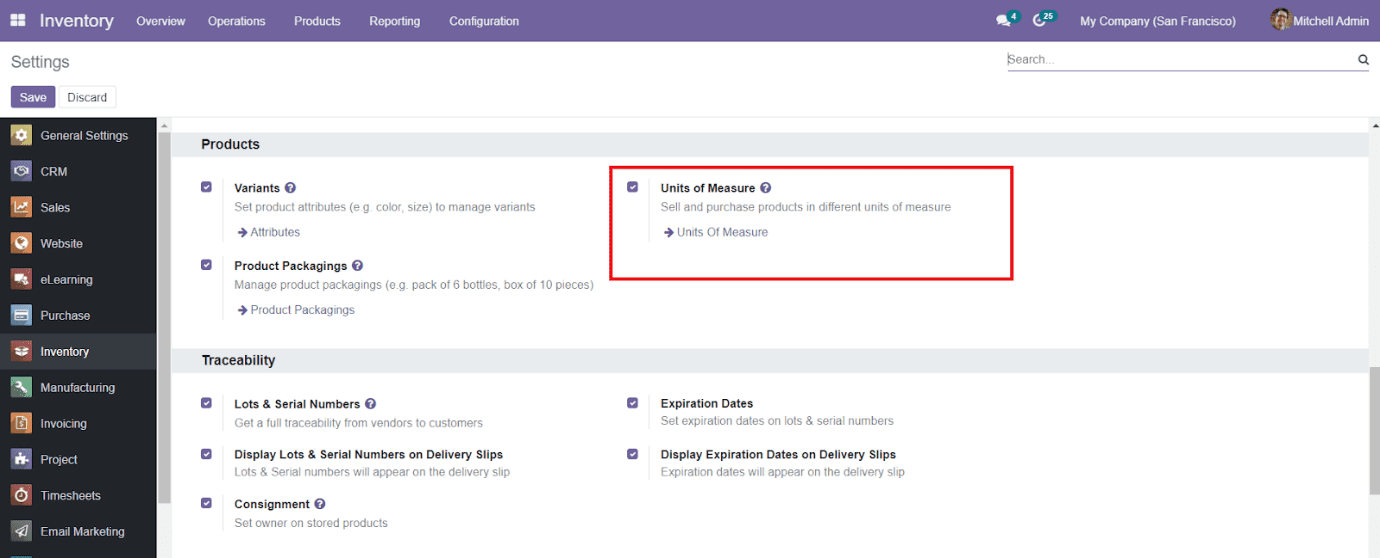
After enabling this field, you will get access to the platform from the Configuration menu. While entering into this platform, you will be able to see the list of Unit of Measure Category and corresponding Unit of Measures.

To add a new unit for measuring the product, click on the âCreateâ button.

You have to mention the Unit of Measure Category in the specified field. Using the âAdd a Lineâ button, you are allowed to add the Unit of Measure, Type, Ratio, Active status, and Rounding Precision in the given spaces. You can use this Unit to measure suitable products after saving the data by clicking on the âSaveâ button.